
Operating Guide


PLEASE NOTE: THIS MODEL IS NOT RECOMMENDED NOR HAS IT BEEN TESTED FOR ANY PERMANENT INSTALLATIONS. THIS MODEL
IS PART OF OUR PORTABLE SERIES AND NEEDS TO BE TAKEN DOWN AND STORED IN A WARM DRY PLACE AFTER EVERY USE.
THIS MANUAL AND ALL ECCOTEMP CONTENT IS SUBJECT TO CHANGE WITHOUT NOTICE.
English L10
10 11
Support: Eccotemp.com/help-desk Shop Online: Eccotemp.com/products Store Locator: Eccotemp.com/locator
Support: Eccotemp.com/help-desk Shop Online: Eccotemp.com/products Store Locator: Eccotemp.com/locator
Phone: 866-356-1992 | Email: Support@eccotemp.com | Address: 315 - A Industrial RD Summerville, SC 29483
Phone: 866-356-1992 | Email: Support@eccotemp.com | Address: 315 - A Industrial RD Summerville, SC 29483
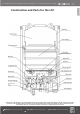
1. 1. Check box for damage. Damages caused in shipment must be reported immediately.
2. 2. Make sure you have all the parts.
Please note: Included parts and accessories may vary depending on country and
regulations.
3. 3. Install the rain cap to the top of the ue vent. The rain cap should t securely. It is
recommended that a beaded layer of high temperature sealant be used around the
perimeter of the seal between the rain cap and the ue vent.
4. 4. If using a standard garden hose, attach the 1/2” NPT to garden hose adapter to the
tting marked “Water Input”. Use Sealant tape or other approved sealing method on the
threads for a secure, water tight t. Check to make sure the screen inside the water inlet is
in place and clean. Then attach your water input/garden hose.
5. 5. Install gas supply line and regulator to the portable tankless water heater by using 2
wrenches, one on the compression tting already attached to the water heater and the
other on the gas line. DO NOT OVER TIGHTEN. OVER TIGHTING MAY CRACK THE GAS
REGULATOR CAUSING A GAS LEAK! Check for any gas smell before ignition! Make sure gas
connection is secured.
6. Attach the water output to the tting marked “Water Outlet”. Do not over tighten.
7. Install two “D” cell batteries in the compartment on the bottom left of the heater. Check
that batteries are facing the correct direction.
8. Use the top tab on the portable tankless water heater to suspend from a mounted screw
capable of holding 30 pounds. Place at a comfortable height without putting stress on the
gas hose.
9. Attach gas regulator with hose to the LP tank. Use hand pressure only on the plastic
connector. LEAVE GAS TANK VALVE IN THE “OFF” POSITION.
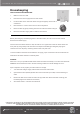
Getting Started
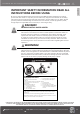
WARNING!
GAS HOSE ADAPTER
THE L5, L7,& L10 PORTABLE TANKLESS WATER HEATERS HAVE A 1/2’’ TO 3/8” ADAPTER
ALREADY ATTACHED TO THE GAS INLET ON THE WATER HEATER.
PLEASE ENSURE THE ADAPETER IS CORRECTLY INSTALLED WITH THREAD SEALANT. A
SPOOL OF SEALANT TAPE IS INCLUDED WITH THE WATER HEATER.
MULTIPLE WRAPS OF SEALANT TAPE MAY BE
NECESSARY TO ASSURE COMPLETE SEAL.
AL WAYS CHECK FOR GAS LEAKS BEFORE USING HEATER.
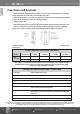
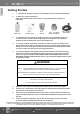
qty. 1 -
Water heater
qty. 1 -
Hardware pack
qty. 1 -
Rain cap
qty. 1 - 1/2” NPT to
garden hose adapter
qty. 1 - Gas hose
and regulator