
Full Product Manual


8
Product Support: Eccotemp.com/help-desk Shop Online: Eccotemp.com/products Store Locator: Eccotemp.com/locator
9
Product Support: Eccotemp.com/help-desk Shop Online: Eccotemp.com/products Store Locator: Eccotemp.com/locator
Phone: 866-356-1992 | Email: Support@eccotemp.com Address: 315 - A Industrial RD Summerville, SC 29483 Phone: 866-356-1992 | Email: Support@eccotemp.com Address: 315 - A Industrial RD Summerville, SC 29483
TECHNICAL DESCRIPTION
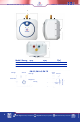
There are three Eccotemp Mini tank models, a 2.5-gallon, a 4-gallon and a 7-gallon
model. The pressure vessel (water tank) is welded, glass lined steel and is
equipped with an anode rod. The water heater is equipped with a thermostat and
a high limit temperature switch. A temperature/pressure relief valve is supplied
with the unit.
INSTALLATION INSTRUCTIONS
MODELS: EM-2.S, EM-4.0, EM-7.0
A licensed professional must complete the installation adhering to all state and
local codes. The manufacturer will not be liable for any damages because of
failure to comply with these installation instructions or because of improper
installation performed by an unqualied installer.
CHOOSE A LOCATION that allows ease of access for maintenance ideally with at
least 9 clearance at the top from the ceiling, cabinet, or any adjacent walls.
WALL MOUNTING
Fasten the supplied mounting bracket to the wall. Use screws that are suitable for
the wall material and the weight of the water heater lled to capacity (EM-2.5-41
lbs.; EM-4.0-57 lbs.; EM-7.0-76 lbs.). Hang the water heater on the bracket and
pull downwards on the water heater to ensure that both ngers of the bracket are
seated in the mounting slots.
Conrm your water piping orientation (hot and cold) before wall mounting.
ONLY INSTALL IN VERTICAL POSITION.
Heater can also sit on the oor. ONLY INSTALL IN VERTICAL POSITION!
EM models can be installed under the sink.