
User's Guide
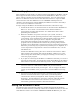

7. Click Assign IP. This opens the Assign IP Address Wizard.
8. On the Assignment Method page, select Assign a Specific IP Address and
then click Next. This opens the IP Settings window.
9. Enter an IP address that will be unique and valid on your network, the
subnet mask, and the default gateway.
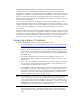
10. Click Next. This opens the Assignment window. Click Assign. When a
status message indicating that the IP address has been successfully assigned
to the IP Meter displays, click Finish.
Note: The IP Meter has a 30 second window of time during which it accepts
commands from the DeviceInstaller. This 30 second window occurs
approximately 30 seconds after the IP Meter is powered up or reset. If any of
the configuration steps fail, reset the IP Meter and try again. Work quickly to
avoid missing the window of time.
Assigning a Dynamic IP Address
The steps to assign a dynamic IP address to an IP Meter are the same as those
required to assign it a static IP address, with the exception that starting in step 8
above, you should perform these steps:
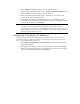
1. Select Obtain An IP Address Automatically on the Assignment Method
page and click Next.
2. The IP Discovery Settings page opens. Click Next, and then click Assign.
When a status message indicating that the IP address has been successfully
assigned to the IP Meter displays, click Finish.