
User Manual


20 Introduction
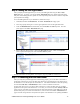
d. Click OK. Two copies of the data point named “Copy of <DP name>” are added underneath
the VirtFB functional block. Note that the second data point copy will have an index
appended to its name.
e. Click Submit.
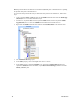
3. Re-name the two data point copies you created in step 2. To do this, follow these steps:
a. Right-click the first data point copy, and then click Rename on the shortcut menu.
b. The Enter Name dialog opens.
c. Enter a meaningful name for the first data point copy such as “count 2”.
d. Click OK. The data point is re-named to the name specified in step c.
e. Click Submit.
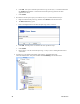
f. Repeat steps a–e for the second data point copy. In step c, enter a meaningful name such as
“total count”.
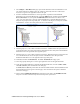
4. From the tree in the sidebar (left) frame, right-click the “Net/LON/i.LON App
(Internal)/VirtFB/count1” data point and then click Add Binding in the shortcut menu.