
User`s guide

i.LON SmartServer Power Line Repeating Network Management Guide 53
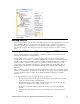
database. Enter your login information for accessing the LNS Server via the LNS Proxy Web
service and then click OK. The default user name and password is ilon, but you may have entered
a different user name/password in the Echelon i.LON Enterprise Services installer.
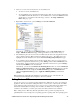
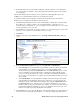
7. If IP-852 routing is licensed on your SmartServer, a dialog appears informing you that you need to
reboot your SmartServer in order to use it as an IP-852 router. Click Close.
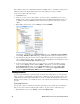
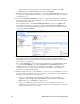
8. In the LNS Network property, the name of the network in the SmartServer tree is selected as the
LNS network database to be updated with the network configuration stored in the SmartServer’s
internal database (XML files in the root/config/network folder on the SmartServer flash disk).
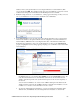
If the LNS network database is new to the specified LNS Server, the box in the LNS Network
property is highlighted red and a dialog appears prompting you to confirm the creation of the LNS
network database.
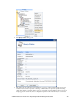
• To create the new LNS network database, click OK. An LNS network database is created in
the ilON/db folder on your computer. Click Submit. If you selected LNS Auto in step 5, the
network in the SmartServer tree is automatically synchronized to the new LNS network
database. The time required for the synchronization depends on the size and complexity of
the network.
You can use the LonMaker tool to create a new LonMaker drawing from the LNS network
database and then synchronize the LonMaker drawing to the LNS network database. See the
LonMaker User’s Guide for more information on how to do this.
• To select an existing LNS network database, or create a new LNS network database with a
different name, click Cancel, select an existing LNS network database or enter an LNS