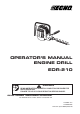
OPERATOR’S MANUAL ENGINE DRILL EDR-210 WARNING READ INSTRUCTIONS CAREFULLY AND FOLLOW RULES FOR SAFE OPERATION. FAILURE TO DO SO COULD RESULT IN SERIOUS INJURY.
This spark ignition system complies with Canadian ICES-002. Copyright © 2002 All Rights Reserved.
INTRODUCTION ECHO Engine Drill EDR-210 is a lightweight, high performance, two-stroke engined unit designed for drilling. WARNING IMPROPER USE OR CARE OF THIS UNIT, OR FAILURE TO WEAR PROPER PROTECTION CAN RESULT IN SERIOUS INJURY. READ AND UNDERSTAND THE RULES FOR SAFE OPERATION AND ALL INSTRUCTIONS IN THIS MANUAL. This Manual provides the information necessary for operation and maintenance.
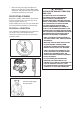
SAFETY WARNING WARNING ENGINE DRILL USERS RISK INJURY TO THEMSELVES AND OTHERS IF THE ENGINE DRILL IS USED IMPROPERLY, AND/OR SAFETY PRECAUTIONS ARE NOT FOLLOWED. PROPER CLOTHING AND SAFETY GEAR MUST BE WORN WHEN OPERATING ENGINE DRILL. ALWAYS STOP THE ENGINE WHEN A DRILL JAM OCCURS. DO NOT ATTEMPT TO REMOVE AN OBJECT CAUSING A DRILL JAM IF THE ENGINE IS RUNNING. PHYSICAL INJURY CAN OCCUR IF A DRILL JAM IS REMOVED AND THE DRILLS START MOVING.
• Wear non-slip, heavy-duty work gloves to improve your grip on the engine drill handles. The gloves also help reduce the transmission of machine vibrations to your hands. WARNING PRECAUTION AGAINST VIBRATION AND COLD IT IS BELIEVED THAT A CONDITION CALLED RAYNAUD’S PHENOMENON, WHICH AFFECTS THE FINGERS OF CERTAIN INDIVIDUALS MAY BE BROUGHT ABOUT BY EXPOSURE TO VIBRATION AND COLD.
Repetitive Stress Injuries It is believed that over-using the muscles and tendons of the fingers, hands, arms and shoulders may cause soreness, swelling, numbness, weakness and extreme pain in those areas. Certain repetitive hand activities may put you at a high risk for developing a Repetitive Stress Injury (RSI). An extreme RSI condition is Carpal Tunnel Syndrome (CTS), which could occur when your wrist swells and squeezes a vital nerve that runs through the area.
OPERATING TECHNIQUES • When starting to drill, run the engine at full throttle. • When transporting or storing the machine always remove the drill bit. • To reduce fire hazard keep engine and silencer free of debris, leaves or excessive grease. • Handle drill with care, contacting with drills may cause injury. WARNING BEFORE DRILLING, BE SURE TO READ AND UNDERSTAND THE ENTIRE OPERATOR’S MANUAL TO AVOID THE CHANCE OF SERIOUS INJURY.
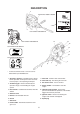
DESCRIPTION 2 Part Number 890317-05560 1 3 4 Part Number X505-002310 14 15 Part Number X505-002570 13 Part Number X505-002310 12 11 10 Part Number X505-002570 9 6 7 8 5 * If a decal cannot be read, a new one can be ordered from your ECHO dealer. 9. Fuel tank - Contains fuel and fuel filter. 1. Operator’s manual - Included with unit. Read before operation and keep for future reference to learn proper, safe operating techniques. 10. Fuel tank cap - For closing the fuel tank. 11.
ASSEMBLING FRONT HANDLE • Washer Front handle Insert the front handle to the machine, and turn clockwise. (TIGHTEN THE SCREW FIRMLY) - To operate front handle with right hand, remove right plug then reverse sides when installing handle and plug. DRILL BIT • Insert the drill bit (not provided with unit) until it reaches the bottom of the chuck, then back it out slightly; tighten the chuck laws evenly and completely.
IMPORTANT • ECHO premium Power Blend X™ Universal 2-Stroke Oil may be mixed at 50 : 1 ratio for application in all ECHO engines sold in the past regardless of ratio specified in those manuals. • Use of unmixed, improperly mixed, or fuel older than 90 days, (stale fuel), may cause hard starting, poor performance, or severe engine damage and void the product warranty. Read and follow instructions in the Storage section of this manual. HANDLING FUEL MIXING INSTRUCTIONS 1.
STARTING COLD ENGINE WARNING WHEN ENGINE IS STARTED, CONFIRM IF THERE IS NOT ANY ABNORMAL VIBRATION OR SOUND. IF THERE IS ABNORMAL VIBRATION OR SOUND, ASK YOUR DEALER TO REPAIR. ON • Stand the engine upright on a level surface. • Place ignition switch in ON (START/RUN) position. • Push purge bulb 3 to 4 times (or until fuel is visible in fuel return line). • Shift choke lever to close position (START). • Pull starter handle until the engine fires.
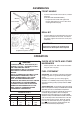
REVERSE ROTATION Counter clockwise (CCW) Shift lever Clockwise (CW) • This model is equipped with reverse rotation mechanism. • When drilling, set shift lever down to clockwise (CW) rotation position. • If bit is locked due to deep penetration during drilling operation, set shift lever up to counterclockwise (CCW) rotation position and operate reversed for easy pulling-out. • When changing direction of drill rotation, operate as follows: - Return engine to idle.
MAINTENANCE AND CARE AREA MAINTENANCE Air Filter Fuel Filter Spark Plug Carburetor PAGE BEFORE USE Clean/Replace 13 • Inspect/Clean/ Replace 13 • Inspect/Clean/ Adjust/Replace 13 • Adjust 14 Inspect/Clean 15 • Silencer Inspect/Tighten/Clean 15 • Starter Rope Inspect/Replace - Drills Inspect/Clean/ Lubricate - Inspect DATE MAINTENANCE PERFORMED • • 13 • Screws, Bolts and Inspect, Nuts Tighten/Replace - • Fuel Line - Inspect YEARLY • Cooling System Fuel Leaks MONTHL
TROUBLE SHOOTING Trouble Engine - hard to start Cause Remedy does not start Engine Fuel at No fuel • Fuel filter clogged • Clean or replace cranks carburetor at carburetor • Fuel line clogged • Clean • Carburetor • Ask your ECHO dealer • Carburetor • Ask your ECHO dealer • Fuel mixture is too rich • Open choke Fuel at No fuel at cylinder cylinder Silencer wet with fuel • Clean/replace air filter • Adjust carburetor • Ask your ECHO dealer Spark at No spark at • Ignition switch off
MAINTENANCE AIR FILTER • Air filter Clean before use. - Remove air cleaner cover and pull out air filter. - Lightly brush off dust or wash it in water and detergent. - Dry completely before putting it back in place. Air cleaner cover FUEL FILTER • Fuel filter Check periodically. - Do not allow dust to enter into fuel tank. - Clogged filter will cause difficulty in starting engine or poor engine performances. - Pick up fuel filter through fuel inlet port with a piece of steel wire or the like.
REPLACEMENT OF CHUCK Replacement of chuck should be done in the following manner: 1. Remove bolt with hexagonal hole fixed in the driving axle. 2. Insert accessory hexagonal bar (Part Number 895412-20960) into chuck and fix. 3. Fit 19 mm spanner onto driving axle and keep it fitted. 4. Fit 10 mm box spanner onto the hexagonal bar and turn it into direction as indicated by an arrow to remove chuck. 5. Fit a new chuck in the reversed order of removing.
CLEANING CYLINDER FINS (Check Periodically) CLEANING SILENCER AND EXHAUST PORT (Check Periodically) NOTE 1. Carefully remove housing halves. Clogged fins will cause poor engine cooling. 2. Remove and disassemble silencer. 1. Carefully remove housing and clean dirt and dust from fins. NOTE 2. Reinstall housing. Be careful not to scratch the cylinder or piston when cleaning the cylinder exhaust port. 3. Clean deposits from cylinder exhaust port and silencer.
SPECIFICATIONS EDR-210 Mass without drill bit kg 4.6 (10.1 lbs ) Volume fuel tank L 0.5 (16.9 US, fl. oz.) Drill size chuck capacity speed mm mm r/min Mission reduction ratio 32 - 178 (1.25 - 7 inch) 13 (0.5 inch) 520 17.1 (regular side) 18.6 (reverse side) grease lubrication External Dimensions length × width × height without drill bit mm 430 × 320 × 265 (16.9 × 12.6 × 10.4 inch) Engine type Air cooled Two stroke single cylinder engine displacement mL(cm³) 21.2 (1.29 cu.