HOPPER 3 USER GUIDE I Hopper_3_UserGuide.
Warning and Attention Symbols You must be aware of safety when you install and use this system. This document provides various procedures. If you do some of these procedures carelessly, you could injure or kill yourself or damage equipment or property. Some other procedures require special attention.
Send comments or questions about this document to techpubs@echostar.com or Technical Publications, EchoStar Technologies L.L.C, 90 Inverness Circle East, Englewood, Colorado 80112. Part Number: 207601 Printed in DISH is a registered trademark of DISH Network L.L.C. All product names, trade names, or corporate names mentioned in this document are acknowledged to be the proprietary property of the registered owners. Manufactured under license from Dolby Laboratories.
Important Safety Instructions 1 2 3 4 5 6 7 8 9 10 11 12 13 14 15 16 17 18 19 20 21 Read these instructions. Keep these instructions. Heed all warnings. Follow all instructions. Do not use the apparatus near water. Clean only with a dry cloth. Do not block any ventilation openings. Install in accordance with the manufacturer’s instructions. Do not install near any heat sources such as radiators, heat registers, stoves, or other apparatus (including amplifiers) that produce heat.
22 Do not attempt to service the receiver yourself, as opening or removing covers may expose you to dangerous voltage and will void the Limited Warranty. Refer all servicing to authorized service personnel. 23 Unplug the receiver from the AC power outlet before cleaning. 24 Do not place the receiver in an enclosure such as a cabinet without proper ventilation. 25 Do not install the receiver in any area where the temperature can be less than 40°F or more than 113°F.
Important Safety Instructions, Cont’d Proper Care of Your Equipment • Always handle the receiver carefully. Excessive shock and vibration can damage it. • If the equipment is turned on and needs to be moved, unplug the equipment and let it sit for at least 30 seconds before moving it. • The use of accessories or attachments not recommended by the receiver manufacturer will void the Limited Warranty.
Hopper 3 Receiver Your new Hopper® 3 receiver is a Whole-Home HD DVR that offers full digital video recording functionality, including pausing live TV, to every TV in your house that is part of your Whole-Home DVR system. The Hopper 3 receiver is the hub for all things entertainment. It is an HD DVR that provides the equivalent of 16 tuners, allowing you to record multiple HD channels at once and at any time and play them back in any room in your home.
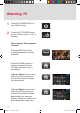
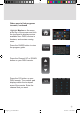
Watching TV 1 Press the POWER button on your DISH remote. 2 Press the TV POWER button on your DISH remote. Live TV displays. Other ways to find programs to watch Press the RECALL button to display previously viewed channels. Press the HOME button to display programs On Now, On Later, and a list of your recordings. Highlight Shows on the menu at the top of the screen and click the touchpad to display top shows picks.
Other ways to find programs to watch, continued Highlight Movies on the menu at the top of the screen and click the touchpad to display movies available from DISH, movies in theaters, and movies coming soon. Press the GUIDE button to view the program guide. Press the Channel UP or DOWN button on your DISH remote. Press the 123 button on your DISH remote. The number pad displays within the touchpad area of the remote. Enter the channel that you want. 3 Hopper_3_UserGuide.
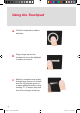
Using the Touchpad a Click the touchpad to make a selection. b Drag a finger across the touchpad to move the highlight to where you want it. c Swipe to navigate more quickly through large groups of content such as the program guide or to open additional options while viewing TV. To swipe, drag and then lift your finger at the end. 4 Hopper_3_UserGuide.
Using the Microphone Note: This remote is only in listening mode when the MICROPHONE button is pressed and held. It is not a listening device. a To go directly into voice control, press and hold the MICROPHONE button. b To create a text search, press the MICROPHONE button twice. 5 Hopper_3_UserGuide.
Recording Shows 1 2 Using one of the methods listed in Watching TV, click on the show that you want to record. A menu appears, giving you the option to Record This show, Record Series (if appropriate), Watch On Demand, or to See Program Information. Highlight your preference and click the touchpad. Viewing Timers for Shows to Record 1 To view the timers, press the DVR button on your DISH remote. 2 Highlight Timers in the menu at the top of the screen and click the touchpad to select it.
Setting PrimeTime Anytime When enabled, the PrimeTime Anytime® feature provides instant access to your favorite shows on ABC, CBS, FOX, and NBC in high-definition. Programs airing during primetime hours, 8-11 p.m. ET/PT Monday through Saturday and 7-11 p.m. ET/PT Sunday, are recorded and accessible for eight days from their initial air dates. You can save these recordings to your DVR library to watch them at any time.
Setting Parental Controls To place parental controls on the programming coming to the TV connected to this receiver, you can set parental controls. 1 Press the HOME button on your DISH remote. 2 Highlight the Menu option on the top of the screen and click on the touchpad to select it. 3 Select the Settings tile. 4 Select the Parental Controls tile. The Parental Controls screen appears. 8 Hopper_3_UserGuide.
5 Set your preferences by highlighting an option and clicking the touchpad. The Hopper 3 saves each option as you select your preference. 6 If you want to copy your settings to another receiver such as a Joey, highlight the Copy Settings to button and click the touchpad. 9 Hopper_3_UserGuide.
Remote Settings If you would like the VOLUME and MUTE buttons on your DISH remote to work with your TV or other devices, go to the Remote Control Settings menu to program your DISH remote. 1 Press the HOME button. 2 Use the touchpad to access the tabs. Move the tab selection to Menu and click the touchpad to select. 3 Select Settings. 4 Select Remote Control. 5 Select the Devices, Customizations, or Advanced Features that you would like to program.
Locating the Remote When you are looking for the remote, try the LOCATE REMOTE feature on the front panel of the Hopper receiver. 1 Press LOCATE REMOTE on the front panel of the Hopper 3 receiver. 2 If the missing remote control is paired to this Hopper 3 receiver and within radio frequency (RF) range, there should be a series of tones you hear to help find the location of the remote. It may take up to 30 seconds after touching LOCATE REMOTE before you hear the tones.
Sharing Content If all tuners are in use, you may either join one of the events or watch a program found under PrimeTime Anytime®, On Demand, or recorded on the DVR. 1 2 Press the OPTIONS button on your DISH remote. The TV Viewing Options screen appears. With the TV Activity tile highlighted, click on the touchpad. The TV Activity screen displays. 12 Hopper_3_UserGuide.
Backing-up Your Remote Settings After changing your remote settings, it is recommended that you back-up these settings. 1 Press the HOME button. 2 Use the touchpad to access the tabs. Move the tab selection to Menu and click the touchpad to select. 3 Select Settings. 4 Select Diagnostics. 5 Select Tools under Receiver. 6 Select Back Up Settings. 7 Select Continue. Note: Do not move your DISH remote or receiver during this process. 8 Select Finished when the backup is completed.
Restoring Remote Settings After your remote is paired, restore your remote settings to update the remote with settings that were previously backed-up. 1 Press the HOME button. 2 Use the touchpad to access the tabs. Move the tab selection to Menu and click the touchpad to select. 3 Select Settings. 4 Select Diagnostics. 5 Select Tools under Receiver. 14 Hopper_3_UserGuide.
6 Select Restore Settings. 7 Select Restore to Remote Control to update your remote with previously backed-up settings. Note: Do not move the remote or disturb the receiver during this process. 8 Select Finished when the remote settings have been restored. 15 Hopper_3_UserGuide.
Inserting the Batteries 1 Push the tab toward the top of the remote to release the battery door latch and lift the battery door from the remote. 2 Insert 2 AA batteries, putting the negative end first. Match the plus (+) ends with the plus markings inside the battery case. 3 Slide the top of the remote battery cover back into place and push the bottom of the cover until it clicks closed. 16 Hopper_3_UserGuide.
Pairing the Remote 1 Turn your receiver and TV on. 2 Press SYSTEM INFO on the front panel. Hopper 3: OR Joey: 3 Press the SAT button on your remote. When the remote is paired, it gives a series of ascending tones. 4 Highlight the BACK button. 5 Click the touchpad to return to live TV. SYS INFO SYSTEM INFO 17 Hopper_3_UserGuide.
SAT Mode To use the features described in this section, make sure you are in SAT mode by pressing the SAT Mode button. Use SAT Mode to control the Hopper 3 receiver. Note: Some features may not be available.
SAT/TV/AUX Mode Changes which device the remote controls Input Swaps the tuner Microphone Press and hold to use voice commands or initiate voice or text search Hot Key/ Shortcut Button Creates a shortcut Backlight Backlights the remote buttons 19 Hopper_3_UserGuide.
Front and Rear Panels of the Hopper 3 Receiver The front panel of the Hopper 3 receiver is provided below.
The back panel of the Hopper 3 receiver is provided below.
Troubleshooting Use this information if you have a problem using the Hopper 3 receiver. To solve a particular problem, do the following: • • • In the following section, find the information that relates to the problem you are experiencing. Try the suggested solution for that problem. Make sure your remote control has fresh batteries. If you see the Remote Battery Low warning on your TV screen, change the batteries. Visit mydish.com/support. The Hopper 3 receiver does not turn on.
My PIP (Picture-In-Picture) button isn’t working. What to do: The PIP feature is available only on the Hopper 3 receiver. When can I use the Picture-In-Picture (PIP) feature on the Hopper 3? What to do: When any two of the tuners on your Hopper 3 receiver are available, you can use the PIP functions on the TV that is connected to your Hopper 3 receiver. The TV(s) connected to your linked Joey receiver(s) do not support the PIP feature.
Troubleshooting, cont’d Why are some Pay-per-View programs blacked out? What to do: Sporting events and other programs are sometimes blacked out because of local broadcast restrictions. Note that the provider of such programming determines these restrictions, not DISH. Why did my All-Day Pay-Per-View program shut off while I was watching it? What to do: The all-day events run from 3 AM to 3 AM Mountain Time. You should ensure that you can finish watching an event that you have ordered by this time.
How can I fast-forward through commercials? What to do: If you are watching a pre-recorded program, or have delayed a live program, press the SKIP FWD or FWD button on your remote control. However, you cannot skip/ forward while watching live TV. Why did the receiver delete a program that I recorded? What to do: If your recording was unprotected and the receiver’s hard-disk drive fills up, your DVR deletes the oldest unprotected recording. Your picture is snowy (or black or blue).
Troubleshooting, cont’d While performing a remote control procedure, the remote control stops working. What to do: Start over again. If you don’t press a button for 20 seconds in a programming sequence, the remote shuts off its programming function. My remote is not working. What to do: Verify the batteries are installed according to the diagram inside the remote control’s battery compartment. Check the Battery Level indicator located in the System Info screen.
If your remote is not listed or cannot be un-paired on the System Info screen, then complete the following steps: 1 2 Press and hold SAT until the Mode Indicator lights and then release. If the Mode Indicator does not light up, the remote isn’t paired. Use the Locate Remote button on the front panel of the Hopper 3 receiver to find a paired remote (see Locating the Remote on page 11). Press and hold the HOME and GUIDE buttons simultaneously until the remote beeps. The remote is now unpaired.
Limited Warranty This Limited Warranty is a legal document. Keep it in a safe place. Remember to retain your Bill of Sale for warranty service! Any items returned without a copy of the Proof of Purchase will be considered out of warranty. What the Warranty Covers This warranty extends only to the original user of the equipment and is limited to the purchase price of each part. DISH Network L.L.C.
WARRANTY ON THIS SYSTEM, NOR FOR ANY INCIDENTAL OR CONSEQUENTIAL DAMAGES RESULTING FROM THE USE OF, OR INABILITY TO USE, THIS SYSTEM. SOME STATES MAY LIMIT OR EXCLUDE THE FOREGOING LIMITATION, SO THE ABOVE EXCLUSION OR LIMITATION MAY NOT APPLY TO YOU. EXCEPT TO THE EXTENT PROHIBITED BY APPLICATION LAW, UNDER NO CIRCUMSTANCES SHALL DISH’S LIABILITY, IF ANY, EXCEED THE PURCHASE PRICE PAID FOR THIS SYSTEM.
FCC Compliance The following text is extracted from Federal Communications Commission (FCC) regulations, as of the publication date of this User’s Guide. Contact the FCC (see following) or your library for the complete text of the regulations. FCC Compliance This device complies with Part 15 of FCC Rules. Operation is subject to the following two conditions: 1. 2.
Agreement on Internet Usage via Hopper 3 Receiver The software contained in the receiver may reference, display, link to, and provide users access to web services, sites, and information located worldwide through the Internet. Because EchoStar Technologies L.L.C. and DISH Network L.L.C.
If You Need Help 1. Review the Hopper 3 and Joey receiver guides available at mydish.com/manuals. 2. See Troubleshooting on page 22. 3. If You Need Help On your receiver, select the Help tile from the Menu tab. 4. Visit mydish.com/chat for 24/7 support. 5. Call the Customer Service Center at 1-800-333-DISH (3474). For additional information, refer to the Residential Customer Agreement included with your Hopper 3 and available at mydish.com/legal. 44 Hopper_3_UserGuide.
Hopper 3 Receiver Information You may need to provide this information if you call the Customer Service Center. Note: Some of the items listed below may not be used at this time. Purchase Location Name: Purchase Location Telephone Number: Hopper 3 Receiver CAID Number: R Hopper 3 Receiver Smart Card Number: S Remote Control Settings Television Code (TV Mode): Auxiliary Device Code (AUX Mode): Auxiliary Device Type (AUX Mode): 45 Hopper_3_UserGuide.
For all your customer needs, go to mydish.com/chat or call the Customer Service Center at 1-800-333-DISH (3474) 207601 46 Hopper_3_UserGuide.