
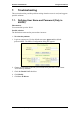
Specifications


B-FOCuS 270/285/400 PR Configuration Manual
ECI Telecom Ltd. Proprietary 52
6.6.2. Advanced Workflow
To define PPP over Ethernet using the advanced method:
1. From the Advanced operations menu select Configure.
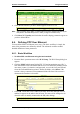
2. In the VCC tab click Add. The VCC Configuration dialog box appears.
3. Select the PPPoE radio button. Define: VPI, VCI, Profile ID, user name
(<name>@<domain>) and password, authentication protocol, a ppp interface,
mode of operation (Direct or Auto and idle time), encapsulation type (LLC),
subnet mask and trace. Enable NAT.
Note: You can define a few Profile IDs, but only one of them is active. This means that you
can define a few users on the same interface, but when one of them is connected to
the ISP, the others cannot be connected.
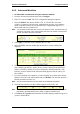
4. Click Apply. Check that a line is added at the VCC tab.
5. Select the PPPoE tab and validate that the interfaces you have defined are
displayed.
6. Note that the interface you have defined in the Basic menu appears in ppp2 (the
first available ppp interface, before the one you have defined in the Advanced
menu is selected by default). It has been assigned by default Profile ID 0. The
interface you have defined in the Advanced menu appears with the values you
have defined.
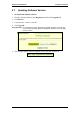
7. If you have defined a few channels, you must identify one of them as the default
channel. Click one of the radio buttons and click Default. The selected interface’s
Default parameter becomes Yes.
Note: Only an interface defined in the Auto mode can be selected as a default.
8. Check that the interface you have defined appears in the VGCC list.
Note: After connection to the WAN, you will be able to see the IP address allocated by the
ISP (either in the WAN Setup menu or when you login as a PPPoA user).
9. Click Show VCC Quality and check that the traffic shaping parameters appear as
you have defined them.