B-FOCuS Router 312+ User Guide http://www.ecitele.
B-FOCuS Router 312+ User Guide © Copyright by ECI Telecom 2005. All rights reserved worldwide. The information contained in this document is proprietary and is subject to all relevant copyright, patent, and other laws protecting intellectual property, as well as any specific agreement protecting ECI rights in the aforesaid information.
B-FOCuS Router 312+ User Guide Table of Contents 1 Introduction ....................................................................... 1 1.1 Package Contents ..................................................... 1 2 Hardware Installation........................................................ 2 3 Basic Software Configuration.......................................... 3 3.1 Logging In to Your Router.......................................... 3 3.2 Setting Up a Connection................................
B-FOCuS Router 312+ ECI Telecom Ltd.
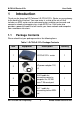
B-FOCuS Router 312+ 1 User Guide Introduction Thank you for choosing ECI Telecom’s B-FOCuS 312+ Router as your gateway to the world of fast Internet. Your new router is a state-of-the-art unit that includes an ADSL router and an advanced router, enabling you to create and connect a network of computers to a single ADSL line. Your router also provides a powerful firewall that will secure your home network and computers from unwelcome intrusions. 1.
B-FOCuS Router 312+ 2 User Guide Hardware Installation The following diagram and explanations will help you install your router. Figure 1. B-FOCuS 312+ Router Connection Diagram To connect your router 1. Connect one end of the RJ-45 Ethernet cable to a LAN port on your router and the other end to the LAN port of one computer. 2. Connect one end of the RJ-11 telephone cable to the ADSL port on the back of your router and connect the other end to the ADSL port on the phone line splitter. 3.
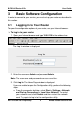
B-FOCuS Router 312+ 3 User Guide Basic Software Configuration In order to connect to your service, you must set up your router as described in this section. 3.1 Logging in to Your Router To open the configuration options of your router, use your Internet browser. To log in to your router 1. Open your Internet browser and type 10.0.0.138 in the address bar. The Log In window is displayed. 2. Enter the username Admin and password Admin. Note: The username and password are case-sensitive. 3.
B-FOCuS Router 312+ User Guide b. If you are still unable to connect to the configuration utility, then from your Internet browser, select Tools > Internet Options and click Delete Cookies, Delete Files, and Clear History. Try again to log in to the configuration utility. 4. Click the Setup tab. You have logged in to the configuration utility and are now ready to configure your router. ECI Telecom Ltd.
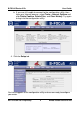
B-FOCuS Router 312+ 3.2 User Guide Setting Up a Connection To set up a new connection 1. From the Setup window, click New Connection. The Connection Setup window is displayed. 2. Give your new connection a name. Note: Any name is legal, for example, the name of your service provider, but you may not use spaces or special characters. 3. In the Options section, it is recommended to enable NAT and Firewall in order to protect your network from intrusions. 4. Configure the parameters for the network.
B-FOCuS Router 312+ User Guide For the connection Type, select according to your network type, for a home network, choose PPPoE. In the PVC Settings section, in the VPI box, type 8. In the VCI box, type 35. 5. Click Apply. 6. To save the changes, click the Tools button (at the top of the page) and select System Commands. From the System Commands page, click Save All. 7. To make the changes effective, click the Tools button (at the top of the page) and select System Commands.
B-FOCuS Router 312+ 4 User Guide Safety Considerations The B-FOCuS 312+ Router is designed for in-house desktop use only. Therefore: • Do not expose to direct sunlight. • Do not expose to temperatures exceeding 40°C. • Do not immerse in water, and do not dampen or install in wet conditions. ECI Telecom Ltd.
B-FOCuS Router 312+ User Guide 5 Buttons and LEDs 5.1 Buttons/Ports This section describes the ports and buttons on the router. ADSL Port LAN Port Reset Button Power On/Off Button Figure 2. B-FOCuS Router 312+ Back Panel • Reset Button. To reset the router, press and release the Reset button; after about 30 seconds the unit will become operational. • Restore to Factory Defaults.
B-FOCuS Router 312+ 5.2 User Guide LED Descriptions The following pictures show where the LED indicators are positioned on the units. An explanation of each LED follows. Power LED Internet Link LAN LEDs ADSL Sync Figure 3. B-FOCuS Router 312+ • Power LED. Indicates that power is supplied to the unit. • ADSL Link. This LED serves two purposes. If it is continuously lit, the ADSL interface is successfully connected to a device through the WAN port. If the LED flickers, the router is training.
B-FOCuS Router 312+ 5.3 User Guide LED Table The LED table below can help diagnose problems. Table 2. B-FOCuS Router LEDs Off Power not applied LED Status Green Normal Operation ADSL Link ADSL line not connected ADSL line is trained ADSL line is training LAN Link Wrong type of Ethernet cable used Ethernet line is connected Ethernet traffic is flowing Internet Link No Internet link established Internet link established N/A LED Power ECI Telecom Ltd.
B-FOCuS Router 312+ 6 User Guide Troubleshooting Below is a list of common problems. Before calling technical support, please look through these issues to see if they help solve your problem. 6.1 The Router is not Functional • Check that the power LED is green. • Check that the network cables are installed correctly. • Check that the LAN and Internet Link LEDs are green. • Check that the ADSL Sync LED is green. • Make sure that your PC and the router are on the same network segment.
B-FOCuS Router 312+ User Guide • Disable your network card and then enable it. • Delete your temporary Internet files, history files, and cookies. • Verify that your Windows LAN is configured for dynamic IP Addresses. • Verify that none of your applications are trying to create a dial-up connection to the Internet. • If your router does not work after performing all the steps above, press the reset button on the back panel for 10 seconds until the ADSL Sync lamp turns off.