OWNER'S MANUAL AVN2210p In-Dash Portable Navigation with CD/USB Multi-Source Receiver We appreciate your purchase of this receiver. Please read through this manual for correct operation. We suggest that after reading it you keep this manual in a safe place for future reference.
For your Safety in Using the AVN2210p Warnings and caution signs, illustrated below, are posted throughout this manual as well as on the AVN2210p. They show safe and correct ways to handle the product so as to prevent personal injury to you, others and to avoid property damage. Please read through the "Warning" and "Caution" notes before reading the owner's manual for operational features and functions.
● ● ● ● ● ● ● ● WARNING Do not place foreign objects in the disc insertion slot or USB input terminal. Fires or shocks may result. Do not disassemble or alter this main unit. Accidents, fires or shocks may result. Do not let water or foreign objects enter the internal parts of this main unit. Smoke, fires or shocks may result. Do not use when main unit is malfunctioning (the screen is not lit or no sound comes out). Accidents, fires or shocks may result.
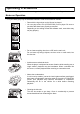
Operating Precautions Notes on Operation • For your safety, play only at moderate volumes in order to hear exterior sounds. • Discs with the logo shown to the left can be played. • You can play music CDs (CD-R/CD-RW) on this player. Be sure to use discs that have been properly processed. Depending on the editing format and software used, some discs may not play properly.
Basic Operation Adjusting Sound Muting the Volume 1 Press the [MUTE] button. To cancel muting, either press the [MUTE] button again or turn the [VOL] rotary knob to the right. While the audio system is muted, navigation voice guidance continues unmuted. Setting Guide Tone 1 Press the [FUNC] button to establish the FUNCTION mode. 2 Press the [FUNC] button until the indication on the sub display switches to BEEP. 3 Press the [SELECT (Right/Left)] button to switch between ON and OFF statuses for BEEP.
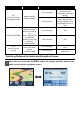
Switching Audio Control Modes 1 Modes will switch in the order shown below each time the [ENTER] button is pressed. BASS MID TREB BAL FAD NON-F NF-P LPF LOUD SVC BASS ... Turn the [VOL] rotary knob to the right or left in the audio mode while referring to the table below to adjust the sound. Mode BASS Function Adjusts bass level. [VOL] rotary knob/Function Turn to the right Emphasizes low sounds. Turn to the left Softens low sounds.
Mode Function [VOL] rotary knob/Function LPF ON : Turn to the right LPF (Low Pass Filter for Sub-Woofer output) Adjust frequency filtering settings. LPF OFF : Turn to the left LOUD (LOUDNESS) SVC (Source Volume Control) Only allow lower frequencies (low range) through. Allow all frequencies through regardless if the frequencies are low or high. Accentuate low and high frequencies when the volume is low.
Turning the PND Display ON and OFF 1 While the PND display is OFF, press the [SCREEN] button. The PND display will come ON. 2 Press the [SCREEN] button for longer than a second while the PND display is ON. The PND display will go OFF. ● Note ● For details on using PND, refer to the operation manual of the PND. Switching Between Left and Right Speaker Output for the Navigation Voice Voice guidance speaker output can be switched between right and left speaker.
How to Operate the Tuner Calling up Preset Channels 1 Press the [MODE] button to select the preset channel mode. 2 Turn the [VOL] rotary knob to call up the station registered for a preset channel. 3 Press the [ENTER] button. The registered preset channel will be selected and the corresponding station will be received. Six stations can be memorized for each of FM 1, 2 and 3, and six stations can be memorized for AM, making a total of 24 stations.
The selected station is memorized and the preset registration number and frequency are indicated on the display. To manually set additional selected stations for the remaining preset channels, repeat this procedure for each channel. If the stations have been stored in memory, pressing a switch from [1] to [6] will tune to that preset station. CAUTION If the vehicle's battery is disconnected (for repairs to the vehicle or for removing the main unit), all stations in memory will be lost.
ATTENTION • Pressing the preset switches ([1] to [6]) allows you to make one-touch station selections. The frequency of the selected station is displayed on the preset switch. • When a new station is set in memory, the station previously set in memory will be deleted. • If there are fewer than six receivable stations, the stations set in the remaining switches will remain unchanged.
How to Operate the CD/MP3/WMA Player About Compact Discs • The signal recorded on a compact disc is read by a laser beam, so nothing touches the disc surface. A scratch on the recorded surface or a badly warped disc may cause deteriorated sound quality or intermittent playback. Observe the following precautions to ensure high quality sound performance: • Do not leave an ejected disc in the disc slot for very long; the disc may warp.
• Do not use accessories (stabilizers, protective seals, laser lens cleaners, etc.) sold for "improving sound performance" or "protecting CDs." The changes in CD thickness or outside dimensions made by these accessories may cause problems in the player. • Please be sure NOT to attach any ring-shape protector (or other accessory) to your discs.
About MP3/WMA ATTENTION The making of MP3/WMA files by recording from sources such as broadcasts, records, recordings, videos and live performances without permission from the copyright holder for uses other than personal enjoyment is prohibited. What is MP3/WMA? MP3/WMA (MPEG Audio Layer III) is a standard format for audio compression technology. By using MP3/WMA a file can be compressed to one-tenth the size of the original. WMA (Windows MediaTM Audio) is format for audio compression technology.
Media Media capable of playing MP3/WMA includes CD-R and CD-RW discs. Compared to CD-ROM media commonly used for music discs, CD-R and CD-RW discs are fragile in high temperature/high humidity environments and one section of the CD-R and CD-RW may become incapable of playback. Fingerprints or scratches on the disc may prevent playback or cause skipping during playback. Sections of a CD-R and CD-RW may deteriorate if left inside a vehicle for long periods of time.
Multi-Sessions Multi-sessions are supported, and playing of CD-R and CD-RW discs with annotated MP3/WMA files is possible. However, when "Track at once" has been written, close the session or process the warning message. Standardize the format of each session without changing the format. Playing MP3/WMA When a disc with recorded MP3/WMA files is inserted, the main unit first checks all the files on the disc. No sound is output while the main unit is checking the files on the disc.
Writing to CD-R/CD-RW MP3/WMA files can be recorded on CD-R/RW by using a CD-R/RW drive connected to a computer. Record by setting the recording format of the recording software to ISO9660 level 1 or level 2 (not including extension format). Select CD-ROM ( mode1 ) or CD-ROM XA ( mode2 ) for the disc format. When Playing Back CD-R/RW Insert a CD-R/RW disc having recorded MP3/WMA files.
Skipping to the Next Track (File)/Returning to the Beginning of a Track (File) 1 Press the [SELECT(Right/Left)] button. Right: Advances to the next track (file). Left (pressing once): Returns to the beginning of the track (file) being played. Left (pressing more than two times): Returns to the previous track (file). FAST FORWARD/REWIND 1 Press the [SELECT(Right/Left)] button for more than one second. Right: Fast forward. Left: Rewind.
3 Press the [ENTER] button. RAND ONE... Play the files in the folder being played in a random order. RAND ALL... Play the files in all folders in a random order. Repeat Track 1 Press the [FUNC] button while a CD track is being played to switch to RPT on the sub display. 2 Press the [SELECT (Right/Left)] button to select RPT ON or OFF. Right: ON Left: OFF 3 Press the [ENTER] button. The track being played is played again.
Scan Files/Folders 1 Press the [FUNC] button while an MP3/WMA file is playing to switch to SCAN on the sub display. 2 Press the [SELECT (Right/Left)] button to select the scan setting. Press the [SELECT(Right/Left)] button to switch the mode in the following sequence: Right: SCAN ALL Left: SCAN ONE 3 Press the [ENTER] button. SCAN ALL... Play the first ten seconds of the first file in each folder. SCAN ONE...
When an MP3/WMA file is playing 1 Press the [TEXT] button to switch the display on the sub display. Press the [TEXT] button to switch the screen's display pattern in the following sequence: Folder name/File name Artist/Title Folder No. /File No. Playing time Folder name/File name ... ATTENTION • If the CD came with a logo shown below, it is recorded with a disc title and track titles. Text information will be displayed during playback.
How to Operate the USB Music File Player About Playable USB Memory Standards • Supported File System: FAT 16/32 • Playable Audio Format: MP3 • Max.Current: 500mA • Compatibility: USB1.1/2.0 (Maximum transmit speed equivalent to USB 1.1: 12 Mbps) • Correspondence: USB mass storage class (Playing from external HDD is not supported) Playable MP3 File Standards • Supported standards: MPEG-1 MPEG-2 MPEG-2.5 • Supported sampling frequencies:MPEG-1:32, 44.1, 48 (kHz) MPEG-2:16, 22.05, 24 (kHz) MPEG-2.5:11.
[Configuration example for USB memory supporting MP3] 001.mp3 002.mp3 003.mp3 004.txt 005.mp3 Number of files possible on a single USB memory is 3000. Files aside from MP3 files (Example: 004.txt) will be included as one of the 3000 files. 1498.mp3 1499.mp3 3000.mp3 Skipping to the Next File/Returning to the Beginning of the File 1 Press the [SELECT(Right/Left)] button. Right: Advances to the next file. Left (pressing once): Returns to the beginning of the file being played.
Random File Order (Shuffle Songs) 1 Touch "Preferences". 2 Touch "Shuffle songs ". All music files in the USB memory are played in random order. Repeat Song 1 Touch "Preferences". 2 Touch "Repeat song ". The music file currently being played is repeated.
File Search 1 Touch "Select". Song title Artist name Album name 2 Touch "Playlist", "Artist", "Album", "Song" or "Genre". 3 Touch the name of the music file to be played. The selected file in the USB memory is played. If and are displayed, you can change the displayed page of the music file list by touching them. You can search for a file name or the name of an artist by touching "Find".
You can search for a music file by entering alphanumeric characters. CAUTION • Music files in the USB memory can be played only when the PND is attached to the main unit. • Do not remove the USB without first switching the display to the audio screen and then touching switch. Loss of data may result if this procedure is not followed. • When the music file in the USB memory is played, if the USB memory or PND is removed from the main unit, the mode will be returned to the one previously selected.
How to Operate iPod® An iPod can be connected to the main unit using an optional dedicated connection cable, allowing you to listen to iPod music files and operate some iPod functions from the main unit. iPod is for legal or right holder-authorized copying only. Don't steal music. iPod is a trademark of Apple Inc., registered in the U.S. and other countries. Going to the Next File/Returning to the Beginning of a File 1 Press the [SELECT(Right/Left)] button. Right: Advances to the next file.
Repeat Song 1 Touch "Preferences". 2 Touch "Repeat song ". The iPod music file being played will be played again. File Search 1 Touch "Select". Song title Artist name Album name 2 Touch "Playlist", "Artist", "Album", "Song" or "Genre".
3 Touch the name of the music file to be played. The selected file in the iPod will be played. If and are displayed, you can change the displayed page of the music file list by touching them. You can search for a file name or the name of an artist by touching "Find". You can search for a music file by entering alphanumeric characters. CAUTION • Music file in the iPod can be played only when the PND is attached to the main unit.
How to Operate the Optional Satellite Radio If the optional XM/SIRIUS satellite radio tuner unit is connected, satellite radio broadcast can be received. With XM/SIRIUS satellite radio, over 100 channels are available including music, sports, news, and entertainment programs. The channel can be selected from categories such as ROCK and DANCE, or by selecting individual channel manually. Reception of XM/SIRIUS satellite radio is fee based; you have to subscribe to it.
Memorizing Channels Manually setting Channels into memory 1 Tune into the station to be memorized. 2 Press the [MODE] button to select the rotary select mode. 3 Turn the [VOL] rotary knob to select one of the preset switches P1 to P6. 4 Press the [ENTER] button for more than one second. The selected channel will be memorized and the preset number and channel name will be displayed in the display area.
Manually Memorizing Channels on the PND Display 1 Tune into the station to be memorized. 2 Press the [SCREEN] button and switch the display to the audio screen. 3 Touch the preset switch where you want to memorize the station until you hear a "beep" sound. The selected station will be memorized. To set additional manually selected stations for the remaining preset channels, repeat this procedure for each preset channel.
Preset Scan 1 Press the [FUNC] button until the sub display switches to SCAN, then press the [ENTER] button to confirm. "P SCAN" will be displayed and the stations memorized for preset channels P1 to P6 will be called up in order and received for five seconds each. To cancel the preset scan, press the [FUNC] button. Channel Preset Recall 1 Press the [MODE] button to select the preset channel mode. 2 Turn the [VOL] rotary knob to recall the station registered for a preset channel.
Switching the Display Information from the PND Touch Panel 1 Touch the title/display selection switch to change the screen display. Channel, artist, and title information will be displayed. Title/display switch ATTENTION If there is no name, NO_ DATA will appear. Displaying XM ID The XM ID is necessary when subscribing to XM services. 1 Press the [FUNC] button to select the XM ID. 2 Press the [ENTER] button. The XM ID is displayed. To clear the ID display, press the [ENTER] button again.
How to Operate the Portable Audio Player Use an optional AUX105 to connect a portable audio player to the main unit. Switching the AUX Mode ON and OFF 1 Press the [SOURCE/PWR] button for more than one second to turn the audio mode OFF. "Audio off" is displayed on the PND display. On the sub display "GOOD BYE" will be momentarily displayed and then "ALL OFF". 2 Press the [TEXT] button and [FUNC] button simultaneously for longer than 3 seconds.
Information You should Know If One of These Messages Appears If any of the following messages are displayed on sub display, check the equipment while referring to the Cause and Corrective action columns. Messages Cause Corrective action CD/MP3 INFO 3 DISCS ARE DIRTY OR DAMAGED The loaded disc is dirty or upside down. Check it for proper orientation and verify it is clean. INFO 5 CD PLAYER FAILS MECHANICALLY The CD player is inoperative for some reason.
Messages Cause Corrective action SIRIUS ANTENNA SIRIUS ANTENNA IS DISCONNECTED Connect the SIRIUS antenna. LINKING SIRIUS Satellite RADIO SIGNAL RECEIVING FAILS Adjust the SIRIUS antenna position to receive the satellite signal. CALL 888-539-SIRIUS NO SUBSCRIPTION TO THE SELECTED CHANNEL Subscribe to SIRIUS to receive the service by SIRIUS Satellite radio. SUB UPDATED SUBSCRIBING FOR THE CHANNEL AND ESTABLISHING THE RECEIVING STATUS Wait for a moment.
Before Asking for Repairs Slight differences in operation can sometimes be mistaken for malfunctions, so check the following table before asking for any repairs. CAUTION If a problem occurs, for instance when the main unit does not respond to any button presses, or the display doesn't work correctly, press the [Reset] button using a paper clip or similar item. Pressing the [Reset] button will delete all the entries from memory. The settings will return to those made at the factory prior to shipment.
Problem There is a point of light on the display. Possible reason At least 99.99% of the pixels on the LCD panel are effective, but it is possible that 0.01% of the pixels may not light or may stay lighted. Corrective action This is not a defect, so please use the equipment in this condition. *: According to your cellular phone, the mute function may not work correctly. In this case, press the [MUTE] button on the main unit. Also, refer to "tomtom" web site for details on applicable phone models.
Specifications Power Supply Current Drain Dimensions (whole unit) (W x H x D) Weight (whole unit) Dimensions (PND only) (W x H x D) Weight (PND only) Operating temperature range (whole unit) Operating temperature range (PND only) Storage temperature range Suitable load impedance 13.2V DC (11-16V) 3A 7" x 4" x 6-1/2" (180 x 100 x 165mm) 5.5lbs (2.5kg) 4" x 3" x 1" (101 x 76.1 x 23.3mm) 0.4lbs (0.
How to Contact ECLIPSE Fujitsu Ten Corp.