
Instruction manual


Model Setup Functions
Ratchet change
Some pilots, especially those flying helicopters, prefer a
"softer" or "smoother" ratchet action on the throttle stick.
An alternate ratchet that provides a smoother ratcheting
action is included as an accessory with your Eclipse 7
system. To change the throttle ratchet, remove the back
of the transmitter case as directed above in the "stick le-
ver tension adjustment" section. Then, unscrew the rat-
chet retaining screw, remove the old ratchet, and replace
with the new one. Tighten the retaining screw gently but
firmly. Then, replace the transmitter rear cover.
Changing the Eclipse 7 transmitter's mode
If you wish to change the mode of the transmitter, say
from Mode 2 to Mode 1, return the radio to Hitec for
conversion. If you don't know what this means, you don't
need to worry about it!
To use the trainer cord:
1 Set up both the student's and instructor's transmitters
to have identical trim and control motions. If the instruc-
tor's transmitter is on a different frequency than the stud-
ent's, use the student's transmitter as the master (held by
the instructor) and the other transmitter should be held by
the student.
2 Collapse the student's antenna, and fully extend the
instructor's antenna. If the student's transmitter has a
removable RF module, remove it from the transmitter.
3 The Hitec cord is specifically marked at one end as the
"master" the other end as "student". Plug it accordingly
into each transmitter, with power switched off. The trainer
jack is on the back of the transmitter. Turn the connector
until its notches line up and it fits without having to be
forced.
4 Turn on the instructor's transmitter.
DO NOT turn on the student transmit-
ter power. Move the controls on the
instructor's transmitter, and verify each
control moves the proper direction.
Now verify that the student's
trims and control travels match the instructor's by using
the trainer switch (the momentary Trainer switch on the
top left of the transmitter case) and switching back and
forth while leaving the control sticks and trims alone,
then moving the control sticks.
5 The instructor's transmitter has normal control over
the model unless the trainer switch is pulled, passing
control to the student's transmitter. If the student loses
control, the instructor can quickly "take over" by releas-
ing the trainer switch and controlling the model.
Other Adjustments
Adjustable length control sticks
You may change the length of
the control sticks to make your
transmitter more comfortable to
hold and operate.
To lengthen or shorten your transmitter sticks, first
unlock the stick tip by holding locking piece B and turning
stick tip A counterclockwise. Next, move the locking
piece B up or down (to lengthen or shorten).
When the length feels comfortable, lock the position by
turning locking piece B counterclockwise.
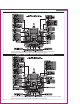
Stick lever tension adjustment
You may adjust the stick tension of your sticks to provide
the "feel" that you like for flying. To adjust your springs,
you'll have to remove the rear case of the transmitter.
Using a screwdriver, remove the six screws that hold the
transmitter rear cover into position, and put them in a
safe place. Place some padding under the front of the
transmitter and place it face-down on the pad. Gently
ease off the transmitter rear cover and move it to the
right side of the transmitter, carefully turning it as you
would turn the page of a book. Now you'll see the
If you have any questions regarding this product, please
consult with Hitec's service center. The address and
telephone numbers of our service center is given below.
Telephone inquiries are accepted from 8:00 AM to
4:30 PM weekdays (closed on holidays).
Please read the warranty card supplied with your system,
and return it so your system will be under warranty.
Before you decide to have your system repaired, if there
is no apparent physical damage, read this instruction
manual again and check to be sure that you are operat-
ing the system as it is supposed to be operated. If you
are still having trouble, pack up your system in its original
shipping materials and send it to the factory or the near-
est authorized Hitec R/C Service Center.
Be sure to include a note in your package that describes
the trouble in as much detail as possible, including:
Symptoms of the problem in as much detail as you can
provide, including any unusual mounting conditions
or equipment orientation
A list of items you are sending, and what you want to
be repaired.
Your name, address, and telephone number.
6
AB
(for U.S. & Canada only)
Factory Service Repair Information
view shown. Using a small cross-point screwdriver,
rotate the adjusting screw for each stick for the desired
spring tension. The tension increases when the adjusting
screw is turned clockwise, and
decreases for counterclockwise
motion. When you are satisfied
with the spring tensions, you
may close the transmitter.
Very carefully reinstall the rear
cover. When the cover is
properly in place, tighten the six
screws.
Web site:
http://www.hitecrcd.com
Hitec-RC
D, Inc.
12115 P
aine S
t.
P
oway
, CA 92064
T
E
L: 1-858-748-
6948
FA
X
: 1-858-748-
1767
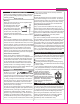
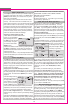
Charge Jack Trainer Jack