
Specifications

8
OVERVIEW
Read through the entire manual before beginning your
installation.
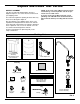
There are seven steps to installing your Drinking Water
system. They are as follows:
STEP A - Install Cold Water Supply fitting
STEP B - Install Drain Adapter
STEP C - Install Reverse Osmosis Assembly
STEP D - Install Storage Tank
STEP E - Install Reverse Osmosis Faucet
STEP F - Connect Tubing
STEP G - Sanitize, Pressure Test, Purge System
These steps are explained in detail over the next few
pages. Follow all steps. Reading this manual will also help
you receive and use all the benefits your Reverse Osmosis
system can give you.
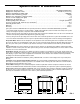
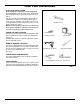
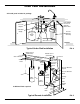
PREPARE SITE FOR INSTALLATION
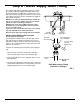
1. Before starting, close the hot and cold water shutoff
valves (See Figure 7).
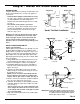
2. Temporarily place tank and filter assembly into planned
location. Check position of items and space required for
proper installation. Ensure tubes may be routed without
kinking.
3. Remove tank and filter from planned location and set
aside.
NOTE: You must check and comply with all local
plumbing codes.
NOTE: Codes in the state of Massachusetts require
installation by a licensed plumber and do not permit
the use of saddle valves.
If you live in the state of Massachusetts, review plumb-
ing code 248-CMR of the Commonwealth of
Massachusetts before proceeding with the installation.
NOTE: For best system performance, the feed water to
the system should be softened or have hardness less
than 10 grains per gallon, with no iron.
FIG. 6
Overview and Site Preparation