
User Manual


9205-3000 (FAS1548) Nexa™ Touch Free Dispenser Beacon User’s Guide
Ecolab, Inc.
Ecolab P/N
Revision
Date
Drawing Number
Page
9205-3000
??
03/03/17
???
6 of 14
1. Nexa Touch Free Dispenser Beacon Overview
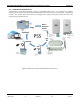
The Nexa Touch Free Dispenser Beacon (part number 9205-3000) is an integral component of the Encompass HH CMS. When
the Encompass HH CMS is installed, Healthcare facilities determine which dispensers they wish to have monitored, and a
beacon is installed in those dispensers. Each Dispenser Beacon has a unique identification address that is associated to a
specific physical location during the install process.
The Dispenser Beacon communicates with the Healthcare Worker Badges to obtain Badge ID and Status information during
a dispense event. The dispense event communication sets the HCW Badge’s status to “Green” or “State 0” and then both
the dispenser and the HCW badge ID information is transmitted by the dispenser beacon to the nearest Hub, along with the
time and date of the event, to be relayed to the offsite server for data compilation. Once the information exchange between
the Dispenser Beacon and the HCW Badge is complete, the dispenser LED will light up Yellow to indicate that the HCW has
been credited with the dispense event.
2. Touch Free Dispenser Beacon Set Up
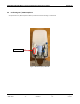
2.1 Installing Batteries
Each Touch Free Dispenser Beacon (TDB) requires 2 AAA alkaline batteries for operation. These must be installed prior to
initial installation of the TDB in the dispenser. The door to the TDB battery compartment can be found on the left side of
the device.
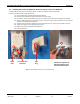
To install batteries prior to initial installation, complete the following steps:
1. Remove the battery compartment door by gently pulling back on the ridged tab and lifting away from the TDB.
2. Once the battery compartment door has been removed, install two (2) AAA alkaline batteries, aligning the
positive (+) and negative (-) terminals of the batteries with the corresponding signs displayed within the battery
compartment (Ecolab recommends that only Duracell® Coppertop batteries be used to power the TDB).
3. Once the batteries have been installed, replace the battery compartment door and make sure that it is firmly in
place before installation in the dispenser.
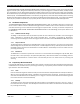
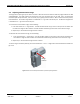
Figure 2. Battery door tab location
Battery
door tab