
User Manual


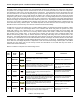
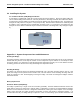
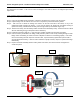

Table Of Contents

Patient Safeguard System – Healthcare Worker Badge User’s Guide UltraClenz, LLC
Page 7
are assigned to the HCWs. Take care to return the badge to the HCW in which it is assigned upon battery
replacement.
Tools needed to replace the badge’s battery:
Quantity 1 - #2 Phillips head screwdriver
Step 1 - Using the #2 Phillips head screwdriver, remove the two back cover screws. Save the screws.
Step 2 - Flip the badge over and remove the front cover to expose the pc board and battery holder.
Step 3 - Take care not to disturb or damage the antenna on the left hand side of the board, or any of the
components while changing the battery. If you need to remove the board from the badge housing to
replace the battery, hold the board securely from the right hand top and bottom edges only.
Step 4 - Remove the battery from the battery holder and discard the old battery safely. Wait 30 seconds to allow
all of the remaining energy to dissipate from the old battery.
Step 5 - Install the new battery with the "+" side facing the installer and slide into the battery the holder.
Step 6 - Once the battery is installed in the badge, it will perform a power on self-test by scrolling through the LED
badge states and emitting an audio tone when complete to indicate it is functioning properly. If the audio
tone is heard during the LED sequence instead of after, repeat the battery replacement process with a
second replacement battery. If there is still no indication of proper function, request a replacement badge
immediately.
Step 7 - Replace the board assembly with the battery holder face down, then the back cover and tighten the
screws into place.
Step -1
Step - 2
Step 3