
User's Manual
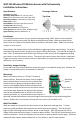

Coverage Pattern:
Top View Side View
WST-702 Wireless PIR Motion Sensor with Pet Immunity
Installation Instructions
Specifications
Frequency: 345 MHz
Operating Temperature: 32°-120°F (0°-49°C)
Battery: One 3Vdc Lithium CR-123A (1550 mAh)
Operating Humidity: 5-95% RH non-condensing
Battery life: 5 years
Compatibility: Honeywell and 2GIG receivers
Pet Immunity: 50 lbs (22 kg)
Supervisory interval: 60 min(approx.)
Coverage Area: 40 x 40 feet (12m), 90 degree angle
Light Immunity: 2000 lux (EN50131-2-4)
Enrollment:
To enroll the motion sensor, set your panel into programming mode. Refer to the manual for
your specific alarm control panel for details on programming mode. When prompted by the
panel, enter the 7 digit serial number which is printed on the sensor label. Make sure the loop
number is set to Loop 1.
Alternatively, the motion sensor can be enrolled by triggering wireless transmissions. To do this,
hold down the tamper button on the sensor while inserting the battery. The red LED will begin to
flash. After 30 seconds the red LED will stop flashing and the sensor can be triggered by waving
your hand in front of the motion sensor. The sensor will transmit every time motion is detected.
Trigger the motion sensor as many times as is required by your panel until the panel recognizes
the sensor’s serial number.
Sensitivity Jumper Settings:
For normal sensitivity motion detection leave the jumper in the default setting (on). Remove the
jumper if increased sensitivity to movement is desired.
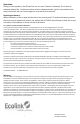
Mounting:
Mount the motion sensor at 7.5 feet (2.3 meters)
above the floor. Remove the sensor cover to expose
the circuit board then remove the circuit board from
the back cover by gently pressing that plastic tab as
shown in the diagram. With the board removed you
have access to both the flush mount and corner mount
screw knock outs. Remove the appropriate knockouts
and use the included screws to mount in the desired
mounting location. It is recommend to ensure there is a
tight seal around the knockouts to prevent bugs from entering the sensor and causing false
alarms. Replace the circuit board and snap the front cover onto the back cover.
Walk Test Mode:
Walk test mode can be used to test the motion sensor detection coverage area. To enter
walk-test mode hold down the tamper button while inserting the battery. The red LED will
begin to flash indicating that the motion sensor is warming up. After 30 seconds the LED no
longer flashes and the motion sensor is ready to detect motion. The LED will illuminate each time
motion is detected. Once the LED goes out, the sensor is ready to detect motion again. Walk test
mode ends after twenty motion detections or if no motion is seen for two minutes.
Sensitivity Jumper
Push tab to
remove PCB
Sensitivity
jumper