
User's Manual


Datum // date
15.03.2013
Teile-Nr. // part no.
300011
Dokument-Nr. Revision //
document no. revision
300011AL11E 04
Head Module Settings
User Manual
Seite/gesamt // page/total
8 / 8
Dokument erstellt // document created
SAS387 15.03.2013
Dokument geprüft // document checked
FIH091 ,09.04.2013
User Manual: Head Module Settings
● Ablageort: I:\300011\083_Software\05 Dokumente\300011AL11E04_user_manual_head_module_settings.docx
● template no.: 0730QV06A03 ● template created: HAO006 20.01.2011 ● template checked: BEA373 20.01.2011 ● location: ISO drive ●
ecom instruments GmbH
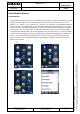
2 Trigger Button Settings
2.1 Map the trigger event “OEM Trigger” on a button
This is necessary to start reading with a head module. There is an event named “OEM Trigger” which
is used in the service of the head modules to start reading with a head module. This event is mapped
on the center scan button by default. You have five opportunities to map this event on a button:
on the center scan button, on the left side upper button, on the left side lower button, on the right side
upper button and on the right side lower button.
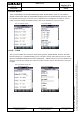
To map a button on the event open the Intermec Settings. Therefore you have to click on the
windows icon on the main screen.
In the next step you have to click on Settings -> System -> Intermec Settings.
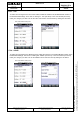
To map the event on a button click on Device Settings -> Keypad -> Button Remapping (see Pic19-
Pic21) in the Intermec Settings. In the next window you can map the “OEM Trigger” event on a
button which you want to use to start reading with a head module (see Pic22).
Pic19: Intermec Settings Pic20: Device Settings
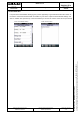
Pic22: Button Remapping
(“OEM Trigger” is mapped on the
Pic21: Keypad center scan button by default)