
Instructions / Assembly


6
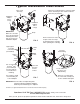
Typical Installation Illustrations
Questions? Call Toll Free 1-800-693-1138 Monday- Friday, 7 AM - 6 PM CST
or visit www.ecopure.com
When you call, please be prepared to provide the model number and date code, found on the rating decal.
7-3/16"
7-3/16”
FIG. 8
FIG. 7
FIG. 6
Outlet
1” NPT
Water
flow
Water
flow
Inlet
1” NPT
Note flow
direction
arrows
on filter
Copper pipes
or flexible
connectors
(not included)
Use several wraps
of Teflon
®
tape
(not included) to
seal inlet and out-
let threads when
installing
M
ount the included bracket to a strong, stable
surface and hang the filter head on it before
c
onnecting to plumbing
Allow at least a few inches
of space under the sump
to grasp and pivot it outward
when replacing filter cartridge
Route the vent tube down
to a floor drain, laundry tub,
or other suitable drain point
Press end of vent
tube firmly over
barbed fitting
Vent port
barbed fitting
FIG. 5
Installation
Adaptor
with 2
o-rings
C
lip
Clip
Installation
Adaptor
with 2
o-rings
Sump
F
ilter Head
Assembly
® Teflon is a registered trademark of E.I. Du Pont de Nemours and Company.
Use caution to avoid
cross-threading the
1” NPT adaptors
IMPORTANT: Do not solder metal plumbing while
attached to plastic installation adaptors.
Soldering heat will damage the adaptors.
IMPORTANT:
Make sure all 3 tabs
of the clip go through
matching holes and
fully into channel on
installation adaptor.