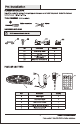
Pr-Installation PLANING INSTALLATION Inspect the product for damage. I sy part appears damaged, do mt Intel this product. Contact the Customs Service Team al 1-800-910-7184. TOOLS REQUIRED (Not included) Phillips screwdriver Solvers > HARDWARE INCLUDED ; A NTE: Siu ot hon lo Faust a.
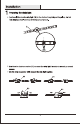
Installation "§ Preparing the straight o (skeptical} Shorten the lightship (A) to the desired length by cutting along fw 3.9 Inch distance the black lines with the scissors mark.
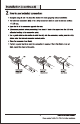
Installation continued) | 2 How to use included connectors 0 Complete siege 5 and 7 to check the device If I works propagator galore initialization oi Tha wire lead connectors (60) or the sirloin connector (DB) are used Io fol twa sections of LED taps. o Open te id of the counselor opposite the wire, uo (Disconnect product before proceeding) Pole about Va inch of the paper from the LED strip abrasive backing a! the connection point.
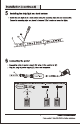
Installation continued) | 3 installing the strip it o Ensure the mounting location is even, clean, and dry. o Remove the protective film from the back of the ship light (A). ut Crass the strip light (A) te the mounting surface and hood in place fora few seconds. & 4 Installing the contra! module a Align the arrow un tha Inline centralization (L) 10 The + 12V mark on the strip light (A). o Connect the inline contriver (C) fu the pipe ght (A).
Installation continued) | 5 Installing the strip light ona hard surface = install the strip Eight (A) to a hard surface using the mounting clips (AA) and resews (BB). Ensure the mounting clips are placed in between LESS in order not cover the lights. BB \ gum sme IRE 6 Connecting the power © Connection plug-in power supply (I) tu the inline controller © Plug the plug-In power supply {B) Info wall receptacles.
Care and Cleaning Usa a soft, dry cloth to clean the strip ght. Do not usa alcohol-based cleaners, as this may damage the acrylic surface. Battery Safety o Swallowing the batteries may lead to serious Injury or death. if swallowed go straight to a medical emergency rem. Nisan batteries and the battery contacts before Inserting Hf necessary with a clean, dry cloth. Only use Coin Cell Battery CR2025 3-Volt or CR2032 3-Volt for battery replacement.