® 1/10 ELECTRIC STADIUM TRUCK ECX03000 | ECX03000AU | ECX03000I ECX03001 | ECX03001AU | ECX03001I INSTRUCTION MANUAL BEDIENUNGSANLEITUNG MANUEL D’UTILISATION MANUALE DI ISTRUZIONI Congratulations on your purchase of the ECX® Circuit™ Stadium Truck. This 1/10-scale model introduces you to the sport of RC driving. Herzlichen Glückwunsch zum Kauf des ECX Circuit Stadium Truck. Dieses 1/10 Scale Model öffnet Ihnen die Welt des RC Car Sports. Nous vous félicitons pour l’achat du ECX Circuit Stadium Truck.
EN NOTICE All instructions, warranties and other collateral documents are subject to change at the sole discretion of Horizon Hobby, Inc. For up-to-date product literature, visit http://www.horizonhobby.com and click on the support tab for this product.
EN WATER-RESISTANT VEHICLE WITH WATERPROOF ELECTRONICS Your new Horizon Hobby vehicle has been designed and built with a combination of waterproof and water-resistant components to allow you to operate the product in many “wet conditions,” including puddles, creeks, wet grass, snow and even rain. While the entire vehicle is highly water-resistant, it is not completely waterproof and your vehicle should NOT be treated like a submarine.
EN COMPONENTS 1. 2. 3. 4. 5. ECX Circuit 1/10-scale Stadium Truck Spektrum™ DX2E Transmitter AA (4) Batteries DYN4113 2A Peak Battery Charger Dynamite® Speedpack™ 7.2V Ni-MH battery (DYN1050EC) ® ™ 3 ST. TRIM R POWE ST. RATE 4 TH. TRIM 1 2 5 VEHICLE PREPARATIONS CHARGING THE VEHICLE BATTERY 1. Connect the AC power cord to the power slot on the charger, then connect the other end of the power cord to an AC power source. 2.
EN INSTALLING TRANSMITTER BATTERIES We recommend using only alkaline AA batteries in the transmitter, however, it is possible to use rechargeable NiMH batteries. CAUTION: If using rechargeable batteries, charge only rechargeable batteries. Charging non-rechargeable batteries may cause the batteries to burst, resulting in injury to persons and/or damage to property. 1. Slide the panel open on the bottom of the transmitter. 2.
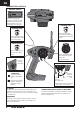
EN TRANSMITTER CONTROLS REVERSE SWITCH BIND ST TH BIND N R N R ST N TH R N R Allows you to change the direction of steering (ST. REV) and throttle (TH. REV) controls (default settings are “N” for steering and “R” for throttle). STEERING RATE STEERING TRIM Adjusts the amount the front wheels move when the steering wheel is turned left or right. Adjust to make the vehicle drive straight with no input at the steering wheel. STEERING WHEEL THROTTLE TRIM ST.
EN GETTING STARTED 2. Power on the ESC. 1. Power on the transmitter. ST. TRIM POWER ST. TH. TRIM 3. Do a test of the transmitter’s control of the vehicle with the vehicle’s wheels off the ground. 4. Start driving slowly, and, if the vehicle does not go straight, adjust the steering trim dial on the transmitter. IMPORTANT: Seat the motor brushes by driving smoothly on a flat surface during use of the first battery charge.
EN OPERATION • ALWAYS turn on your transmitter before you turn on the receiver in the vehicle. Always power off the receiver before turning your transmitter off. • ALWAYS operate your vehicle in a wide open area. Operating the vehicle in a small space or indoors can cause overheating at low speeds. Operating at low speed increases heat in the electronic speed control (ESC). Overheating can damage the vehicle and failure may result. WHEN YOU ARE FINISHED 1. Power off the Electronic Speed Control (ESC). 2.
EN MAINTENANCE SETTING THE GEAR MESH The gear mesh has already been set at the factory. Setting the gear mesh is only necessary when changing motors or gears. You must remove the vehicle’s gear cover (A) to make this adjustment. Proper gear mesh (how the gear teeth meet) is important to the performance of the vehicle. When the gear mesh is too loose, the spur gear could be damaged by the pinion gear of the motor. If the mesh is too tight, speed could be limited and the motor and ESC will overheat.
EN SHOCK CLEANING REAR SHOCK Oil-filled shocks will require regular maintenance due to the oil breaking down or getting dirty. This maintenance should be performed after about every 3 to 5 hours of use, depending on the conditions that the vehicle is used in. • Remove the shock from the vehicle. • Remove the cap from the shock body and dispose of fluid. • Disassemble the shock. Clean thoroughly with DYN5505. Dry parts before assembly.
EN BINDING Binding is the process of programming the receiver to recognize the GUID (Globally Unique Identifier) code of a single specific transmitter. The DX2E and SR201 are bound at the factory. If you need to rebind, follow the instructions below. 1. With the receiver off, insert the bind plug into the BIND port on the receiver. 2. Power the receiver through any other port. The orange LED will flash continuously, indicating the receiver is in bind mode. 3.
EN LIMITED WARRANTY What this Warranty Covers Horizon Hobby, Inc. (“Horizon”) warrants to the original purchaser that the product purchased (the "Product") will be free from defects in materials and workmanship at the date of purchase.
EN Country of Purchase Germany France China Horizon Hobby Address Horizon Technischer Service Christian-Junge-Straße 1 25337 Elmshorn Germany Horizon Hobby SAS 11 Rue Georges Charpak 77127 Lieusaint, France Horizon Hobby - China Room 506, No. 97 Changshou Rd. Shanghai, China 200060 Phone Number/Email Address +49 (0) 4121 2655 100 service@horizonhobby.de +33 (0) 1 60 18 34 90 infofrance@horizonhobby.com +86 (021) 5180 9868 info@horizonhobby.com.
PARTS DIAGRAM | EXPLOSIONSZEICHNUNG | VUE ÉCLATÉE DES PIÈCES | ESPLOSO DEL MODELLO CON REFERENZA PEZZI RECOMMENDED ITEMS EMPFOHLENE WERKZEUGE OUTILS RECOMMANDÉS ATTREZZI CONSIGLIATI M3x25 M3x12 M3x10 M3x10 9 M3x10 M3x25 2 mm 1.5 mm 45 7 M4.3x13 11 3 4 11 20 5 7 2 8 2 44 2 45 8 7 M3x18 10 M4.3x13 1 12 M3x8 2 M3x12 M3x18 43 17 46 31 M3x25 M3x13 M3x12 48 M3x12 M3x12 31 M3x16 19 20 20 20 M2.5x4 16 M3x16 8 23 7 M4.3x13 18 3 M2x8 M4.3x13 2 23 21 23 15 M4.
PARTS DIAGRAM | EXPLOSIONSZEICHNUNG | VUE ÉCLATÉE DES PIÈCES | ESPLOSO DEL MODELLO CON REFERENZA PEZZI The slipper clutch can be adjusted using this locknut (ECX1060). Fully tighten the locknut, then loosen the nut two full turns. Die Rutschkupplung kann durch diese Stopmutter eingestellt werden (ECX1060). Ziehen Sie die Mutter an und drehen Sie dann volle zwei Umdrehungen zurück. Il est possible d’ajuster le sliper par action sur cet écrou de blocage (ECX1060). Veillez à serrer l’écrou de blocage à fond.
Replacement Parts / Ersatzteile / Pièces de rechange / Pezzi di ricambio Description Beschreibung Description Descrizione 1 2 Part # | Nummer Numéro | Codice ECX1017 ECX1028 Main Chassis Servo Saver Set Chassis Servo Saver Set 3 ECX1092 Rear Suspension Mount Set Querlenkerhalter hinten 4 5 ECX1050 ECX1053 Setscrew M3x12 (4) Foam Block Schrauben Set M3x12 (4) Schaum Block Châssis principal Sauve servo Jeu de renfort de suspension arriére Jeu de vis M3x12 (4) Bloc de mousse 6 ECX1098 Motor
Part # | Nummer Numéro | Codice Description Beschreibung 36 ECX1026 Transmission Drive Shaft (2) Getreibeausgangswelle (2) 37 38 39 40 41 42 43 44 45 ECX1052 ECX1055 ECX1059 ECX232006 ECX1073 DYN1171 ECX1048 ECX1056 ECX1029 Washer Set Bearings 10x15x4 (2) M3 Locknut (4) Spur Gear 19-Tooth Pinion Gear Motor Body Clip Bushing 3x6x2.8mm (2) Top Plate Unterlegscheiben Set Lager 10x15x4 (2) M3 Stopmutter (4) Hauptzahnrad 19-Tooth Pinion Gear Motor Body Clip Buchse 3x6x2.
® ECX03000 | ECX03000AU | ECX03000I ECX03001 | ECX03001AU | ECX03001I www.ecxrc.com 37870 Created 1/2013 © 2013 Horizon Hobby, Inc. ECX, the ECX logo, Circuit, Dynamite and Speedpack are trademarks or registered trademarks of Horizon Hobby, Inc. WD-40 is a registered trademark of WD-40 Manufacturing Company. The Spektrum trademark is used with permission of Bachmann Industries, Inc.