® 1.9 4WD ELECTRIC SCALE CRAWLER BUILD-TO-DRIVE™ KIT ECX01011 INSTRUCTION MANUAL BEDIENUNGSANLEITUNG MANUEL D’UTILISATION MANUALE DI ISTRUZIONI Congratulations on your purchase of the ECX® Barrage® 1.9 4WD Electric Scaler. This model introduces you to the sport of RC driving. Herzlichen Glückwunsch zum kauf des ECX Barrage 1.9 4WD Electric Scaler. Dieses Modell ist der gelungende Einstieg in die Welt des RC Cars Sports. Nous vous félicitons pour l’achat de l’ECX Barrage 1,9 4WD électrique.
IT AVVISO Tutte le istruzioni, le garanzie e gli altri documenti pertinenti sono soggetti a cambiamenti a totale discrezione di Horizon Hobby, LLC. Per una documentazione aggiornata sul prodotto, visitare il sito horizonhobby.com e fare clic sulla sezione Support del prodotto.
IT VEICOLO RESISTENTE ALL’ACQUA CON ELETTRONICA IMPERMEABILE Il vostro nuovo veicolo Horizon Hobby è stato progettato e costruito con una combinazione di componenti impermeabili e resistenti all’acqua, per consentirvi di utilizzare il prodotto in molte situazioni “umide,” incluse pozze, ruscelli, erba bagnata, neve e anche pioggia. Sebbene tutto il veicolo sia altamente resistente all’acqua, tuttavia non è completamente impermeabile e NON si può trattare come fosse un sottomarino.
IT COME INIZIARE 1 2 3 4 5 6 Caricare la batteria Montare il telaio Verniciare la carrozzeria Installare la batteria Impostare la trasmittente Pronti alla guida! 4 2 1 5 3 AVVERTENZE PER LA CARICA AVVERTENZA: se non si presta attenzione quando si usa questo prodotto e non si osservano gli avvertimenti, si potrebbe avere un malfunzionamento, con problemi elettrici e di surriscaldamento, FUOCO, e anche lesioni e/o danni. • NON ABBANDONARE LE BATTERIE DURANTE LA CARICA.
a1 x1 x4 x2 x1 x1 2 1 4 5 3 M2 x 8mm 1.
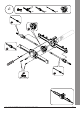
a2 x4 x4 x2 x1 x2 x2 NOTICE: The spindles have positive castor (see image, right). HINWEIS: Die Spindeln haben positiven Nachlauf (siehe Bild rechts). REMARQUER : Les fusées possèdent une chasse positive (voir l’image de droite). AVVISO: i fuselli hanno incidenza positiva (v. figura a destra).
b1 x1 x4 x1 x2 x1 4 5 2 1 M2 x 8mm 3 1.
b2 x4 x4 x2 x1 x2 x2 4 M2 x 6mm 2 5 4 x 8 x 3mm 1 4 x 8 x 3mm 3 M2 x 6mm 6 7 8
c1 x1 x3 x1 x1 x1 x1 x1 2 M2 x 14mm 1 3 M2 x 8mm M2 x 20mm 1.
c2 x1 x4 1 2 M3 x 8mm 10 x1
d1 x4 x4 x4 x4 x4 NOTICE: Spacer is optional. HINWEIS: Das Distanzstück ist optional. REMARQUER : L’utilisation d’une entretoise est optionnelle. AVVISO: il distanziale è opzionale. 1 4 2 3 1.
e1 x2 x1 x1 1 2 M2.5 x 5mm Tip: Leave the screws slightly loose in order to adjust the gear mesh. Tipp: Schrauben leicht gelöst belassen, um die Verzahnung anzupassen. Conseil : laissez les vis légèrement desserrées afin d’ajuster le maillage de rouages. Consiglio: lasciare le viti leggermente allentate per regolare gli ingranaggi.
e2 x2 x1 x1 x1 x1 2 M3 x 3mm 5 M2 x 4mm 1 4 3 See: SETTING THE GEAR MESH, page 30. Siehe: EINSTELLEN DES ZAHNEINGRIFFS, Seite 30. Voir la section: MONTAGE DE L’ENGRÈNEMENT DE LA ROUE DENTÉE, page 30. V.: IMPOSTAZIONE DEL RAPPORTO DEGLI INGRANAGGI, pagina 30. 1.
e3 x1 x2 x2 3 1 4 M4 x 4mm 2 M4 x 4mm 14
f1 x2 x2 x1 x1 1 3 M2 x 15mm 2 M2 x 12mm 1.
f1 x5 4 x1 x4 1 2 M3 x 10mm M3 x 10mm 3 M3 x 6mm 16 x2 x1 M3 x 6mm
g1 x2 x2 x1 x2 x2 Tip: Hold the shock and link in place while pushing the screw through the mount, shock, and link. Do not over tighten. There should be space and minimal movement between the shock and the link. Tipp: Halten Sie den Dämpfer und die Verbindungsstange in Position, während Sie die Schraube durch den Befestigungspunkt, den Dämpfer und die Verbindungsstange schieben. Nicht zu fest anziehen. Zwischen Dämpfer und Verbindungsstange sollte ein geringes Spiel bestehen.
g2 x2 x2 x1 x2 x2 Tip: Hold the shock and link in place while pushing the screw through the mount, shock, and link. Do not over tighten. There should be space and minimal movement between the shock and the link. Tipp: Halten Sie den Dämpfer und die Verbindungsstange in Position, während Sie die Schraube durch den Befestigungspunkt, den Dämpfer und die Verbindungsstange schieben. Nicht zu fest anziehen. Zwischen Dämpfer und Verbindungsstange sollte ein geringes Spiel bestehen.
g3a x2 x1 x1 3 M2 x 14mm 2 1 NOTICE: Ensure the driveshaft slides together smoothly. HINWEIS: Sicherstellen, dass die Antriebswelle leichtgängig mitläuft. REMARQUER : assurez-vous que l’arbre d’entraînement s’enclenche doucement. AVVISO: accertarsi che l’albero di trasmissione si muova insieme liberamente. 1.
g3b x2 x1 x1 5 6 4 NOTICE: Ensure the driveshaft slides together smoothly. HINWEIS: Sicherstellen, dass die Antriebswelle leichtgängig mitläuft. REMARQUER : assurez-vous que l’arbre d’entraînement s’enclenche doucement. AVVISO: accertarsi che l’albero di trasmissione si muova insieme liberamente.
g4a x1 x1 x1 x2 1 M2 x 20mm 2 M2 1.
g4b x1 x1 x2 x1 3 M2 x 20mm 4 M2 22
h1 x1 x4 x1 x1 2 1 M3 x 14mm 4 M3 x 14mm 3 1.
h2 x4 x1 x4 1 M4 24
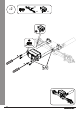
i1 x1 x4 x4 x4 1 2 M2 x 6mm Tip: Use zip ties to secure the excess wiring to the chassis. Tipp: Kabelbinder zum Sichern der überschüssigen Kabel an der Karosserie verwenden. Conseil : utilisez des colsons pour fixer l’excédent de câble au châssis. Consiglio: utilizzare fascette per assicurare i cavi in eccesso al telaio. 1.
i2 x1 x2 x1 x1 x2 x1 3 2 1 5 4 CH 2 ESC CH 1 Steering Servo B/C LEDs 26
1 j1 x1 x4 x2 x2 x1 x4 2 4 3 M2.6 x 11mm 1.
IT STEP 3: COLORAZIONE CARROZZERIA E APPLICAZIONE ADESIVI 1. Pulire l’interno della carrozzeria Barrage con un po’ di acqua e detersivo per piatti. Sciacquare bene la carrozzeria e asciugarla con uno straccio. Consiglio: Non usare carta assorbente. 2. Posizionare le mascherine dei finestrini all’interno della carrozzeria. 3. Colorare l’interno della carrozzeria Barrage. 4.
IT STEP 5: IMPOSTAZIONE DEL SISTEMA TRASMITTENTE 1. 2. 3. 4. Togliere il coperchio del portapile dal trasmettitore. Installare quattro batterie AA come illustrato. Rimettere la copertura del compartimento batteria. Controllare i comandi della trasmittente (vedi sotto). La trasmittente e l’ESC sono connessi già da fabbrica. Se dovesse essere necessario rifare la connessione, seguire le istruzioni di CONNESSIONE.
IT STEP 6: GUIDARE 1 2 Accendere il trasmettitore. 3 Accendere l’ESC. Guidare! QUANDO AVETE TERMINATO 1 2 Spegnere l’ESC. Spegnere il trasmettitore. 3 Togliere la batteria dal veicolo e ricaricarla. REGOLATORE ELETTRONICO DI VELOCITÀ (ESC) Collegamenti Calibrazione 1. Collegare il filo ROSSO (+) dell’ESC al filo ROSSO (+) del motore. 2. Collegare il filo NERO (-) dell’ESC al filo NERO (-) del motore.
IT GUIDA ALLA RISOLUZIONE DEI PROBLEMI Problema Breve durata della carica Risposta lenta Controlli invertiti Motore/ESC surriscaldati Non funziona nulla Portata scarsa Il sistema non si connette Il ricevitore va in failsafe a breve distanza dal trasmettitore Il ricevitore smette di rispondere durante l’utilizzo Il ricevitore e il trasmettitore non sono connessi Il veicolo si muove in avanti e indietro senza alcun comando da parte dell’utente La macchina non va dritta Il veicolo non sterza o sterza poco
IT PERIODO DI GARANZIA Periodo di garanzia Garanzia esclusiva - Horizon Hobby, LLC (Horizon) garantisce che il prodotto acquistato (il “Prodotto”) sarà privo di difetti relativi ai materiali e di eventuali errori di montaggio alla data di acquisto. Il periodo di garanzia è conforme alle disposizioni legali del paese nel quale il prodotto è stato acquistato. Tale periodo di garanzia ammonta a 6 mesi e si estende ad altri 18 mesi dopo tale termine.
IT Replacement Parts List • Teileliste Part Number English Deutsch DYNS1206 Tazer 390 Motor Motor: Tazer 370 DYNS2210 WP 60A FWD/REV Brushed ESC WP 60A Bürstenregler Vorwärts/rückwärts ECX13002 2.4GHz Transmitter, 2-Channel V3 2.4GHz 2 Kanal Sender V3 ECX13003 2.4GHz Receiver WP, 4-Channel V3 2.
IT Liste des pièces de rechange • Elenco dei ricambi Part Number Français Italiano DYNS1206 Moteur: Tazer 370 Motore: Tazer 370 DYNS2210 WP 60A Contrôleur à balais avant/arrière WP 60A ESC con spazzole avanti/indietro ECX13002 2.4GHz Emetteur 2 voies, V3 2-Ch trasmettitore, V3 ECX13003 2.4GHz Récepteur étanche 2 voies V3 2.
IT PARTS DIAGRAM | EXPLOSIONSZEICHNUNG | VUE ÉCLATÉE DES PIÈCES | ESPLOSO DEL MODELLO CON REFERENZA PEZZI ECX210010 - Clear / transparent / transparente / trasparente ECX1048 ECX211019 ECX1048 ECX220009 ECX211019 ECX211014 ECX41006 ECX41004 ECX41006 ECX1060 ECX41004 ECX1060 62
ECX216003 ECX211021 DYNS2210 1.
64 ECX224000 ECX216003 ECX224000 ECX222000 ECX216003 ECX216003 ECX212009 ECX212010 ECX221000 FRONT AXLE | VORDERACHSE | HINTERACHSE | ASSE ANTERIORE ECX217001 ECX216003 ECX222000 ECX212020 ECX222002 ECX216003 ECX212028 ECX217001 ECX216003 ECX212027 ECX217001 ECX216003 ECX212021 ECX221000 ECX212027 ECX217001 ECX221000 ECX212027 IT PARTS DIAGRAM | EXPLOSIONSZEICHNUNG | VUE ÉCLATÉE DES PIÈCES | ESPLOSO DEL MODELLO CON REFERENZA PEZZI
DYNS1206 1.
ECX01011 www.ecxrc.com © 2017 Horizon Hobby, LLC. ECX, the ECX logo, Barrage, Dynamite, Speedpack, Prophet, Tazer, EC3 and the Horizon Hobby logo are trademarks or registered trademarks of Horizon Hobby, LLC. The Spektrum trademark is used with permission of Bachmann Industries, Inc.