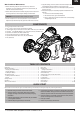
® 1:18 GEN2 4WD BRUSHED ROCK CRAWLER RTR ECX01015T1/T2 Congratulations on your purchase of the ECX® Temper® Gen2 4WD Brushed Rock Crawler. This model introduces you to the sport of RC driving. INSTRUCTION MANUAL BEDIENUNGSANLEITUNG MANUEL D’UTILISATION MANUALE DI ISTRUZIONI Herzlichen Glückwunsch zum Kauf des ECX Temper Gen2 4WD Brushed Rock Crawler. Dieses Modell ist der gelungende Einstieg in die Welt des RC Cars Sports.
EN NOTICE All instructions, warranties and other collateral documents are subject to change at the sole discretion of Horizon Hobby, LLC. For up-to-date product literature, visit http://www.horizonhobby.com and click on the support tab for this product.
EN Wet Conditions Maintenance • Spray the bearings, drive train, fasteners and other metal parts with a water-displacing light oil or lubricant. Do not spray the motor. • Let the vehicle air dry before you store it. Water (and oil) may continue to drip for a few hours. • Increase the frequency of disassembly, inspection and lubrication of the following: • Front and rear axle hub assembly bearings. • All transmission cases, gears and differentials.
EN VEHICLE PREPARATIONS CHARGING THE VEHICLE BATTERY NOTICE: Never charge a battery in the vehicle or damage may result. 1. Connect the NiMH battery to the battery charger. 2. Connect the charger to an AC power outlet. 3. Allow the NiMH battery to charge for 9 hours. CHARGING WARNINGS WARNING: Failure to exercise caution while using this product and comply with the following warnings could result in product malfunction, electrical issues, excessive heat, FIRE, and ultimately injury and property damage.
EN TRANSMITTER CONTROLS Battery Level Indicator Reverse Switch Solid Red: Battery voltage is good (above 4V) Flashing Red: Battery voltage is critically low (below 4V). Replace transmitter batteries Allows you to change the direction of steering (ST. REV) and throttle (TH.
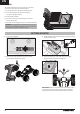
EN BINDING The included transmitter and receiver are bound at the factory. If you need to rebind, follow the instructions below. 1. Power ON the receiver. The receiver LED flashes slowly. 2. Insert the bind plug into the receiver’s binding pins. The receiver LED flashes rapidly. 3. Power ON the transmitter. 4. The receiver LED turns solid when binding is successful. Remove the bind plug. You must rebind when binding the receiver to a different transmitter.
EN OPERATION • ALWAYS turn on your transmitter before you turn on the receiver in the vehicle. Always power off the receiver before turning your transmitter off. • ALWAYS operate your vehicle in a wide open area. Operating the vehicle in a small space or indoors can cause overheating at low speeds. Operating at low speed increases heat in the electronic speed control (ESC). Overheating can damage the vehicle and failure may result. WHEN YOU ARE FINISHED 1. Power off the ESC. 2.
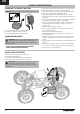
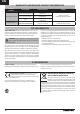
EN MAINTENANCE SETTING THE GEAR MESH B The gear mesh has already been set at the factory. Setting the gear mesh is only necessary when changing motors or gears. You must remove the vehicle’s gear cover (A) to make this adjustment. C Proper gear mesh (how the gear teeth meet) is important to the performance of the vehicle. When the gear mesh is too loose, the spur gear could be damaged by the pinion gear of the motor. If the mesh is too tight, speed could be limited and the motor and ESC will overheat.
EN LIMITED WARRANTY What this Warranty Covers Horizon Hobby, LLC, (Horizon) warrants to the original purchaser that the product purchased (the “Product”) will be free from defects in materials and workmanship at the date of purchase. that you may need any assistance. For questions or assistance, please visit our website at www.horizonhobby.
EN WARRANTY AND SERVICE CONTACT INFORMATION Country of Purchase United States of America Horizon Hobby Contact Information Horizon Service Center (Repairs and Repair Requests) Horizon Product Support (Product Technical Assistance) servicecenter.horizonhobby.com/ RequestForm/ productsupport@horizonhobby.com 877-504-0233 websales@horizonhobby.com 800-338-4639 service@horizonhobby.
Replacement Parts / Ersatzteile / Pièces de rechange / Pezzi di ricambio Part # Description Beschreibung Description Descrizione DYNB0111EC 7.2V 900mAh NiMH 6C, 3+3 w/ EC3 7,2V 900mAh NiMH 6C, 3+3 mit EC3 7,2 V 900 MAH NIMH 6 C, 3+3 AVEC EC3 7,2V 900 mAh NiMH 6C, 3+3 con EC3 DYNS1207 Tazer 32T 380 Brushed Motor Tazer 32T 380 Bürstenmotor Moteur à balais Tazer 32T 380 Motore a spazzole Tazer 32T 380 ECX11008 Rock Crawling ESC/RX 2.
Optional Parts / Optionale Teile / Liste des options / Elenco parti opzionali Part # Description Beschreibung Description Descrizione DYNB0105EC 7.
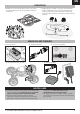
PARTS DIAGRAM | EXPLOSIONSZEICHNUNG | VUE ÉCLATÉE DES PIÈCES | ESPLOSO DEL MODELLO CON REFERENZA PEZZI ECX215000 (M2x6mm) ECX210012 ECX11008 ECX215000 (M2x8mm) ECX210013 (Yellow // Gelb // Jaune // Giallo) ECX210014 (Blue // Blau // Bleu // Blu) ECX215000 (M2x6mm) ECX210012 ECX211023 ECX215000 (M4x4mm) ECX215000 (M2x8mm) ECX211028 ECX215000 (M2x8mm) ECX215000 (M2x12mm) ECX215000 (M2x6mm) ECX211025 ECX210012 ECX215000 (M4x6mm) ECX215000 (M2x6mm) ECX215000 (M4x6mm) ECX211024 ECX210012 ECX2110
ECX41013 ECX216004 (M4) PARTS DIAGRAM | EXPLOSIONSZEICHNUNG | VUE ÉCLATÉE DES PIÈCES | ESPLOSO DEL MODELLO CON REFERENZA PEZZI ECX41011 (Black wheel with yellow beadlock // Schwarzes Rad mit gelbem Beadlock // Roue noire avec verrou de talon jaune // Ruota nera con Beadlock giallo) ECX41012 (Gray wheel with blue beadlock // Graues Rad mit blauem Beadlock // REAR AXLE AND SUSPENSION | HINTERACHSE UND AUFHÄNGUNG Roue grise avec verrou de talon bleu // Ruota grigia con Beadlock blu) ESSIEU ARRIÈRE ET SUSPEN
® ECX01015T1/T2 www.ecxrc.com © 2018 Horizon Hobby, LLC. ECX, the ECX logo, Temper, Dynamite, Prophet, Tazer, EC3, and the Horizon Hobby logo are trademarks or registered trademarks of Horizon Hobby, LLC. The Spektrum trademark is used with permission of Bachmann Industries, Inc.