Battery and Charger Not Included 1/10 2WD ELECTRIC MONSTER TRUCK 1/10 2WD ELECTRIC SHORT COURSE TRUCK ECX03431T1 | ECX03431T2 ECX03433T1 | ECX03433T2 | ECX03433T3 INSTRUCTION MANUAL BEDIENUNGSANLEITUNG MANUEL D’UTILISATION MANUALE DI ISTRUZIONI Congratulations on your purchase of the ECX® Ruckus® Monster Truck or Torment™ Short Course Truck. This 1/10-scale model introduces you to the sport of RC driving. Herzlichen Glückwunsch zum Kauf des ECX Ruckus® Monster Truck oder Torment™ Short Course Truck.
EN NOTICE All instructions, warranties and other collateral documents are subject to change at the sole discretion of Horizon Hobby, LLC. For up-to-date product literature, visit http://www.horizonhobby.com and click on the support tab for this product.
EN Wet Conditions Maintenance • Remove the battery pack(s) and dry the contacts. If you have an air compressor or a can of compressed air, blow out any water that may be inside the recessed connector housing. • Remove the tires/wheels from the vehicle and gently rinse the mud and dirt off with a garden hose. Avoid rinsing the bearings and transmission. NOTICE: Never use a pressure washer to clean your vehicle.
EN QUICK START Please read the entire manual to gain a full understanding of the vehicle, fine-tuning the setup and performing maintenance. 1. Read the safety precautions found in this manual. 5. Power ON the transmitter and then the vehicle. Wait 5 seconds for the ESC to initialize. Always power the transmitter ON before the vehicle and power it OFF after the vehicle has been powered OFF. 2. Charge a battery for the vehicle.
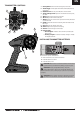
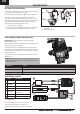
EN TRANSMITTER CONTROLS 1. Steering Wheel Controls direction (left/right) of the model 2. Throttle Trigger Controls speed and direction (forward/brake/reverse) of the model 3. ON/OFF Switch Turns the power ON/OFF for the transmitter 4. Throttle Limiting Switch Adjusts the throttle limit from 50%, 75%, and 100% 5. TH Rate Adjusts the end point of the throttle 6. TH Trim Adjusts the throttle neutral point 7. TH REV Reverses the function of the speed control when pulled back or pushed forward 8.
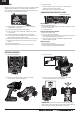
EN BINDING Binding is the process of programming the receiver to recognize the GUID (Globally Unique Identifier) code of a single specific transmitter. The STX2® transmitter and SPMSRX200 receiver are bound at the factory. If you need to rebind, follow the instructions below. You must rebind when: • Different failsafe positions are desired e.g., when throttle or steering reversing has been changed. • Binding the receiver to a different transmitter. CHANGING THE THROTTLE LIMIT Throttle Limit Switch 1.
EN OPERATION • ALWAYS turn on your transmitter before you turn on the receiver in the vehicle. Always power off the receiver before turning your transmitter off. • ALWAYS operate your vehicle in a wide open area. Operating the vehicle in a small space or indoors can cause overheating at low speeds. Operating at low speed increases heat in the electronic speed control (ESC). Overheating can damage the vehicle and failure may result. WHEN YOU ARE FINISHED 1. Power off the ESC. 2.
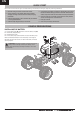
EN MAINTENANCE SETTING THE GEAR MESH B The gear mesh has already been set at the factory. Setting the gear mesh is only necessary when changing motors or gears. C You must remove the vehicle’s gear cover (A) to make this adjustment. Proper gear mesh (how the gear teeth meet) is important to the performance of the vehicle. When the gear mesh is too loose, the spur gear could be damaged by the pinion gear of the motor. If the mesh is too tight, speed could be limited and the motor and ESC will overheat.
EN SHOCK CLEANING REAR SHOCK Oil-filled shocks require regular maintenance because oil breaks down and/or gets dirty. Perform this maintenance every 3–5 hours of use, depending on useage conditions. ECX1037 ECX1037 ECX1043 ECX1043 ECX1057 • Remove the shock from the vehicle. • Remove the cap from the shock body and dispose of fluid. • Disassemble the shock. Clean thoroughly with a plastic- and electronic-safe degreaser (DYNE50001). Dry parts before assembly.
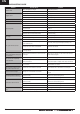
EN TROUBLESHOOTING GUIDE Problem Possible Cause Solution Battery damaged/not charged Check/change battery Motor dirty Check/clean Motor dirty Check/clean Bind in drivetrain Clean/adjust Vehicle battery is not charged Replace/recharge Controls reversed ST. REV or TH.
EN LIMITED WARRANTY What this Warranty Covers Horizon Hobby, LLC, (Horizon) warrants to the original purchaser that the product purchased (the “Product”) will be free from defects in materials and workmanship at the date of purchase. that you may need any assistance. For questions or assistance, please visit our website at www.horizonhobby.
EN WARRANTY AND SERVICE CONTACT INFORMATION Country of Purchase United States of America Horizon Hobby Contact Information Horizon Service Center (Repairs and Repair Requests) Horizon Product Support (Product Technical Assistance) servicecenter.horizonhobby.com/ RequestForm/ productsupport@horizonhobby.com 877-504-0233 websales@horizonhobby.com 800-338-4639 service@horizonhobby.
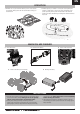
RUCKUS PARTS DIAGRAM | EXPLOSIONSZEICHNUNG | VUE ÉCLATÉE DES PIÈCES | ESPLOSO DEL MODELLO CON REFERENZA PEZZI The slipper clutch can be adjusted using this locknut (ECX1060). Fully tighten the locknut, then loosen the nut two full turns. Die Rutschkupplung kann durch diese Stopmutter eingestellt werden (ECX1060). Ziehen Sie die Mutter an und drehen Sie dann volle zwei Umdrehungen zurück. Il est possible d’ajuster le sliper par action sur cet écrou de blocage (ECX1060).
TORMENT PARTS DIAGRAM | EXPLOSIONSZEICHNUNG | VUE ÉCLATÉE DES PIÈCES | ESPLOSO DEL MODELLO CON REFERENZA PEZZI M3X10 11 M3X10 M3X10 30 12 9 M3X12 5 M3X18 45 51 M3X12 1 3 M3X12 51 M3X12 M3X25 12 M3X18 M3X10 M3X12 2 M3X12 4 7 2 44 20 7 2 45 49 M3X10 8 17 2 2 19 2 7 16 M3X12 19 20 M3X15 M3X10 M3X25 13 46 8 29 23 M3X15 8 19 M3X12 21 14b 15 15 31 M3X10 7 18 23 31 M3X8 48 20 M3X15 M3X12 13 22 RUCKUS | TORMENT™ ®
TORMENT PARTS DIAGRAM | EXPLOSIONSZEICHNUNG | VUE ÉCLATÉE DES PIÈCES | ESPLOSO DEL MODELLO CON REFERENZA PEZZI 42 M3X3 The slipper clutch can be adjusted using this locknut (ECX1060). Fully tighten the locknut, then loosen the nut two full turns. Die Rutschkupplung kann durch diese Stopmutter eingestellt werden (ECX1060). Ziehen Sie die Mutter an und drehen Sie dann volle zwei Umdrehungen zurück. Il est possible d’ajuster le sliper par action sur cet écrou de blocage (ECX1060).
Replacement Parts / Ersatzteile / Pièces de rechange / Pezzi di ricambio Part # Description Beschreibung Description Descrizione 1 ECX2008 Main Chassis Chassis Châssis principal Telaio principale 2 ECX1028 Servo Saver Set Servo Saver Set Sauve servo Set salvaservo 3 ECX2011 Cover and Rear Mount Set Abdeckung und hinterer Halter Set Capot et fixations arrières Copertura e set di montaggio posteriore 4 ECX1050 Setscrew M3 x 12 (4) Schrauben Set M3 x 12 (4) Jeu de vis M3 x 12 (4)
Replacement Parts / Ersatzteile / Pièces de rechange / Pezzi di ricambio Description Beschreibung Description Descrizione 45 ECX2009 Part # Body Mount Set Aufnahme Karosseriehalter Set Montage Carrosserie Set di montaggio per la carrozzeria 46 ECX2007 Skid Plate Set Skid Plate Set Set Plaque Chassis Set pistre di protezione 47 ECX2013 RR Bump Mount Heckstoßstangenhalterung Support de pare-chocs arrière Supporto bumper posteriore 48 ECX1023 Top Shaft/Spacer Top Shaft/Spacer Set de Goup
® ECX03431T1 | ECX03431T2 ECX03433T1 | ECX03433T2 | ECX03433T3 www.ecxrc.com © 2018 Horizon Hobby, LLC. ECX, the ECX logo, Ruckus, Torment, Dynamite, Prophet, STX2, EC3, Tazer, SpeedTreads, Reaction and the Horizon Hobby logo are trademarks or registered trademarks of Horizon Hobby, LLC. The Spektrum trademark is used with permission of Bachmann Industries, Inc.