
User's Manual


Acclarix AX3 Series Diagnostic Ultrasound System User Manual Utilities
- 102 -
10.2 Selecting a Preset
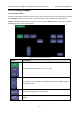
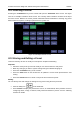
Pressing the <Transducer> key on the console will open the Transducer touch screen. See figure
10-2 for an example Transducer touch screen. The currently active transducer is shown at the top of
the touch screen. Below it are all the presets associated with that transducer. Pressing any preset
button selects that preset, recalling its parameters for system use.
Figure 10-2 Example Preset Screen
10.3 Storing and Editing a Preset
There are two ways to store or modify an exam preset: Snapshot and Editing.
Snapshot:
Select the exam preset you want to modify or use as the basis for a new preset.
Make any changes you want to system settings using the standard imaging UI.
Press the <Transducer> key on the console.
Press the Save button on the touchscreen to update the current exam preset with the new
setting.
Press the Save As button to create a new preset and rename the preset.
Editing:
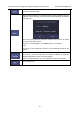
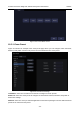
You can directly view and change the settings for any preset using the Set-up function.
Click the Utility icon on the status bar.
Press Presets to display the preset touch screen, as shown below, which provides access to
configuring Exam, Image, Comment, Body Mark and Measure presets. See the following
sections for details.