
User's Manual


Acclarix AX3 Series Diagnostic Ultrasound System User Manual Utilities
- 104 -
Comment: Select one of the pre-defined comment presets to be the default comment preset for the
selected exam preset.
Body Mark: Select one of the pre-defined body mark presets to be the default body mark preset for
the selected exam preset.
Patient Info: Select one of the pre-defined patient information categories for the selected exam preset,
which determines the patient information items displayed on the patient information page by default.
Set Default: Set the selected exam preset as the default exam preset of the transducer. The default
exam preset will be marked with "*".
Copy As and Rename: Copy the selected exam preset as a new preset and then rename it.
Delete: Delete the copied exam preset.
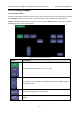
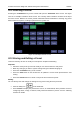
10.3.2. Image Preset
Figure 10-5 shows an example set-up screen for Image Preset, where you can configure the imaging
parameters for an exam preset. This example shows the screen for editing the B-mode settings for the
C5-2Q OB exam preset.
Figure 10-5 Example Set-up Screen for Image Preset
Transducer and Exam: There are drop-downs at the top of the screen for selecting the Transducer
and Exam Preset you want to edit. Each transducer has its own set of exam presets, and these two
drop-downs let you select which exam preset, on which transducer, you want to edit.
TI: Select the TIB, TIS or TIC to display on main screen.
Power: Set the default acoustic output power of the current exam preset.
Image Modes: The next row of controls show tabs for each imaging mode. These let you select which
imaging mode you want to edit for the current exam preset. The example shows the B-mode tab
selected.
The image mode is divided into two sections. Parameters that have one value for each preset are
shown on the left. Parameters that are associated with Image Types are shown on the right.