
User's Manual

Acclarix AX3 Series Diagnostic Ultrasound System User Manual Getting Started
- 17 -
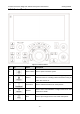
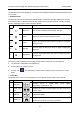
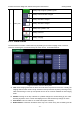
20.
Dual
Enters dual split screen. Each single press on it toggles
between two images. See section 7.3 for details.
21.
Store Image
Press to store static images.
22.
Store Clip
Press to store clips.
23.
Freeze
Press to switch between the frozen and real-time states.
24.
Update
In measurement, pressing <Update> switches the active
side of calipers. See section 8 for details.
When Spectral Doppler strip is displayed, pressing
<Update> allows switching between live acquisition of the
Doppler strip or the reference image.
25.
Trackball
Move the trackball to change the cursor position, adjust M
mark position in M mode, adjust sample line position in
PW mode, etc.
26.
Trackball
keys
Two trackball keys provide a wide variety of functions
depending on the system state (e.g., selects a start or end
point of a measurement, selects menu items on the
screen, etc). For the convenience of introduction, we call
them <Set> throughout this user manual.
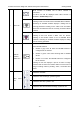
27.
Zoom/Angle
The functions of this knob vary with system functions.
When one function is activated, its indicator illuminates.
Then rotate to zoom an image or adjust the angle.
For example:
In B and Color mode, the Zoom function is auto activated
and its indicator illuminates. Rotating the knob will zoom
images.
In PW or CW mode, the Angle function is auto activated
and its indicator illuminates. Rotating the knob will adjust
the Doppler scale to account for the angle between the
Doppler cursor and the blood flow.
When Comment or Body Mark function is enabled, the
Angle function is auto activated and its indicator
illuminates. Rotating the knob will adjust the angle of
comment arrow or the transducer icon.