
Use Instructions

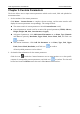

Vital Signs Monitor User Manual Basic Operation
- 14 -
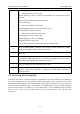
3
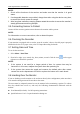
Indicator, from top to bottom:
Working indicator of the Stand
Keeps lighting in green: connected with monitor and will respond to host
monitor;
Flashes in green: disconnected with monitor;
Off: in Off status;
AC Power indicator of the Stand
Keeps lighting in green: connected with AC power;
Off: disconnected with AC power;
Battery Power indicator of the Stand
Keeps lighting in green: battery full;
Keeps lighting in yellow: in charging;
Flashes in yellow: battery low;
Off: no battery inserted or zero battery power or battery fault.
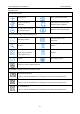
4
Plug-in TEMP module, including TAT TEMP or F3000 TEMP. The TEMP
module in the figure above is for reference only.
5
Heat sink
6
USB interface: supports USB 2.0 output. It connects approved USB devices,
for example, USB flash disk. It is for software upgrade operated by service
personnel of the manufacturer and for data export.
7
AC power input: for connecting AC power cable
8
Equipotential grounding terminal. If the monitor is used together with other
devices, connect this terminal to eliminate potential ground differences
between devices.
2.2 Operating and Navigating
Everything you need to operate the monitor is contained on its screen. Almost every element on
the screen is interactive. Screen elements include measurement data, waveforms, screen keys,
information fields and menus. The configurability of the monitor means that often you can access
the same element in different ways. For example, you might be able to access an item through its
on-screen setup menu, via a hard key, or via a shortcut key. The User Manual always describes
how to access items via an on-screen menu. You may use whichever way you find most
convenient.