
User's Manual

Acclarix LX3 Series Diagnostic Ultrasound System User Manual Transducers and Biopsy
- 77 -
Installation and Use Steps:
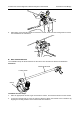
1. Place an appropriate amount of gel on transducer surface, and insert transducer into the sheath.
2. Loosen the locking knob to open the clamp bracket. Attach the bracket to the transducer by
aligning the locating markers on the bracket and the transducer. Properly secure the clamp of
bracket with the locking knob.
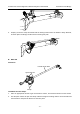
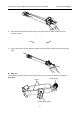
3. Install the disposable Needle Guide.
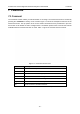
a. Select appropriate disposable needle guide to achieve target depth from skin line:
Specification Depth
21G(1.0cm)
0.8 - 1.2 cm
21G(1.5cm)
1.3 - 1.7 cm
21G(2.0cm)
1.8 - 2.2 cm
b. Install the needle guide to the needle guide holder, and then put in the biopsy needle:
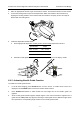
6.4.2. Activating Needle Guide Function
To enable the needle guide function:
1. In the B mode imaging, press Needle button on touch screen. A needle touch screen UI is
displayed. Press Enable button to active the Needle Guide function.
2. Press Double Line button to switch double line and single line as the Needle guide Line
graphics.
3. Some needle guide brackets support multiple angles. If the current transducer supports such a
guide then the Line paddle key appears. Pressing it selects guide lines of different angles. Each
line represents a corresponding angle marked on the needle guide bracket.