
User's Manual


Acclarix LX9 Series Diagnostic Ultrasound System User Manual Features
- 100 -
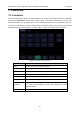
7.2 Body Mark
Body Mark allows you add a body mark graphic to an image and indicate the location of the
transducer using a transducer icon on that graphic. The Body Mark function is invoked by pressing the
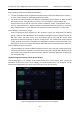
<Body Mark> hard key on the console. Figure 7-2 shows an example touch screen for Body Mark.
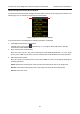
The main portion of the screen shows a grid of body marks that are pre-defined in pre-sets. See
section 10 for details on how to configure these. The bottom portion of the screen shows controls
available while the Body Mark function is active. Table 7-2 gives an overview of these controls.
Figure 7-2 Body Mark Touch Screen
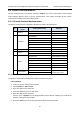
Button
Description
Delete
Delete the graphics on the image area
Angle
Rotates the transducer icon on the body mark graphic.
Exit
Press to exit the body mark function.
Table 7-2 Body Mark Touch Screen Description
Adding a body mark:
1. Invoke the Body Mark function
The default body mark graphic appears on the main screen, with the transducer icon shown in the
default position.
2. Select a desired body mark graphic on the touch screen, that graphic replaces the default.
3. Move the position of transducer icon as needed. The orientation of the transducer icon can be
changed with the Angle touch screen key or <Angle> knob on the console.
4. Press <Update> key and roll the trackball to move the position of body mark graphic.
The <Update> key can be used to toggle between moving the transducer icon and moving the
body mark graphic
5. Press <Set> to complete the adding of a body mark.
NOTE:
In dual image or quad imaging mode, body mark can be added separately on each image.