
Product Manual


F6 and F6 Express Fetal & Maternal Monitor User Manual Fetal Monitoring
- 52 -
3 Select -20 bpm (default), 0 bpm or +20bpm.
4 Select OK.
This preset FHR2 offset will be printed on the recorder paper every 10 minutes.
“FHR2: -20bpm”: the FHR2 trace is 20bpm lower than it really is.
“FHR2: +20bpm”: the FHR2 trace is 20bpm higher than it really is.
7.5 Monitoring Uterine Activity Externally
7.5.1 Parts Required
1) TOCO transducer 2) Belt
7.5.2 TOCO Monitoring Procedure
1) Placing Transducer Belt
Place the transducer belts across the bed, ensuring that the belt will be around the abdomen
when it is fastened. Lay the patient on the bed.
Alternatively, the patient can take a sitting position. Arrange the belt around her abdomen.
2) Fixing the Transducer
Wipe any gel remaining on abdomen around the fundus area.
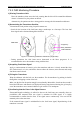
Place the TOCO transducer on the patient’s abdomen, which is flat and approximately 3 cm
away from the fundus, e.g. slightly above the umbilicus on the left or on the right. The
position should be different for different purposes: place the transducer close to the fetal
buttocks for NST, and place it on fetal back in delivery.
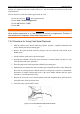
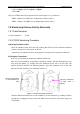
Figure 7-4 Positioning TOCO Transducer
Wrap the abdomen with the belt over the transducer. Fix the transducer by pushing its buckle
through the overlapping section of the belt. Make sure the belt fits the patient snugly but
comfortably.
Place the transducer
on fetal buttocks for
NST
Place the transducer
on fetal back in
delivery