
Product Manual


SE-601 Series Electrocardiograph User Manual System Setup
- 74 -
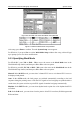
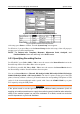
Figure 9-3 SE-601B / SE-601C Work Mode Setup Window
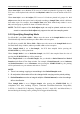
Figure 9-4 SE-601A Work Mode Setup Window
After setup, press Enter to confirm. Then the System Setup screen appears.
For SE-601A, if you press Esc to exit the Work Mode Setup window after setup, a hint will pop
up to prompt you to save these modifications.
9.1.1 Specifying Work Mode
For SE-601B/C, press Tab or Shift + Tab to move the cursor to the Work Mode item in the
Work Mode Setup window, and then press F1 or F2 to select an option.
For SE-601A, press F1, F2, Tab or Shift + Tab to move the cursor to the Work Mode item in the
Work Mode Setup window, and then press F3 or F4 to select an option.
Manual: In the MANU mode, you can select 3-channel ECG waves or 6-channel ECG waves to
be displayed and printed.
Auto: In the AUTO mode, the lead groups are switched automatically according to the lead
sequence during the printing course. After the ECG signals of one lead group are printed within a
certain time, the system switches to print ECG signals of another lead group automatically.
Rhythm: In the RHYT mode, you can select rhythm leads to print 60s or 20s rhythm-lead ECG
waveform.
R-R: In the R-R mode, you can select a lead to print its 180s ECG waveform, R-R histogram and
R-R trend chart.