E-2ECGCNG-I-0513 Operator’s Instruction Manual NEW DUAL-DISC FLOOR GRINDER Electric • Gasoline 2EC-NG-1.5 ELECTRIC MODEL 2GC-NG-11H GASOLINE MODEL 100 Thomas Johnson Drive, Frederick, MD 21702-4600 USA Phone (301) 663-1600 • 1-800-638-3326 Fax (301) 663-1607 • 1-800-447-3326 Website: www.edcoinc.com • Email: sales@edcoinc.
EDITABLE PAGE SAVE FOR CHANGES ONLY E-2ECGCNG-I-0513 READ AND UNDERSTAND THE OPERATORS INSTRUCTION MANUAL THOROUGHLY BEFORE ATTEMPTING TO OPERATE THIS EQUIPMENT. Death or serious injury could occur if this machine is used improperly. SAFETY MESSAGES SAFETY MESSAGES • Safety Instructions are proceeded by a graphic alert symbol of DANGER, WARNING, or CAUTION. Indicates an imminent hazard which, if not avoided, will result in death or serious injury.
E-2ECGCNG-I-0513 Table of Contents Section Page Number Safety/Warnings...................................................................................................... 2 Specifications/Table of Contents............................................................................. 3 Operating Controls.................................................................................................. 4 Getting started with your new grinder..................................................................
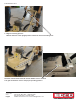
E-2ECGCNG-I-0513 Operating Controls Please Note: Controls shown are for the model indicated. The location of these controls may vary on the different models. Due to improvements and changes in the equipment, the illustrations shown may vary from the actual machine.
E-2ECGCNG-I-0513 Getting started with your new grinder 1. Loading tools Lean the machine back on the handle to expose the work area and load the proper tools for your job. Electric machines should be unplugged, gas machines should have the spark plug wire removed. Once all tools are in the proper position return the machine to upright. Remember if you are using tools with PCD’s on Stripserts they have a leading edge and must be loaded as such. Also, remember both of the discs turn in direction of arrows.
E-2ECGCNG-I-0513 2. Begin the leveling process With the machine in the upright position release the level lock locking lever. Rock the machine back and forth until the bubble level in centered. This gets the machine close to the proper operating position. Printed in USA ©2013 Page 6 100 Thomas Johnson Drive, Frederick, MD 21702-4600 USA Phone (301) 663-1600 • 1-800-638-3326 Fax (301) 663-1607 • 1-800-447-3326 Website: www.edcoinc.com • Email: sales@edcoinc.
E-2ECGCNG-I-0513 Return level lock to the locked position. Lean back slightly on the handle to get the tools off of the surface and start the machine. Lower the machine to the surface and do a short touch pass on the concrete. You are looking for two complete circles. If you see partial circles repeat the process until complete circles are achieved. 100 Thomas Johnson Drive, Frederick, MD 21702-4600 USA Phone (301) 663-1600 • 1-800-638-3326 Fax (301) 663-1607 • 1-800-447-3326 Website: www.edcoinc.
E-2ECGCNG-I-0513 The bubble on the machine will not necessarily be centered once optimum operating position is achieved. It will also float back and forth during grinding. Level on your machine may not be the same as pictured above. 3. Attach the skirt - Printed in USA ©2013 Page 8 100 Thomas Johnson Drive, Frederick, MD 21702-4600 USA Phone (301) 663-1600 • 1-800-638-3326 Fax (301) 663-1607 • 1-800-447-3326 Website: www.edcoinc.com • Email: sales@edcoinc.
E-2ECGCNG-I-0513 Attach the skirt - continued. Once the machine is leveled to the concrete attach the velcro skirt with approximately 1/4” space underneath all around. You are now ready to grind. Final note - If you are using tools that have no directionality they should be rotated occasionally for longer life and the machine should be readjusted as needed. 100 Thomas Johnson Drive, Frederick, MD 21702-4600 USA Phone (301) 663-1600 • 1-800-638-3326 Fax (301) 663-1607 • 1-800-447-3326 Website: www.
E-2ECGCNG-I-0513 • • • Operating Instructions • Read and understand all operating instructions before operating this equipment. Death or serious injury can result if this machine is used improperly. • Concrete grinders are designed to be used to grind flat horizontal concrete slabs using EDCO approved accessories. The machines are equipped with gasoline/propane engines and electric motors. They are designed to be controlled by a single operator from a position at the rear of the machine.
Operating Instructions E-2ECGCNG-I-0513 • BEFORE STARTING THE ENGINE OR MOTOR: Raise the front of the machine clear of the working surface. • START ENGINE/MOTOR AND ALLOW IT TO REACH OPERATING SPEED. Position the grinder at the starting point. Bring the engine to full speed. Lower the machine onto the slab surface. Use a slow sweeping motion from left right and back continously, and do not force the machine into the work, the engine or motor should not strain when grinding.
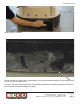
E-2ECGCNG-I-0513 PROCEDURE FOR ATTACHING A VACUUM Vac Port If using a vacuum for dust control attach it to the vacuum port at the rear of the machine which is on the handle as pictured above, securing it with clamps. The port is circled in the above photo. The vacuum port is in the same location on both the gas and electric models. PROCEDURE FOR ADJUSTING OR REPLACING DRIVE BELT NOTE: The following applies to all machines. They all adjust in the same manner.
E-2ECGCNG-I-0513 FOR USE WITH QUICK-CHANGE MULTI-ACCESSORY DISC Dyma-Serts™ (Patented) Accessory case Spring clip This is a DYMA-SERT, rotate the DYMA-SERT only, not the case. Use a hex wrench to remove hex screw to allow rotation of blade. DYMA-SERTS™ are diamond segments welded to snapin plates for faster, controlled, dry grinding, and are ideal for removing trowel marks, rough finish, rain spots, large volume projects, paints, thin mastics, epoxy and urethane coatings, or polymer enhanced surfaces.
E-2ECGCNG-I-0513 MAINTENANCE INSTRUCTIONS 1. Disconnect the machine from the power source. Remove the spark plug lead on the propane and gasoline engine models or disconnect the supply voltage connector at the machine on electric models before performing any maintenance. All maintenance to be performed by qualified personnel. 2. Never work under equipment without first properly securing the equipment to prevent it from moving or falling. Always work on a flat and level surface. 3.
E-2ECGCNG-I-0513 Repairs are to be performed by approved EDCO repair technicians. Read and follow all instructions in the Engine Manufacturer’s Owner’s manual.
E-2ECGCNG-I-0513 LIMITED EQUIPMENT WARRANTY OF SALE - TERMS & CONDITIONS Equipment Development Company, Inc. herein referred to as EDCO (Seller) warrants that each new unit manufactured by EDCO to be free from defects in material and workmanship in normal use and service for a period of (1) one year (except for the cutter drum assembly on all model concrete/asphalt planes, in which case the warranty period shall be 90 days) from date of shipment to the original retail or equipment rental center owner. 2.