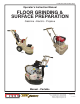
E-SEC,2EC,2GC-P,4GC-I-0512 Operator’s Instruction Manual FLOOR GRINDING & SURFACE PREPARATION Gasoline • Electric • Propane SEC 2EC, 2GC, 2GC-P 4EC, 4GC, 4GC-P Manual - Portable 100 Thomas Johnson Drive, Frederick, MD 21702-4600 USA Phone (301) 663-1600 • 1-800-638-3326 Fax (301) 663-1607 • 1-800-447-3326 Website: www.contrxsystems.com Email: sales@contrxsystems.
E-SEC,2EC,2GC-P,4GC-I-0512 READ AND UNDERSTAND THE OPERATORS INSTRUCTION MANUAL THOROUGHLY BEFORE ATTEMPTING TO OPERATE THIS EQUIPMENT. Death or serious injury could occur if this machine is used improperly. SAFETY MESSAGES SAFETY MESSAGES • Safety Instructions are proceeded by a graphic alert symbol of DANGER, WARNING, or CAUTION. Indicates an imminent hazard which, if not avoided, will result in death or serious injury.
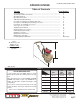
E-SEC,2EC,2GC-P,4GC-I-0512 SPECIFICATIONS Section Table of Contents Page Number Safety/Warnings...................................................................................................... Specifications/Table of Contents............................................................................. Operating Controls.................................................................................................. Operating Instructions.............................................................
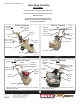
E-SEC,2EC,2GC-P,4GC-I-0512 Operating Controls Please Note: Controls shown are for the model indicated. The location of these controls may vary on the different models. Due to improvements and changes in the equipment, the illustration shown may vary from the actual machine.
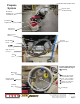
E-SEC,2EC,2GC-P,4GC-I-0512 Propane System Propane Tank (20 lb horizontal) Red Arrow Pointing “Up” Tank Bottom #1 Main Power Adjustment Vapor Hose (Low Pressure) High Pressure LP Hose #2 Idle Mixture Screw Vacuum Fuelock - Filter Dry-Gas Regulator High Pressure LP Hose Vacuum Hose Propane Tank (P/N 5130) Horizontal Mount (Vapor Withdrawal) Main Fuel Valve Propane Tank (20 lb horizontal) NOTE: The Red arrow on the tank will be pointing “up”.
E-SEC,2EC,2GC-P,4GC-I-0512 Operating Instructions • Read and understand all operating instructions before operating this equipment. Death or serious injury can result if this machine is used improperly. • Concrete grinders are designed to be used to grind flat horizontal concrete slabs using EDCO approved accessories. The machines are equipped with gasoline/propane engines and electric motors. They are designed to be controlled by a single operator from a position at the rear of the machine.
E-SEC,2EC,2GC-P,4GC-I-0512 Operating Instructions • BEFORE STARTING THE ENGINE: Raise the front of the machine clear of the working surface. • START ENGINE AND ALLOW IT TO REACH OPERATING SPEED. Position the grinder at the starting point. Bring the engine to full speed. Lower the machine onto the slab surface. Use a slow sweeping motion from left right and back continously, and do not force the machine into the work, the engine or motor should not strain when grinding.
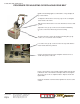
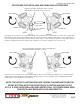
E-SEC,2EC,2GC-P,4GC-I-0512 PROCEDURE FOR ADJUSTING OR REPLACING DRIVE BELT NOTE: The following applies to all machines. They all adjust in the same manner. To adjust the drive belt loosen four (4) cap screws securing the motor mount to the frame. Slide the motor mount to the rear of the machine to increase belt tension. Tighten the four (4) cap screws loosened earlier maintaining pressure on the motor mount to prevent loosening.
E-SEC,2EC,2GC-P,4GC-I-0512 PROCEDURE FOR INSTALLING AND REMOVING ACCESSORIES Place wooden block against this surface and tap with hammer or mallet to remove accessory MULTI-DISC MULTI-DISC This is the part of the Dyma-Sert that is rotated 180° LH Multi-disc Not the DYMASERT case.
E-SEC,2EC,2GC-P,4GC-I-0512 INSTRUCTIONS FOR CHANGING ACCESSORIES 1. Disconnect the machine from the power source before performing any work on the equipment. To disconnect the power source remove the spark plug lead on gasoline and propane models or unplug the electrical models at the grinder. The scarifiers can be added or removed from the case without disturbing the case. One end of the scarifier is short and has a tab.
E-SEC,2EC,2GC-P,4GC-I-0512 THREE TYPES OF ACCESSORIES Use a hex wrench to remove hex screw to allow rotation of blade. SILABIDE PAD INSTALLATION MULTI-DISC Roll Pin Threaded Hub Hub Stud Non Spin Tab (3) Pad Driver Disc This is a STRIP-SERT, rotate this blade to expose a new cutting surface. There are four (4) cutting surfaces on each blade. Flat Washer Cap Screw Silabide Pad Exploded view of Silabide Pad assembly.
E-SEC,2EC,2GC-P,4GC-I-0512 GRINDER/SURFACER ACCESSORIES (for the models listed in this manual) Dyma-Serts (Patented) DYMA-SERTS are diamond segments welded to snapin plates for faster, controlled, dry grinding, and are ideal for removing trowel marks, rough finish, rain spots, large volume projects, paints, thin mastics, epoxy and urethane coatings, or polymer enhanced surfaces.
E-SEC,2EC,2GC-P,4GC-I-0512 PROCEDURE FOR LUBRICATING FLANGE BEARINGS Inspection hole Inspection hole Gear case Gear case The procedure is the same for two or four disc machines. The hood has to be removed to access the grease points on the flange bearings. The single disc grinder is lubricated through the access hole on the front of the machine and under the belt cover. The grease points are circled in the photos above.
E-SEC,2EC,2GC-P,4GC-I-0512 MAINTENANCE INSTRUCTIONS 1. Disconnect the machine from the power source. Remove the spark plug lead on the propane and gasoline engine models or disconnect the supply voltage connector at the machine on electric models before performing any maintenance. All maintenance to be performed by qualified personnel. 2. Never work under equipment without first properly securing the equipment to prevent it from moving or falling. Always work on a flat and level surface. 3.
E-SEC,2EC,2GC-P,4GC-I-0512 Repairs are to be performed by approved EDCO repair technicians. Read and follow all instructions in the Engine Manufacturer’s Owner’s manual.
E-SEC,2EC,2GC-P,4GC-I-0512 LIMITED EQUIPMENT WARRANTY OF SALE – TERMS & CONDITIONS Equipment Development Company, Inc.