
User guide


Printed in USA
TVW ©2012
Page 9
E-SEC,2EC,2GC-P,4GC-I-0512
100 Thomas Johnson Drive, Frederick, MD 21702-4600 USA
Phone (301) 663-1600 • 1-800-638-3326
Fax (301) 663-1607 • 1-800-447-3326
Website: www.contrxsystems.com
Email: sales@contrxsystems.com
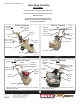
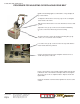
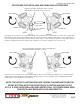
PROCEDURE FOR INSTALLING AND REMOVING ACCESSORIES
To install an accessory, there are several different types but all install in the same manner, use a brass rod or similar mal-
able material to drive the wooden wedge into place as shown in the above and below illustrations, note on which side of
the accessory the wooden wedge is positioned (near center of disc). Never mix worn or used accessories with new ones.
It will cause vibration and an uneven work surface. Replace accessories in complete sets, never mix sets.
To remove an accessory, there are several different types, all are removed in the same manner, use a wooden block as
explained in the above illustration. Never hammer directly on any accessory, damage to the self adjusting system will
result and the accessory will have to be replaced.
Place wooden block against this surface and tap
with hammer or mallet to remove accessory
NOTE: THE ABOVE ILLUSTRATIONS ARE VIEWING THE MACHINE FROM THE
FRONT BOTTOM. NOTE THE DIRECTION OF ROTATION AND MULTI-DISC
STYLE. IF DISCS ARE REPLACED AND INSERTS FALL OUT WHEN BEING USED
THE DISCS HAVE BEEN INSTALLED INCORRECTLY.
Place wooden block against this surface of the Strip-Sert
and tap with hammer or mallet to remove.
LH Multi-disc
LH Multi-disc
RH Multi-disc
RH Multi-disc
MULTI-DISC
MULTI-DISC
MULTI-DISC
MULTI-DISC
This is the part of
the Dyma-Sert that
is rotated 180°
Not the DYMA-
SERT case.