
Instruction Manual


E-SS20/16A-I-0607
Printed in USA
©2007 TVW
Page 10
100 Thomas Johnson Drive, Frederick, MD 21702-4600 USA
Phone (301) 663-1600 • 1-800-638-3326
Fax (301) 663-1607 • 1-800-447-3326
Website: www.edcoinc.com
Email: sales@edcoinc.com
®
A Division of Equipment Development Company, Inc.
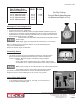
Before Changing Blades:
Inspect all blades carefully before installing. Check for cracks, loose segments and oversize, worn, or
out-of-round arbor holes (See page 13). Do not use any questionable blade since serious personal injury
and/or damage to property can result. Do not use warped, twisted, or out-of-balance blades. Unbalanced
blades will wear excessively, vibrate and damage both arbor shaft and bearings.
For safety reasons, EDCO does not recommend the use of any abrasive blades. Abrasive blades can
break and cause serious personal injury to operator and/or bystanders. If abrasive blades are used by
choice, only use those which are marked as reinforced abrasive blades.
• Make sure you have the proper blade for the job. Determine the hardness and composition of the slab. Give your
dealer complete information including whether re-bars are present, the desired depth of the cut, and the length of the
cut. If in doubt, contact the blade manufacturer. Never exceed the maximum operating speed of the blade. Be sure to
match the blade speed rating with the arbor shaft speed on the machine.
Do not remove or lift the bladeguard unless
blade has stopped completely and the engine is off.
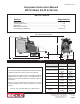
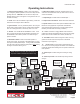
Changing Blades:
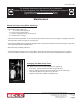
• Raise blade guard and remove arbor shaft nut, washer
and blade retaining cap. (Figure 14) Both the arbor shaft
nut and the at of the backing plate require a 1 1/2” wrench
two are provided with the machine.
• Clean the arbor shaft, backing plate, and blade cap and
inspect for damage or wear. Make sure the arbor shaft
threads are clean and undamaged. If any damage is de
tected, consult your EDCO dealer or the EDCO factory.
• Carefully place the blade on the arbor shaft and turn until
the drive pin lines up with the hole in the backing plate.
(Figure 11) Do not use a blade without a drive pin.
• Fit the washer and arbor shaft nut and retighten
the nut using the two 1 1/2” wrenches.
(Figures 12 & 13)
• Secure the blade guard in the operating
position before starting engine.
Figure 11
Figure 12
Figure 13
Figure 14
Arbor Shaft Nut
Washer
Blade Retaining
Cap
Arbor Shaft
Backing Plate