
Corporation Viper Shocks Installation Instructions
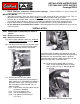


Step 9 Rear IAS shocks
IAS shock reuses the O.E.M. large black clevis mount
and must be unscrewed from the shock body.
9(a) Mount clevis in vice with soft jaws, aluminum
preferred as not to mark up the clevis.
Screw jamb nut by hand until it hard stops at end of
threads (see Fig. 13).
Fig. 13
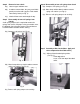
8(d) Apply Loctite to threads, screw rod end on by
hand until it hard stops, tighten jamb nut against
rod end with 1” wrench on rod end using a 7/8”
crowfoot wrench torque nut to 70 ft lbs.
(see Fig. 14).
Fig. 14
8(e) After removing from spring compressor, make
sure spring fits correctly in lower spring pocket.
(see Fig. 15)
Fig. 15
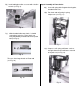
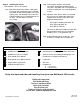
9(b) Using supplied crowfoot wrench (see Fig. 16)
Fig. 16
(Top photo – spanner wrench )
(Bottom photo – crowfoot wrench)
loosen shock body from clevis with ½” drive breaker
bar and crowfoot wrench (see Fig. 17).
Fig. 17
(From the factory, the shock body was torqued to the
clevis with Loctite, so it will require a bit of effort to
remove).
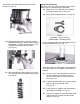
9(c ) Once the clevis and shock body are apart, the
threads need to be cleaned to remove any
grease, Loctite or dirt (use brake cleaner or
parts wash), etc.
9(d) Install the threaded collar on to shock seating it
against snap ring on the IAS shock
(see Fig. 18).
9(e) Install short clevis adapter jamb nut with holes
up towards shock body (see Fig. 18).
9(f) Screw clevis adapter nut on piston rod by hand
until threads stop, install 9/16 jamb nut with
Loctite (see Fig. 18).