
Corporation Automobile Parts User Manual


Catalog #3562, 3563, 3564, 3565
Rev. 3/06 Page 13 of 16
©2006 Edelbrock Corporation
Brochure #63-0047
Fuel
Tank
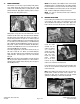
Disconnect two fuel lines, two hoses, and an electrical connection
with a ground wire. There is a center fuel pump sending unit
assembly lock ring holding assembly into tank. Using a hammer
and brass punch, gently strike open edge of lock ring in a counter
clockwise direction. Keep hitting until lock ring rotates enough to
release. Again blow or brush top area clean and carefully remove
the entire assembly. Be careful on removal! Take your time!
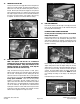
28. FUEL PUMP ASSEMBLY
With fuel pump assembly on bench, loosen and slide up the
lower plastic clamp on top of fuel pump. Now disconnect
electrical connection. On the bottom of the fuel pump, there is a
fuel strainer sock; remove the bottom strainer sock after marking
it so you can re-assemble in the original orientation.
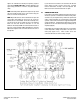
ALTERNATE PROCEDURE: LOWERING FUEL TANK
Suburbans (or trucks that you cannot remove the bed), require removal of the fuel tank(s). The fuel tank must be lowered from beneath the
vehicle. First drain the fuel, then disconnect the ground wire and the weather pack electrical connector. Then disconnect gas fill hose and vent
hose. Let the tank drop enough to gain access to the fuel lines, then disconnect fuel lines and remove tank from vehicle. Most tanks have two
mounting straps which must be removed.
Ground
Connection
Gas Fill Hose
Connection
Gas tank
mounting straps
Note: There is a kit supplied with the 3501 and 3502 that
provides you with new fuel line and clamps. Install the 3" length
of fuel hose onto the 3/8" steel tubing where the old fuel pump
junction hose was previously. Use the 3/8" hose clamp to secure
hose to steel tubing.
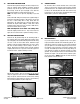
Note: You may want to replace the fuel sock at this time with a
new factory replacement. Use a small flat blade screwdriver to
gently pry around strainer and it will pop off. Carefully slide the
factory fuel pump out of the assembly. Install the new fuel pump
supplied in the kit into this assembly.