
Warranty


2.1B
2.1C
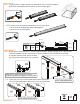
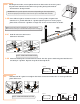
NOTE: Have the hex shaped indent facing up. Screw in until it is ush with bottom of nut so
it slides easily into bolt tracks. After inserting into bolt track, screw in until it holds in place.
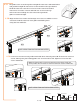
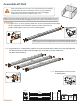
Assemble Right Wall
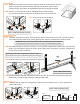
Hand tighten each set screw
to hold in place.
Prepare three F-1 wall proles. Slide set screws into both bolt tracks on one end of prole and
one bolt track on the other end. The single set screw will sit on the inside of the greenhouse
near the base when installed.
Make certain the pieces are in the correct positions before assembling.
Carefully follow the order of assembly to ensure an easy installation.
Wear proper safety gear including work shoes, gloves and goggles.
Prepare needed set screws as shown in step 1.1A
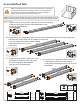
F-1
F-1
F-1
S-2A
S-2B 17
17
QTY
Prole
56”
56”
2F-7
F-1 3
WWW.RSIWW.COM
10 of 44
2.1A
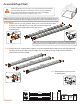
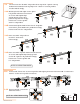
NOTE: Set screw in center bolt channel is used when installing optional
shelving units. Install F-7 prole with set screw near base until needed.
Prepare two F-7 corner proles. Slide set screws into all three bolt
tracks on one end and into two side bolt tracks on other end
of corner proles. Hand tighten each set screw
to hold in place.
F-7
F-7