
Warranty
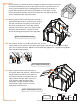


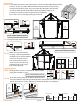

Lining up holes in door, install the D-3 door knobs
using the included screws.
10.5A
10.5B
D-3
D-2L
D-3
D-2R
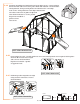
NOTE: VIEW FROM OUTSIDE.
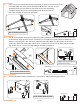
NOTE: VIEWS FROM OUTSIDE.
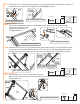
NOTE: VIEWS FROM OUTSIDE.
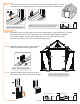
Repeat step 10.4A to install the right door.
Make sure the doors hang
properly, slide easily and look
straight. If you need to adjust
either one or both, loosen
the center bolts to either
raise or lower each door as
needed. Secure the center
bolts when nished.
10.4A
10.4B
10.4C
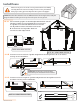
To install D-2L factory assembled door, remove the bolt aaching left door
track D-1L to F-7 prole. With the wheels facing inside, line up so they
roll into the left door track. As you roll the door along the track, make
certain it slides inside the B-3 door guide installed in step10.2.
Continue to roll door until it stops next to the bolt at
the center. Secure using the bolt you removed.
D-1L
D-2L
D-1R
D-2R
D-1R
D-2R
D-1L
D-2L
D-2R
D-2L
D-2L 1
D-2R 1
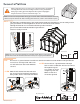
Factory Assembled Doors
QTY
From the inside, place the D-5 door guide bracket
into the channel in the base prole lining holes in bracket with holes in boom door. Use
two S-3 screws to secure. Repeat to install one bracket on each door.
S-3 2
Door Guide
QTY
Door Knob
QTY
D-3
2
NOTE: VIEW FROM INSIDE.
D-2L
B-3
B-3
WWW.RSIWW.COM
43 of 44
S-3
D-5
D-2R
D-2RD-2L