
Operation Manual


new surface on the steel becomes necessary, rotate the slot counter-clockwise one click. By
this means, approximately 28 pairs of “steeling” areas are available over the lifetime of the rod.
Because the knife edge can be pulled over a given pair of areas on the rods several thousand
times before the wear affects the rate or precision of the edge formation, the rods will not need
to be rotated very often and they can last a lifetime with normal household use. Replacement
rods are, however, available from the EdgeCraft Corporation.
CREATING THE PROFESSIONAL STEELED EDGE
The steeled edge is created simply by first sharpening the blade normally in Stage 1 and then
steeling in Stage 2. The highly accurate angle guides in Stage 1 and Stage 2 are set at precisely
the optimum angles to insure rapid and full development of the steeled edge. Fine microscopic
serrations are consequently created in Stage 2 while maintaining the geometry and sharpness
created in the Stage 1 sharpening step.
Step 1. Sharpen the blade fully in Stage 1 as described in the preceding section and
summarized below:
a. Pull the blade slowly through the left slot of stage 1. Repeat by pulling the blade
through the right slot of Stage 1.
b. Repeat (a) above by pulling the knife again through the left and right slots of
Stage 1. Check the blade edge to insure a burr has been fully formed along the
entire edge (See figures 4 and 5). Then proceed to Step 2.
Step 2. Steel the edge in Stage 2.
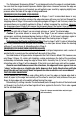
Move the blade forward over the left slot of Stage 2 and insert it between the guide plane
and the blade retaining spring (See Figure 8) as close as possible to the bolster or handle. The
face of the blade should be in intimate contact with the guide plane. Pull the blade toward you
as you press down lightly on the blade so the edge makes good contact with the steel rod (NOTE:
The miniature steel rod is stationary and not powered). Make sure the edge maintains steady
contact with the steel rod from the handle to the tip of the blade. Repeat this procedure making
a full stroke in the opposite right slot between that guide and the spring. You should repeat this
motion making alternating pairs of pulls until the edge is fully conditioned.
You need make only about 10 pairs of alternating pulls to develop a good edge. Making
another 10 pairs of alternating pulls will further refine the edge and remove virtually all remnants
of the burr left from pre-sharpening. You will now find the knife cuts exceedingly well.
RESHARPENING THE STEELED EDGE
Whenever your knives appear to lose their “bite” or to be slightly dull, you can recondition
the edge to its prior performance with only about 10 pairs of alternating pulls in Stage 2. You
will need more pulls than that only if you have used the knife heavily for an extended time.
Resharpen the edge in Stage 1 when you feel it is taking too long (too many strokes) to
recondition the edge in Stage 2 to its initial performance.
Because you can reestablish the microstructure along the steeled edge of your knives
so easily and so many times before it will be necessary to resharpen the edge, you will find
your knives last longer. Conventional steels lacking angle control will, in most hands, create a
rounded and dull the edge after steeling the edge only a few times, making it necessary to
resharpen the edge frequently, thus reducing the useful life of the knife.
9