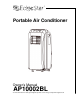
Portable Air Conditioner Owner’s Manual AP10002BL For more information on other great EdgeStar products on the web, go to http://www.edgestar.
Important Safety Information Improper handling can cause serious damage to the appliance and/or to the user. Please read the following safety information. Electrical Safety This unit is designed for indoor use only. Do not use the unit in extremely humid or wet environments. Do not spray water and wet the housing or control panel. Do not pull the unit by the cord. Always turn the unit off and unplug it from the outlet when cleaning.
Table of Contents IMPORTANT SAFETY INFORMATION ................................................................. I INTRODUCTION ................................................................................................... 1 PARTS IDENTIFICATION ..................................................................................... 2 FRONT VIEW ........................................................................................................ 2 BACK VIEW .............................................
Introduction Thank you for purchasing this EdgeStar portable air conditioner. We are glad you chose us. We believe that your purchase of this product opens a relationship between you and EdgeStar. We will provide the customer support needed to nurture that relationship. This manual contains important information regarding the proper installation, use and maintenance of your portable air conditioner. Following this manual will ensure that your product will work at its peak performance and efficiency.
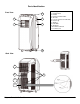
Parts Identification Front View Parts Key: 1. Control Panel 2. Handle 3. Remote Control Holder 4. Air Vent 5. Louvers (Vertical & Horizontal) 6. Castors (4) 7. Air Inlet 8. Filter Grill 9. Air Outlet 10. Power Cord Hook 11.
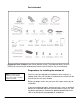
Parts Included Suggested Tools- Phillips Screw Driver (Medium sized), Tape Measure/Ruler, Scissors, Saw (In the event that your window panel needs to be cut down in size for installation). Preparations for installing the window kit NOTE: You may need to contact your electrician if your room’s circuit is not able to power your unit. You must vent your portable air conditioner when running in it cooling mode. Your unit includes a window exhaust kit that can be used to vent the unit out a window.
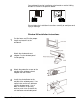
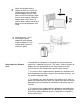
Your window kit can be installed on a horizontal or vertical sliding window as shown in the pictures below. Please follow the installation instructions carefully to avoid personal injury or damage. Window Kit Installation Instructions 1 Cut the foam seal B to the proper length and attach it to the windowsill. 2 Attach the window exhaust adapter C to the window panel inside opening. 3 Attach the protective screen to the outside of the window exhaust adapter with two screws.
3 a) Attach the window panel to the window panel If the inner width of the window is less than 28” (718 mm) wide: 1) Remove the adjustment panel from the window panel, and cut the window panel to the same width as the panel. 2) Open the window sash and place the window panel on the windowsill. 3) Secure the window panel to the windowsill. b) If the inner width of the window is between 28” (718mm) and 36.5” (927mm) inclusive: 1) Open the window sash and place the adjustable window panel on the windowsill.
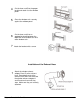
4 Cut the foam seal B to the proper length and attach it to the window panel. 5 Close the window sash securely against the window panel. 6 7 Cut the foam seal A to an appropriate length between the top of the inner window sash and outer window sash. Attach the bracket with a screw. Installation of the Exhaust Hose 1 Attach the window exhaust adapter B and C to the exhaust hose.
2 3 Attach the window exhaust adapter A to the unit. Insert the two projections on the window exhaust adapter A into the two holes on the unit and firmly attach them to each other by sliding the adapter down until it clicks. To remove please make sure to push down on the two projections and lift up. Attach the hose. Insert the window exhaust adapter B to the window exhaust adapter C in the window panel and turn it to lock it in place.
Do not lengthen the exhaust hose by adding additional hoses or attachments. Warning: Longer hoses are not recommended. Installation of the Drain Hose Note: Drainage hose must be installed before using this unit to as not doing so can occur in a block in the drain and prevent the unit from functioning normally. 1 Remove the drain cap from drain port.
2 3 4 Attach the drain hose clamp to the back panel of the air conditioner near the drain port with the screw. Attach one end of the drain hose to the drain port with the clip provided. Insert the rubber plug into the other end of the drain hose and secure clip provided. Draining the Unit When the portable air conditioner is in cooling mode, or dehumidify mode, it will remove moisture from the air.
Installing the Filter Your portable air conditioner ships with a pre-filter. It is recommended you replace the filter every two to three months, or as needed. It is necessary to clean the pre-filter periodically. Follow the steps below to install the carbon filter: 1. Shut off the unit if it is on. In the rear of the unit pull the air filter grill from the side. 2. Place the carbon filter between the grille and the pre-filter. 3. Close the grille.
Operating Instructions Control Panel Overview On/Off Button “+” / “-“ Button Mode Button Fan Speed Water Full Louver Direction 11 Press the button once to manually turn the unit on. Press once more to turn the unit off. In COOL mode, press “-“once, the set temperature will decrease by 1° degree Fahrenheit. Continue to press to get to desired temperature. Press “+” to increase, follow same instructions as above. Press MODE button repeatedly to cycle between modes: Cooling, Dry, and Fan Only mode.
Directional Louvers Remote Control Overview The remote control is used to operate all of your portable air conditioners functions. Use the remote control to change modes, fan speed, timer, and temperature settings and sleep mode. NOTES: Be careful not drop the remote control. Do not place the remote control in a location exposed to direct sunlight. Mode Timer Swing- (not available on this unit) Sleep Timer Button Function Power Powers the unit on or off.
AAA NOTE: The exhaust hose must be used in cooling mode in order to cool a room. Installing the batteries AAA AAA CAUTION: Use only AAA batteries. Remove the batteries if the remote control will not be used for one month or longer. Do not attempt to recharge batteries not designed to be recharged. All batteries should be replaced at the same time. Do not mix old and new batteries. Do not dispose of batteries in a fire as they may explode. AAA 1) Remove the cover on the back of the remote control.
Timer: The timer can be used to either turn the unit on or off after a number of elapsed hours. The timer is adjustable between 0.5-24 hours in one hour increments. . How to set the unit to automatically turn on: 1) Press the Timer button on the remote control while the unit is powered off. 2) Use the Up and Down buttons on the remote to set the time (displayed in hours) you want to pass before the unit turns on. After the selected time passes, the unit will automatically turn on.
Minimize the amount of humidity in the room. For example, run the unit as a dehumidifier. To prolong the compressor's life, please wait at least 3 minutes before turning the unit back on after shutting it off. Inspect and keep the pre-filters clean by cleaning regularly. Inspect and replace the activated carbon filters regularly. Perform routine maintenance. Maintenance Clean the air conditioner and filters regularly to maximize performance and efficiency, and prolong the unit’s life.
Preparation for Storage If you are not going to be using the unit for an extended period of time, follow the instructions below before storing your unit: 1) Drain all the water from the unit’s reservoir. Operate the unit in fan mode for a few hours to thoroughly dry any moisture left on the coils inside the unit. 2) Power off the unit, and clean or change the filters. 3) Unplug and carefully wind the power cord. 4) Remove the exhaust hose and duct connectors and keep them in a safe place.
Troubleshooting Follow the troubleshooting guide below to resolve common issues. Issue My air conditioner is not functioning at all. Possible Cause Unit is not receiving power. LCDI power cord is tripped. Insufficient power. Water reservoir is full. Control panel is disconnected. My remote control does not work and the indicator light on remote does not turn on. My air conditioner is making a loud noise. My air conditioner is making a continuous metallic knocking or pinging sound.
Issue Possible Cause Solution My air conditioner is not cooling at all. Unit is not operating in cooling mode. Set the unit to be in cooling mode, and lower the set temperature (pg. 13). The compressor is not on. The compressor may take up to 3 minutes to turn on, or longer if it is too warm. Lower the room temperature to be below 90°F degrees. Clean the filters. (pg. 16) Remove any obstructions in the exhaust hose and port. The unit must be vented. (pg.
Issue Possible Cause Solution My air conditioner is not cooling at all. Unit is not operating in cooling mode. Set the unit to be in cooling mode, and lower the set temperature (pg. 13). The compressor is not on. The compressor may take up to 3 minutes to turn on, or longer if it is too warm. Lower the room temperature to be below 90°F degrees. Clean the filters. (pg. 16) Remove any obstructions in the exhaust hose and port. The unit must be vented. (pg.
Specifications Edgestar Portable Air Conditioner Description of product Portable Air Conditioner Model AP10002BL Voltage/Frequency AC 115V~60Hz Input Power 1120W Current 9.0 A Color Black Coolant R-410A Timer 24 Hour Dimensions WxHxD 13 3/8” x 30 11/16” x 15 1/2” Weight 52.
EdgeStar Limited Warranty One (1) Year Parts & Ninety (90) Days Labor This product is warranted by EdgeStar to be free from defective workmanship and materials, subject to any conditions set forth as follows: WHAT IS COVERED: LABOR: For a period of NINETY (90) DAYS from the date of original purchase, labor will be performed free of charge at an authorized EdgeStar repair facility.