Portable Air Conditioner AP13500HG Owner’s Manual For more information on other great EdgeStar products on the web, go to https://www.edgestar.com To use the EdgeStar self-diagnostic tool, go to https://support.edgestar.com V2.
Important Safety Information Improper handling can cause serious damage to the appliance and / or to the user. Please read the following safety information. Electrical Safety Improper handling can cause serious damage to the appliance and/or to the user. Please read the following safety information. This unit is designed for indoor use only. Do not use the unit in extremely humid or wet environments. Do not wet the housing or control panel. Do not pull the unit by the cord.
Operation of Safety Plug Note: Electrical products should not be disposed of with household waste. Please contact your local recycling center for more information about how to recycle electronic waste. Your portable air conditioner is supplied with a Leakage-Current Detection and Interruption (LCDI) safety plug. This device provides protection to reduce the risk of fire due to arcing faults in the power supply cord.
Table of Contents IMPORTANT SAFETY INFORMATION ......................................................................................................................... I OPERATION OF SAFETY PLUG .................................................................................................................................. II TABLE OF CONTENTS ................................................................................................................................................ 1 INTRODUCTION ....
Introduction Thank you for purchasing this EdgeStar portable air conditioner. We hope that this purchase will be the beginning of a lasting and rewarding relationship between you and EdgeStar. We will provide the customer support and exemplary products necessary to nurture that relationship. This manual contains important information regarding the proper installation, use, and maintenance of your portable air conditioner.
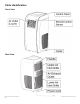
Parts Identification Front View Back View 3
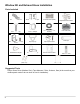
Window Kit and Exhaust Hose Installation Parts Included Flexible Exhaust Hose Window Exhaust Adapter Protective Grille (baffle) Adjustable Window Slider “Joint A” Adapter Foam Seal (Adhesive Backed) Foam Sash Seal Pipe Hoop (2) Pipe Clip and Screw Power Cord Hook (2) Remote Control Holster Wood Screws (4) Window Lock Bracket and Screw Rubber Drain Stopper Battery (AAA 1.
Preparations for Installing the Window Kit You must vent your portable air conditioner when running it in Cool or Dry (Dehumidify) mode. Your unit includes a window exhaust kit that can be used to vent moisture out of a window. Before you begin, make sure that you have all the parts necessary for installation and that a suitable location is picked. If you have multiple windows, choose one that is near an electrical outlet that will be able to provide sufficient power to your unit.
2. Assemble Window Panel To assemble the window panel, start by measuring the width of the window opening where the window panel will be installed. • If the inner width of the window is between 22” and 24” wide: o Remove the adjustment panel from the window panel, and cut the window panel to the same width as the window opening. Cut the side farthest from the exhaust opening. Note: The window panel cannot be installed in windows less than 22” wide as you will be unable to shut the exhaust cover.
3. Attach Foam Seal to Window Panel There are two (2) types of foam seal strips included with your window panel kit. Locate the foam seal that has adhesive backing. This will be used to minimize air leakage on the top and bottom edges of the window panel. • Verify your window panel has been extended to the correct width. • Cut the foam seal to the correct length to cover the entire width of the window panel. • Attach the adhesive backed foam seal strip to both the top and the bottom of the window panel. 4.
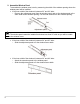
• If the inner width of the window is between 36” and 64” wide, attach the window panel to the window sill with four (4) wood screws. 5. Close Window Sash Close the window sash firmly against the window panel. 6. Attach Window Lock Bracket • • • Ensure that the window sash is closed firmly against the Window Panel. Place the Window Lock Bracket as shown in the below image. Attach the bracket with a screw. 7. Install Sash Seal • • Cut the foam seal to the appropriate length.
Installation in a Sliding Window 1. Attach Grille Attach the protective grille (baffle) to the window panel. Push on the grille firmly to ensure that its four raised tabs are attached securely into the window panel. 2. Assemble Window Panel To assemble the window panel, start by measuring the width of the window opening where the window panel will be installed.
• If the inner width of the window is between 36” and 64” tall: o Attach the extension panel to the window panel. o Slide the adjustment panel to fit the window frame height. 3. Attach Foam Seal to Window Panel There are two (2) types of foam seal strips included with your window panel kit. Locate the foam seal that has the adhesive backing. This will be used to minimize air leakage on the top and bottom edges of the window panel. • Verify that your window panel has been extended to the correct width.
• If the inner width of the window is between 36” and 64” wide, attach the window panel to the window sill with four (4) wood screws. 5. Close Window Sash • Slide the window sash firmly against the window panel. 6. Attach Window Lock Bracket Ensure that the window sash is closed firmly against the Window Panel. • Ensure that the window sash is closed firmly against the Window Panel. • Place the Window Lock Bracket as shown in the below image. • Attach the bracket with a screw.
7. Install Sash Seal • • Cut the foam seal to an appropriate length. Insert the foam seal between the top of the inner window and the outer window to create a proper seal. Note: The sash seal is thicker than the window panel seal and does not include an adhesive backing. Installation of the Exhaust Hose 1. Assemble Window Exhaust Adapter • • Connect the two pieces of the Window Exhaust Adapter. Press each side together and firmly snap the clasps into the corresponding slots. 2.
3. Attach “Joint A” Adapter to Exhaust Hose • • Press the round end of Joint A against the open end of the Exhaust Hose. Rotate the hose counterclockwise into Joint A. 4. Attach Hose Assembly to Unit • • • 13 Align the cutout tabs on the open end of Joint A with the two tabs located on the air exhaust outlet on the back of the unit. Press downward until the tabs click securely in place. To remove, press each of the locking tabs and lift upward.
Notes About the Exhaust Hose Your portable air conditioner is designed to exhaust condensed water that is collected from the air. This water, in either gaseous or droplet form, will be expelled out of the exhaust port of the unit. Please take this into account when deciding how to vent it. 1. The exhaust hose supplied with the portable air conditioner can be extended up to approximately 48 inches; however for maximum efficiency, use the shortest length possible. 2.
Draining the Unit Moisture that is collected during the Cool and Dry (dehumidify) modes will condense in an internal tank and will then be evaporated and exhausted out of the exhaust hose. In most cases, there will be no need to manually drain your portable air conditioner; however, in humid conditions the internal tank may fill completely which will cause the unit to automatically shut off. When the internal tank is full, an alarm will sound and the LED window will display the error code “H8”.
Step 3 Attach one end of the drain hose to the drain port with the pipe hoop provided. Step 4 Insert the rubber plug into the other end of the drain hose, secure it with the pipe hoop and attach it to the drain pipe clip. Manual Drainage When the internal tank is full the LED window will display the error code “H8”. When this occurs, the tank must be drained manually into a drain pan. To drain the tank manually: 1. 2. 3. 4. 5. 6. Remove the drain pipe from the pipe clip on the back of the unit.
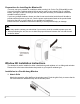
Finishing Installation 1. Install the Remote Control Holster into the groove located on the side of the unit as shown below. The Remote Control Holster provides a convenient location to store your remote control. 2. Install the Power Cord Hooks by sliding each hook into the grooves located on the back and left side of the unit until they click into place. The Power Cord Hooks will allow a convenient place to wind the power cord when not in use.
Operating Instructions Control Panel Overview On / Off Mode Select Buttons Fan Speed Timer Mode Sleep Mode 18 Press this button once to manually turn the unit on. Press this button once more to turn the unit off. Press the MODE button to cycle between modes: COOL à DRY à FAN à HEAT. COOL: The cool indicator is bright. The display will show the set temperature (61°F – 86°F). DRY: The dehumidify indicator is bright. The display will be blank. FAN: The fan indicator is bright. The display will be blank.
Remote Control The included universal remote control is used to operate all of your portable air conditioner’s functions. Use the remote control to change modes, fan speed, timer, and temperature settings. Note: Be careful not to drop the remote control. Do not place the remote control in a location exposed to direct sunlight. Button On / Off Mode + Fan X-Fan Temp Timer On / Timer Off Turbo Sleep Light Function This button powers the unit on or off.
Modes and Features Auto When selecting Auto Mode, the air conditioner will operate automatically according to the ambient room temperature. The set temperature is not adjustable in AUTO mode. This is the default mode of operation when the unit is powered on. Cool If the ambient temperature drops below the temperature you selected, the compressor turns off and the unit functions with the fan only. When the temperature rises above the temperature you selected, the compressor turns on again.
Heat If the ambient temperature reaches the temperature you selected, the heat pump turns off and the unit functions with the fan only. When the temperature drops below the temperature you selected, the heat pump turns on again. The Heat Indicator will be lit. You can press the “+” or “-” button to increase or decrease the set temperature. Note: This unit uses a heat pump to provide the heating function. The heat pump will not work properly if the ambient temperature is below 50° F.
Maintenance Clean the air conditioner and filters regularly to maximize performance and efficiency, and to prolong the unit’s life. Be sure to always unplug the air conditioner from the power outlet before cleaning. Cleaning the Exterior Use a soft dry cloth to wipe the body of the air conditioner clean. If necessary, use lukewarm water to dampen a cloth to clean the unit. Use a soft bristle brush to clean between the vents.
Preparation for Storage If you are not going to be using the unit for an extended period of time, follow the instructions below before storing your unit: 1. Drain all the water from the unit’s reservoir. Operate the unit in fan mode for a few hours to thoroughly dry any moisture left on the coils inside the unit. 2. Power off the unit. Then clean or change the filters. 3. Unplug and carefully wind the power cord. 4. Remove the exhaust hose and duct connectors and keep them in a safe place.
Troubleshooting Follow the troubleshooting guide below to resolve common issues. Issue Possible Cause Solution My air conditioner is not The unit is not receiving Make sure the unit is plugged functioning at all. power. in to a grounded outlet. The LCDI power cord is Press the Reset button on the tripped. LCDI cord. There is insufficient power. Move the unit to another outlet. Check your circuit breaker. (Refer to the rating label on the back of the unit to determine the Amperage draw).
Issue Possible Cause Solution My air conditioner is not cooling at all. The unit is not operating in cooling mode. Set the unit to be in cooling mode, and lower the set temperature (pg. 19). The compressor may take up to 3 minutes to turn on, or longer if it is too warm. Lower the room temperature to be below 90°F. Clean the filters (pg. 21). The compressor is not on. The ambient temperature is too high. The filter may be dusty or blocked. The exhaust port is blocked.
Error Codes The air conditioner may display an error code if it is not operating correctly. Below are the list of error codes and their description. Error Code H8 Possible Cause The water reservoir is full. F1 The ambient temperature sensor has a malfunction. The evaporator temperature sensor has a malfunction. Refrigerant is leaking or the system is blocked. This is overload protection for the compressor There is an overload malfunction.
Specifications 27 Description of product Portable Air Conditioner with Heat Pump Model AP13500HG Voltage / Frequency AC 115 V ~ 60 Hz Input Power 1465 W Cooling 1250 W Heating Current 11.5 A Cooling Capacity (SACC) 6800 BTU Cooling Capacity (ASHRAE) 13500 BTU Color Grey Coolant R-410A Timer 24 Hour Dimensions HxWxD 30 1/2” x 14 3/4” x 17 3/8” Weight 78.3 lbs.
New Portable Air Conditioner BTU’s You may notice that the cooling capacities (in British Thermal Units or BTU’s) labeled on portable air conditioners (PAC’s) are now lower than on models produced prior to October 1, 2017. This is because the labeling on new productions of PAC’s must follow a new federal test standard that was established by the Department of Energy: 10 CFR 430, subpart B, appendix CC. The SACC rating shown on your new PAC is a result of this new standard.
EdgeStar Limited Warranty One (1) Year Parts & Ninety (90) Days Labor This product is warranted by EdgeStar to be free from defective workmanship and materials, subject to any conditions set forth as follows: WHAT IS COVERED: LABOR: For a period of NINETY (90) DAYS from the date of original purchase, labor will be performed free of charge at an authorized EdgeStar repair facility.