Table of Contents Table of Contents -------------------------------------------------------- -----1 Thank You----------------------------------------------------------------- -----2 Energy Saving Tips------------------------------------------------------ -----2 Notes------------------------------------------------------------------------ -----2 Technical Specifications------------------------------------------------------3 Safety Precautions-------------------------------------------------------------4 Part
Thank You Thank you for purchasing an EdgeStar portable air conditioner. It should provide you with years of reliable cooling. Among other features, this versatile unit exhausts all the condensate that it extracts from your air. Additionally, this portable air conditioner features auto restart. If power to the unit is interrupted, the unit “remembers” its previous settings when power is restored.
Technical Specifications Model AP310SS Electrical Power Supply 115 Volts / 60 Hertz Rated Power Consumption During Cooling See Label on Unit Dehumidification Capacity 38 Pints Hours Refrigerant R22 Refrigerant Load 500g Fan Speeds 3 Airflow (H/M/L) 200/170/150 cfm Noise Level 52dB(A) Dimensions (HxWxD) 31"x14"x13.82" Net Weight 55 Pounds Timer 0.
Safety Precautions C A B 1. 2. 3. 4. 5. 6. 7. 8. 9. Do not insert anything into the grill (Fig. A.) Make sure all children are properly supervised around this portable air conditioner (Fig. B.) Do not use an excessively wet cloth or industrial solvents to clean this unit (Fig. C.) Do not damage the power cord (Fig. D.) Do not use the portable air conditioner in the presence of flammable substances or vapors such as alcohol, insecticides, gas, etc (Fig. D.
10. 11. 12. 13. 14. 15. 16. 17. 18. 19. 20. 21. 22. 23. 24. 25. 26. 27. 28. Make sure the portable air conditioner is connected to a grounded power outlet. This portable air conditioner is designed to operate in an ambient temperature of 64°-100° F. This portable air conditioner has been designed for residential use. Always turn the portable air conditioner off before unplugging it. Do not use this portable air conditioner for functions other than those described in this owner’s manual.
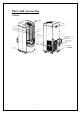
Parts and Accessories 1) Parts Oper at i on Panel Handl e Ai r I nl et Ai r Fi l t er Ai r Out l et Cont r ol Si gnal Recept or Hot Ai r Di schar gi ng Por t Use t o connect ai r hose.
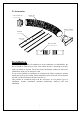
2) Accessories I ndoor Ter mi nal End Exhaust Duct Wi ndow Ki t Adapt er Wi ndow Ki t Mai n pi ece Wat er Dr ai n Hose Installation When you use this portable air conditioner as an air conditioner or a dehumidifier, the hot air should be exhausted out of the room. When the unit is operating in fan-only mode, no exhaust is required. You do not need to hookup the window kit and hot air exhaust hose when you use the unit as a fan.
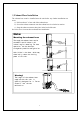
1) Exhaust Hose Installation The exhaust hose must be installed onto the unit before any further installation can occur. a) Pull out about 6” of one end of the exhaust hose. b) Screw the exhaust connector onto the exhaust hose in a clockwise motion. c) Snap the exhaust connector into place in the back of the unit. See below for a few notes about exhaust hose installation: Note: Mounting the exhaust hose The suppl i ed exhaust hose can be ext ended f r om 16 i nches t o 63 i nches l ong f or mount i ng.
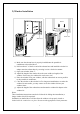
2) Window Installation Wi ndows Wi ndows Wi ndow Ki t s Wi ndow Ki t s a) Make sure the exhaust hose is properly installed onto the portable air conditioner as described above. b) Pull out about 6” of the free end of the exhaust hose and install the window kit adapter onto the exhaust hose by screwing it on in a clockwise manner. c) Open your window about 5”. d) Adjust the length of the window kit to the same width (or length) of the window. If necessary, the window kit can be cut to size.
3) Wall Installation a) Make sure the exhaust hose is properly installed onto the portable air conditioner as described above. b) Make a hole of 5 1/8” diameter in your wall. c) Position the portable air conditioner near the hole. d) Feed as much exhaust hose as is needed through the hole. Notes: Be sure to cover the hole when it is not being used by the portable air conditioner. Be sure to have a qualified person make the hole to avoid the possibility of injury or of unintended damage to your room.
DOWN UP 4) or :Temperature / Time Buttons These buttons are used to adjust the thermostat setting up or down, or to adjust the time setting when using the timer. NOTE: The temperature can be displayed in Celsius or Fahrenheit. To change from one scale to another, press and hold the On/Off button for 20 seconds. 5) TIMER :Timer Button Used to set or cancel the timer. The timer has two functions. When the unit is off, the “On Timer” can be used to turn the unit on after a set time.
timer display will begin to blink. While it is blinking, press the timer button again. The time will disappear from the Timer Display and an “F” will be displayed. The timer has now been cancelled. 2) Remote Control FAN SPEED ON/ OFF TEMP/ TI ME MODE TI MER The six buttons on the remote control are same as the six buttons on the control panel of the main unit. See the control panel section above for an explanation of how to use the buttons. The remote control uses a lithium battery model CR2025.
probably rise by a few degrees (if you do not use the exhaust hose.) The Dehumidifying mode will not work in temperatures below 64°F. Cooling 1) 2) 3) 4) 5) Plug the power cord into a power outlet. Turn on the unit. Press the Mode button until the icon LED next to “Cool” lights up. Select the fan speed by using the Fan button. Set the thermostat using the Temperature / Time buttons. The thermostat is adjustable between 64°F and 90°F in one degree increments. Cooling mode cools and dehumidifies your air.
pump will pump water into the bucket. When the flow of water stops, you can turn off the portable air conditioner. Remove the drain hose and reinstall the drain cap. The unit will now be almost completely drained. If you were draining the unit to allow it to continue cooling or dehumidifying, simply turn the unit back on to the settings you want. Usi ng t he wat er dr ai n hose suppl i ed wi t h uni t , whi ch i s about si x f eet s l ong.
Make sure the unit is turned off and unplugged before performing any maintenance. Do not immerse the unit in water or other liquids. Do not pour liquids into the unit. Some parts may have sharp edges. Be careful to avoid cutting yourself. 1) Filter This portable air conditioner has a washable pre-filter that filters contaminants out of the air. This pre-filter should be cleaned about once every two weeks or as needed. If it becomes clogged with dust, the efficiency of the unit will be lowered.
3) Long Term Storage Down Dr ai n Por t 1) On a warm day, run the unit in Fan-only mode for a few hours to exhaust all condensate and to completely dry out the interior. 2) Turn off the unit and unplug it. 3) Empty any residual condensate water by unplugging the lower drain port and allowing any water accumulated there to drain out. Reinstall the rubber stopper after doing this. 4) Detach the exhaust hose and collapse it to its smallest size. 5) Take out the filter.
Troubleshooting Problem Possible Cause Solution There was a power failure Restore the power supply The plug is not correctly inserted into the socket Insert the plug correctly into the socket The automatic switch, line fuse, or breaker has been tripped Flip the switch, change the fuse, or turn the breaker back on.
The exhaust is obstructed Check the exhaust duct. Remove any obstructions The unit is set in dehumidifying mode Set the unit in cooling mode The unit is set to low fan speed Set the unit to high fan speed Windows or doors are open Close all windows and doors into the room when the unit is cooling There are too many people in the room You may need additional cooling or another air conditioner There is direct sunshine into the room Close curtains and blinds.
Circuit Diagram 9C Recei ver PCB 3C Room Temp Sensor Wat er Level Det ect or Condenser Si de Fan Mot or C1 Oper at i on Panel PCB Mi cr ocomput er Mai n Cont r ol PCB HO LO Bump HI Cut - of f Wat er Pump C3 MI COM LI NO AC- N AC- N0 AC- N1 Cut - of f Evapor at or Si de Fan Mot or C Pr ot ect or Tr ansf or mer POWER SUPPLY L N G S R C2 C1: Runni ng Capaci t or For Fan Mot or of Condenser Si de C2: Runni ng Capaci t or For Compr essor C3: Runni ng Capaci t or For Fan Mot or of Evapor
Limited Warranty This EdgeStar product is warranted to be free from defective workmanship and materials for the first year following the date of original purchase. Replacement parts will be supplied free of charge for the first year following the date of original purchase. Labor will be performed free of charge for the first 90 days following the date of original purchase.
Contact EdgeStar for troubleshooting assistance and warranty service authorization at 1-866-319-5473. Please have your order receipt available to confirm the date of purchase. Once an EdgeStar authorized representative has confirmed that your product is eligible for warranty service, the product must be returned to an EdgeStar authorized repair facility. The purchaser is solely responsible for prepaying all shipping related costs to and from the repair facility.