
Use and Care Guide


18
Cleaning the Lower Spray Arm
The lower spray arm can be removed for periodic cleaning of the nozzles to prevent clogging and
maintain the efficiency of your dishwasher. When removing the spray arm, exercise care so you don’t
damage or break it. To remove, clean and replace the lower spray arm:
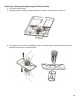
1. Visibly check whether the nozzle holes are clogged by soil or food particles.
2. If cleaning is needed, remove the spray arm by grasping it in the middle and pulling it upwards.
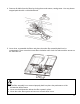
3. Wash the spray arm nozzles under warm, running water. A soft bristled brush may be used to
help remove particles.
4. Reinstall the spray arm by pushing it back down into place until it locks.
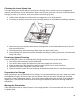
5. Check whether the spray arm has be reinstalled correctly by rotating it by hand. It should rotate
freely and easily.
Protecting Against Freezing
If your dishwasher is left in an unheated place during the winter, ask a service technician to:
1. Turn off the electrical power to the dishwasher.
2. Turn off the water supply and disconnect the water supply line from the unit.
3. Drain the water from the supply line and inlet valve (use a pan to catch the water.)
4. Reconnect the water supply line to the inlet valve.
5. Remove the filter system and use a sponge to absorb the water that is in the filter (sump) area.
Preparation for Storage
When preparing to put the dishwasher into storage, it is recommended that you run a wash cycle with
the dishwasher empty. Disconnect the unit from power. Remove any water remaining in the sump
area with a cloth or absorbent sponge. Turn off the water supply and leave the door of the appliance
slightly open. This will help the door seals to last longer and prevent odors from forming inside the
dishwasher.
Moving the Dishwasher
If the dishwasher must be moved, keep it in the upright position. Do not transport the unit on its side
or upside down.