Mini Kegerator TBC50S Owner’s Manual For more information on other great EdgeStar products on the web, go to http://www.edgestar.
Important Safety Information Improper handling can cause serious damage to the EdgeStar mini kegerator and/or injury to the user. This mini kegerator is designed for domestic indoor use only. Do not use the unit for industrial or commercial use. Any other use may invalidate the warranty. Please review the ratings label located on the rear panel of the unit for electrical and other technical data related to this unit.
Table of Contents IMPORTANT SAFETY INFORMATION ................................................................. I INTRODUCTION ................................................................................................... 1 PARTS IDENTIFICATION ..................................................................................... 2 OPTIONAL ACCESSORY KIT .................................................................................. 2 THREE QUARTER VIEW ..............................................
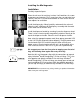
Introduction Thank you for purchasing this EdgeStar mini kegerator. We are glad you chose us. We believe that your purchase of this product opens a relationship between you and EdgeStar. We will provide the customer support needed to nurture that relationship. This manual contains important information regarding the proper installation, use and maintenance of your mini kegerator. Following this manual will ensure that your product will work at its peak performance and efficiency.
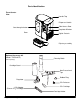
Parts Identification Three Quarter View Handle Top Dispenser Handle See-through window Side Access Door Regulator Window Door Digital Controls Drip tray assembly Optional Accessory Kit (Model: TBC50-ACC) (Sold separately) Cleaning Bottle Cartridge Stand Non-Pressurized Tap Rubber Ring Regulator CO2 Releaser CO2 Adapter (Pierces CO2 Cartridge) CO2 Cartridge Cartridge Holder EdgeStar Mini Kegerator 2
Installing the Mini kegerator Installation Carefully unpack all parts. Place the unit on a flat and level surface. It will work best in a room temperature environment (70°F), away from the sun and other heat sources, and with 3” of clearance between all sides of the unit and other objects for ventilation. Install the drip tray by sliding it partially underneath the main unit (align the “tab” sticking out of the drip tray assembly with the notch in the underside of the main unit).
General instructions Regardless of the brand of 5-liter mini keg, here are the basic steps for tapping it: 1. Chill your keg- although this mini kegerator has a cooling plate that will cool your keg, best results will come from a keg that is already cooled to drinking temperature- this way, the cooling plate only has to keep your keg cool. 2. Follow the instructions on the mini keg to eliminate excess gas or pressure. 3.
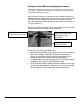
Heineken brand DraughtKeg tapping instructions Heineken brand DraughtKeg™ mini kegs have an internal CO2 tank. This is the only type of mini keg that you can tap without the optional accessory kit. 1. Chill the mini keg 2. Open the door of the mini kegerator. 3. Place the mini keg near the open door. 4. Make sure the top of the mini keg looks like this: 5. Attach the Heineken-style tap to the beer line: 6. Attach the Heineken-style tap and beer line assembly to the mini keg: 7.
Non-pressurized Accessory Kit Part Descriptions The following section describes the parts of the optional TBC50-ACC Accessory Kit (sold separately) and their purposes. 1. Non-Pressurized Tap - Using a piercing tube, this tap is to be inserted into a non-pressurized keg. Beer and CO2 lines are located at the top. It is good practice to wet the piercing tube to lubricate before tapping the minikeg.
Non-pressurized Mini Keg Tapping Instructions Note that the following instructions refer to optional accessory kit (sold separately). Visit kegerator.com for more information and/or to place an order for the optional accessories.
Tapping the different types of non-pressurized kegs: There are several different types of non-pressurized 5 Liter kegs available. The mini kegs mainly differ in the type of “bung” (plug) sealing the top of the mini keg. It is into this bung that the mini kegs are tapped.
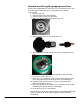
Connecting the CO2: Open the compartment located on the right-hand side of the mini kegerator. Make sure that the pressure gauge valve is closed (to close the valve, turn it counter-clockwise). Attach the pressure gauge on the end piece of the 16g adapter. Insert the 16g CO2 cartridge in the long part of the adapter. Screw the two parts of the adapter together. Screw the gas cartridge fully home on the pressure gauge.
Removing the CO2 line and mini keg Once your mini keg is consumed, you need to shut off the CO2 and remove the keg. Open the compartment located on the right-hand side of the mini kegerator. Shut off the regulator (turn the knob counter-clockwise). Put a container under the dispenser and pour off any remaining beer (this will also relieve some of the pressure in the mini keg). Open the mini kegerator main door and disconnect the CO2 line and beer line.
Tips for Best Results 1. For best results, use clean glasses. Rinsing the glasses with cold water prior to pouring can deliver better results (less foam). 2. Hold the glass at an angle under the dispenser. Do not touch the nozzle of the dispenser to the glass. 3. Pull the dispenser handle towards you to start the flow of beer. Open the dispenser up all the way to get the maximum flow rate (this will decrease foam). 4. Slowly tip the glass upright as it fills. 5.
Important Safeguards EdgeStar Mini Kegerator Do not use the appliance if the power supply cord is damaged. If the power supply cord is damaged, it must be replaced by a qualified technician. This unit is designed to function on 115 Volts/ 60 Hz (110/115/120 Volts acceptable) electrical circuits. This appliance is not designed for children. Never allow unattended children to use this appliance.
Adjusting the Temperature Note: Whether your mini kegerator can reach the actual set temperature depends on the ambient environmental conditions. This mini kegerator has a temperature range from 38°F to 54°F. Press the button on the control panel to lower the temperature by 1 degree increments. Allow at least 24 hours before storing your keg and to allow the temperature to acclimate. Press the button on the control panel to increase the temperature by 1 degree increments.
Specifications Description of product Mini Kegerator & 5L Draft Beer Dispenser Model TBC50S Voltage/Frequency AC 115V~60Hz Amperage 0.63 Amps Input Power 70 Watts Color Metallic Silver with Chrome Accents Storage Capacity One 5-liter Mini-keg Temperature Range 38-54ºF Dimensions (Height x Width x Depth ) 14 7/8” x 15” x 13 2/5” Weight 13 pounds Note: Technical data and performance information is provided for reference only. Specifications are subject to change.
EdgeStar Limited Warranty One (1) Year Parts & Ninety (90) Days Labor This product is warranted by EdgeStar to be free from defective workmanship and materials, subject to any conditions set forth as follows: WHAT IS COVERED: LABOR: For a period of NINETY (90) DAYS from the date of original purchase, labor will be performed free of charge at an authorized EdgeStar repair facility.
EdgeStar Products Box 81336 Austin, TX 78708-1336 Toll Free: 1-866-319-5473 Web: http://www.edgestar.com E-mail: service@edgestar.com Register your product, download owner’s manuals, access additional troubleshooting resources, and obtain more information on other great EdgeStar products on the web at: http://www.edgestar.com Product contents and specifications may change without notice. Copyright © 2010 Living Direct, Inc. All rights reserved.