MAREA I UK F E D NL MAREA, Installazione, uso e manutenzione MAREA, Installation, use and maintenance MAREA, Installation, usage et maintenance MAREA, Instalación, uso y mantenimiento MAREA, Installations-, Betriebs- und Wartungsanleitung MAREA, Installatie, gebruik en onderhoud DIREZIONE CENTRALE : EDILKAMIN S.p.A. www.edilkamin.com -1- pag. 2 pag. 14 pag. 26 pag. 38 pag. 50 pag.
ITALIANO Gentile Sig.ra/Egregio Signore La ringraziamo per avere scelto la nostra stufa MAREA Prima di utilizzare la stufa , Le chiediamo di leggere attentamente questa scheda, al fine di poterne sfruttare al meglio e in totale sicurezza tutte le caratteristiche. Le ricordiamo che la 1° accensione DEVE essere effettuata da CAT (centro di assistenza tecnica abilitato) che verifichi l’installazione e compili la garanzia.
ITALIANO PRINCIPIO DI FUNZIONAMENTO La stufa MAREA utilizza come combustibile il pellet, la cui combustione è gestita elettronicamente. Il combustibile (pellet) viene prelevato dal serbatoio di stoccaggio (A) e tramite una coclea (B) attivata da motoriduttore (C), viene trasportato nel crogiolo di combustione (D). L’accensione del pellet avviene tramite aria calda prodotta da una resistenza elettrica (E) e aspirata nel crogiolo tramite un ventilatore centrifugo (F).
ITALIANO CARATTERISTICHE TERMOTECNICHE Capacità serbatoio 20 kg Rendimento 85 % Potenza utile 9,3 kW Autonomia min/max 9/18 ore 1,1/2,2 kg/h 260 m3 141/186 kg Diametro condotto fumi (A femmina) 80 mm Diametro condotto presa aria (B maschio) 40 mm Consumo combustibile min/max Volume riscaldabile * Peso con imballo min/max * Il volume riscaldabile è calcolato considerando l’utilizzo di pellet con p.c.i.
Per quanto non espressamente riportato, in ogni nazione fare riferimento alle norme locali. In Italia fare riferimento alla norma UNI 10683, nonché ad eventuali indicazioni regionali o delle ASL locali. In caso di installazione in condominio, chiedere parere preventivo all’amministratore. VERIFICA DI COMPATIBILITÀ’ CON ALTRI DISPOSITIVI La stufa NON deve essere nello stesso ambiente in cui si trovano estrattori, apparecchi a gas di tipo B.
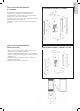
ITALIANO fumi canna fumaria esistente in muratura h minimo 1.
RIVESTIMENTO MAREA in LAMIERA • togliere le nr 2 viti superiori del pannello posteriore; • smontare il top (incastrato a pressione) dalla stufa; • inserire dall’alto (e farlo scorrere verso il basso) il fianco metallico dx e sx nei profili in alluminio; • fissare il pezzo nr 72 con le tre viti in corrispondenza delle 2 asole centrali e dell’asola posteriore; • rimontare il top e riavvitare le 2 viti superiori al pannello posteriore.
ITALIANO L'INTERFACCIA Pannello con display a 4 tasti: 0/1 : per accendere e spegnere Menù: per accedere al menù +/- per incrementare / decrementare le diverse regolazioni IL FUNZIONAMENTO Prima di accendere. 1°Accensione: rivolgersi al CAT ,centro assistenza tecnica, di zona (per informazioni telefonare al nostro numero verde), che vi tarerà la stufa in base al tipo di pellet che usate e alle condizioni di uso.
Premendo per due secondi il tasto menù si accede alla regolazione dell’orologio e premendo + si accede alla funzione di programmazione oraria settimanale, identificata sul display con la descrizione “Program. on/off”. Permette di impostare un numero di accensioni e spegnimenti al giorno (fino a un massimo di tre) in ognuno dei giorni della settimana.
ITALIANO TELECOMANDO cod.
PROBLEMA CAUSA SOLUZIONI pannello sinottico spento mancanza di tensione in rete controllare che il cavo di alimentazione sia collegato controllare fusibile (sulla presa di alimentazione) distanza eccessiva dalla stufa avvicinarsi alla stufa pila del telecomando scarica controllare e nel caso cambiare la pila aria in uscita non calda troppa fuliggine nello scambiatore pulire lo scambiatore dall’ interno del focolare non compare la fiamma (ricordarsi compare dopo 5 minuti dalla pressione del tast
ITALIANO CONSIGLI IN CASO DI INCONVENIENTE - No depressione: (interviene se il sensore di flusso rileva flusso aria comburente insufficiente) Il flusso può essere insufficiente se c’è portello aperto, tenuta non perfetta del portello (es. guarnizione), se c’è problema di aspirazione aria o di espulsione fumi, oppure crogiolo intasato.
Prima di effettuare qualsiasi manutenzione, disinserire l’apparecchio dalla rete di alimentazione elettrica. PULIZIA GIORNALIERA Scuotere spesso le aste di pulizia condotto fumi La pulizia deve essere effettuata aiutandosi con un aspirapolvere, l’intera procedura richiede pochi minuti al giorno. UTILIZZANDO UN ASPIRATORE, a stufa fredda - Aspirare lo sportello, aspirare il piano fuoco, aspirare il vano attorno al crogiolo dove cade la cenere (NON c’è cassetto cenere estraibile).
ENGLISH Dear Sir / Madam Thank you for having chosen our MAREA stove. You are kindly asked to read through this information booklet before using the stove in order for you to make use of all its features in total safety. Please note that a qualified dealer must ignite the stove for the first time and must verify the installation and complete the warranty. The manufacturer cannot be held liable for any damage caused as a result of incorrect installation, incorrect maintenance procedures and improper use.
The MAREA stove is pellet-fi red with electronically controlled combustion. The combustible material (pellets) is transferred from the storage hopper (A) to the combustion chamber (D) by means of a feed screw (B), which is driven by a gear motor (C). The pellets are ignited by the air that is heated by an electrical resistance (E) and drawn into the combustion chamber by a centrifugal fan (F).
ENGLISH TECHNICAL AND HEATING SPECIFICATIONS Hopper capacity 20 kg Efficiency 85 % Power output 9,3 kW Autonomy min/max 9/18 hours 1,1/2,2 kg/h 260 m3 141/186 kg Smoke duct diameter (A female) 80 mm Air inlet duct diameter (B male) 40 mm Flue consumption min/max Heating capacity * Weight including packaging min/max * The heatable room dimensions are calculated on the basis of pellets with an lhv of at least 4300 kcal/kg and home insulation in compliance with Italian law 10/91, and
ASSEMBLY AND INSTALLATION (DEALER) Refer to local regulations in the country of use for anything which is not specifically covered in the information provided. In Italy, refer to the UNI 10683 standard, as well as any Regional or Local Health Authority regulations. If the stove is to be installed in a block of apartments, consult the block administration before installing.
ENGLISH smoke (existing) masonry chimney flue minimum height 1.
ASSEMBLY OF THE MAREA STOVE COVERING STEEL MAREA STOVE COVERING STEEL ENGLISH • Remove the upper 2 screws from the rear panel. • Detach the top (which is only pressed into place) from the stove. • Insert the left and right metal side panels from the top, sliding them downwards, into the aluminium profiles. • Fasten piece no. 72 into place with the three screws corresponding to the 2 central slots and the rear slot. • Put the top back into place and tighten the 2 upper screws back into the rear panel.
THE INTERFACE DISPLAY The panel consists of a display and 4 keys: ENGLISH 0/1 : to ignite and shutdown the stove Menù: to access the menu +/- to increase / deincrease the various settings FUNCTIONS Before igniting the stove. 1st Ignition: contact the DEALER, for the stove to be calibrated according to the type of pellets used and conditions it is used in. A slight smell of paint may be noticed during the first few times it is ignited, however, this only lasts a short while.
Setting the clock Timer setting Press the ‘Menu’ key for two seconds to access the time setting function and press the + key to access the timer settings function: “Program on/off” appears on the display. A maximum of three timer programs can be set for each day of the week.
REMOTE CONTROL code 633280 ENGLISH : ignition / shutdown button + : button to increase the power/operating temperature (when inside a menu, it increases the displayed variable) : button to increase the power/operating temperature (when inside a menu, it decreases the displayed variable) A : button to toggle from manual and automatic mode M : button to toggle from automatic to manual mode - the remote control transmits by means of an infrared signal within a range of 4-5 metres.
PROBLEM CAUSE SOLUTIONS display-control panel off no mains voltage make sure the power cord is connected check the fuse (on the power socket) excessive distance from stove move nearer stove remote control battery flat check battery and replace if necessary outlet air not hot too much soot in heat exchanger clean the heat exchanger from inside the firebox no flame appears (remember that it only appears 5 minutes after pressing the On/Off key) the screw feeder has not been filled Fill screw fee
TROUBLESHOOTING ENGLISH - No depression (trips when the flow sensor detects insufficient combustion air flow) The flow may be insufficient because the door is open, or does not close tightly (e.g. bad seal), there is an air intake or smoke extraction problem or the combustion chamber is clogged up.
SERVICING Regular maintenance is essential for good stove operation. Disconnect the device from the mains power supply before carrying out any maintenance. Shake often smoke duct cleaning rods Clean with a suitable vacuum cleaner. The whole process only takes a few minutes a day. USING A VACUUM CLEANER, when the stove is cold: - vacuum clean the door, hearth and the area around the combustion chamber where the ash falls (there is NO extractable ash pan).
Chère Madame, Cher Monsieur, Nous vous remercions pour avoir choisi notre poêle MAREA. Avant de mettre en fonction votre poêle, nous vous prions de lire attentivement cette fiche technique, cela vous permettra d’exploiter pleinement, et en toute sécurité, toutes ses caractéristiques. Nous vous rappelons que le premier allumage DOIT être effectué par un revendeur formé et autorisé, qui vérifiera l’installation et rédigera la garantie.
Le poêle MAREA utilise comme combustible les pellets, dont la combustion est gérée électroniquement. Le combustible (pellets) est prélevé du réservoir de stockage (A) et, au moyen d’une vis sans fin (B) activée par un motoréducteur (C), il est transporté dans le creuset de combustion (D). L’allumage des pellets se fait par le réchauffement de l’air aspiré. Passant autour de la résistance électrique (E) et sous le creuset par le biais d’un ventilateur centrifuge (F).
CARACTÉRISTIQUES THERMOTECHNIQUES Capacité réservoir 20 kg Rendement 85 % Puissance utile 9,3 kW Autonomie (min/max) 9/18 heures 1,1/2,2 kg/h 260 m3 Consommation combustible (min/max) Volume de chauffe * FRANÇAIS Poids avec emballage (min/max) 141/186 kg Diamètre conduit de fumée indépendant sortie fumées (A femelle) 80 mm Diamètre conduit de fumée prise air (B mâle) 40 mm * Le volume de chauffe est calculé compte tenu de l’utilisation de pellets avec un p.c.i.
MONTAGE ET INSTALLATION (REVENDEUR) Pour tout ce qui n’est pas expressément indiqué, dans chaque pays, faire référence aux normes locales. En Italie, faire référence à la norme UNI 10683/1998, ainsi qu’aux éventuelles indications régionales ou des ASL locales. En cas d’installation dans des copropriétés, demander au préalable l’avis du syndic.
fumées Carneau en acier Carneau existant en maçonnerie FRANÇAIS h minimum 1,5 m prise d’air de l’extérieur à l’environnement (section passante minimum 80 cm²) Air de combustion prélevé de l’extérieur Air de combustion prélevé de l’environnement Distance du matériel inflammable Protection au sol - 30 -
MONTAGE REVÊTEMENT EN TÔLE REVÊTEMENT MAREA en TÔLE FRANÇAIS • retirer les 2 vis supérieures du panneau postérieur; • démonter le top (emboîté par pression) du poêle; • insérer par le haut (et le faire coulisser vers le bas) le flanc métallique droit et gauche dans les profils en aluminium; • fixer la pièce n. 72 avec les trois vis en correspondance des 2 trous centraux et du trou postérieur; • remonter le top et revisser les 2 vis supérieures au panneau postérieur.
L’INTERFACE Panneau avec afficheur à 4 touches : 0/1 : pour allumer et éteindre Menù: pour accéder au menu +/- pour augmenter/diminuer les différents réglages FRANÇAIS LE FONCTIONNEMENT Avant l’allumage. 1°Allumage: contacter votre revendeur (pour tout renseignement, téléphoner à notre numéro vert 800-014142), qui étalonnera votre poêle sur la base du type de pellets que vous utilisez et des conditions d’utilisation.
Réglage horloge Appuyer pendant 2 “ sur la touche Menu pour accéder au menu Horloge. Cette touche permet de programmer les paramètres pour le fonctionnement de l’horloge à l’intérieur de la carte. L’appui en succession sur la touche Menu, affiche en séquence les données suivantes pour permettre leur réglage : Jour, mois, année, heure, minutes, jour de la semaine.
TÉLÉCOMMANDE cod.
CONSEILS EN CAS D’INCONVÉNIENTS Tableau synoptique éteint Télécommande (option ) inefficace CAUSE SOLUTIONS Manque de tension du réseau Contrôler que le cordon d’alimentation est branché. Contrôler le fusible (sur la prise d’alimentation).
CONSEILS EN CAS D’INCONVÉNIENTS FRANÇAIS - PAS DE DEPRESSION (elle intervient si le capteur de flux détecte un flux d’air comburant insuffisant) Le flux peut être insuffisant si la porte est ouverte, si l’étanchéité de la porte n’est pas parfaite (ex. joint), s’il y a un problème d’aspiration de l’air ou d’évacuation des fumées, ou si le creuset est encrassé.
ENTRETIEN Un entretien régulier est à la base du bon fonctionnement du poêle. Avant d’effectuer tout entretien, débrancher l’appareil du réseau d’alimentation électrique. NETTOYAGE QUOTIDIEN NE JAMAIS ASPIRER LES CENDRES CHAUDES, sous risque d’endommager l’aspirateur employé. Après quelques mois, utiliser de l’air sec (type pour clavier de PC) pour nettoyer, avec le poêle éteint, le capteur de flux dans le tuyau d’aspiration de l’air comburant.
Estimado / a señor / a, Le damos las gracias por haber elegido nuestra estufa MAREA. Antes de utilizar la estufa, le aconsejamos leer atentamente esta ficha, para poder disfrutar mejor y con total seguridad de todas sus prestaciones. Le recordamos que el 1º encendido DEBE de ser efectuado por personal técnico, que verifique la instalación y compile la garantía.
La estufa MAREA utiliza como combustible el pellet, cuya combustión se genera electrónicamente. El combustible (pellet) sale del depósito de almacenaje (A) a través de una coclea (B) activada por un motoreductor (C), y llega al crisol de combustión (D). El encendido del pellet se produce a través de aire caliente proveniente de una resistencia eléctrica (E) que se aspira en el crisol mediante un ventilador centrífugo (F).
CARACTERÍSTICAS TÉCNICAS Capacidad depósito pellet 20 kg Rendimiento 85 % Potencia útil 9,3 kW Autonomía min/máx. 9/18 horas 1,1/2,2 kg/h 260 m3 141/186 kg Diámetro conducto humos (A hembra) 80 mm Diametro conducto toma aire (B macho) 40 mm Consumo combustible min/máx. Volumen calentable * ESPAÑOL Peso con embalaje min/máx. * El volumen calentable se calcula considerando la utilización de pellet con p.c.i.
MONTAJE E INSTALACIÓN (Distribuidor) Para cada nación, hay normas locales. Por lo que a Italia se refiere, normativa UNI 10683, además de otras indicaciones regionales o de las administraciones locales. En caso de instalación en condominio, solicitar al administrador. VERIFICACIÓN DE COMPATIBILIDAD CON OTROS DISPOSITIVOS La estufa NO puede instalarse en el mismo ambiente en los que se encuentren ya extractores y aparatos de gas del tipo B.
Humos tubería de acero tubería existente de obra h mínima 1,5 m toma de aire del el exterior al ambiente (sección de paso mínimo 80 cm2) aire de combustión cogido del exterior ESPAÑOL aire de combustión cogido del ambiente Distancia del material inflamable Protección del suelo - 42 -
MONTAJE REVESTIMIENTO EN ACERO REVESTIMIENTO MAREA de ACERO MONTAJE REVESTIMIENTO PIEDRA NATURAL REVESTIMIENTO MAREA de PIEDRA NATURAL • Sacar los 2 tornillos más en alto del panel posterior (49), despegar la parte superior (12) encajado a presión. • Poner las 6 baldosas de piedra natural (78), usando la máxima cautela para no romperlas, en los correspondientes perfiles de aluminio (13). • Volver a colocar la parte superior (12) a presión y fijarlo con los 2 tornillos al panel posterior (49).
EL PANEL SINÓPTICO Panel con display con 4 teclas: 0/1 : para encender y apagar la estufa Menù: para acceder al menú +/- para aumentar/disminuir las diversas regulaciones EL FUNCIONAMIENTO ESPAÑOL Antes de encender. 1º encendido: dirigirse al servicio del distribuidor, que ajustará la estufa en base al tipo de pellet que se usa y a las condiciones de uso. Durante el primer encendido, se pueden dar ligeros olores de pintura que desaparecen en un tiempo breve.
Regulación del reloj Apretando durante 2 segundos la tecla Menù se accede al Menù Reloj, que permite programar los parámetros para el funcionamiento del reloj interno de la ficha. Apretando sucesivamente la tecla Menù, aparecen uno detrás del otro para poder ser regulados los siguientes parámetros: Dia, mes, año, hora, minuto, día de la semana.
MANDO A DISTANCIA cód.
PROBLEMA CAUSA SOLUCIONES Falta de tensión en red Controlar que el cable de alimentación sea conectado controlar fusible (en el enchufe de alimentación) Distancia excesiva de la estufa Acercarse a la estufa Pila del mando a distancia agotada Controlar y si fuera necesario sustituir la pila Aire de salida no caliente Demasiado hollín en el intercambiador Limpiar el intercambiador desde el interior del hogar No aparece la llama (acordarse que aparece después de 5 minutos de la presión de la tecla
CONSEJOS EN CASO DE PROBLEMAS - NO DEPRESIÓN (se activa cuando el sensor de flujo detecta flujo de aire comburente insuficiente). El flujo puede ser insuficiente si el postigo está abierto, no hay un cierre perfecto del postigo (p. ej. junta), si existe un problema de aspiración de aire o de expulsión de humos, o si el crisol está obstruido.
MANTENIMIENTO Un mantenimiento regular es la base de un buen funcionamiento de la estufa. Antes de efectuar cualquier mantenimiento, desconectar el aparato de la red de corriente eléctrica. LIMPIEZA DIARIA Agite a menudo el humo de limpieza de conductos barras La limpieza debe realizarse con la ayuda de una aspiradora; todo el proceso requiere pocos minutos al día.
Sehr verehrte Kundin, sehr geehrter Kunde, wir danken für Ihr Vertrauen in unser Heizofenmodell MAREA. Bitte lesen Sie vor dem ersten Gebrauch gründlich das vorliegende Anleitungsheft, damit Sie alle Funktionen Ihres neuen Heizofens optimal und unter sicheren Bedingungen nutzen können. Bitte beachten Sie, dass die Erstinbetriebnahme nur durch einen autorisierten Händler vorgenommen werden darf, welcher die sachgerechte Installation prüft und den Garantieschein ausfüllt.
Der Heizofen MAREA verwendet Holz-Pellets als Brennstoff, deren Verbrennung elektronisch geregelt wird. Der Brennstoff (Holz-Pellets) wird aus dem Brennstoffbehälter (A) entnommen und von einer Förderschnecke (B), die von einem Getriebemotor (C) angetrieben wird, in den Brennkammereinsatz (D) geführt. Die Entzündung der Pellets erfolgt durch Heißluft, die durch einen Heizwiderstand (E) erzeugt und von einem Fliehkraftgebläse (F) in den Brennkammereinsatz gesogen wird.
HEIZTECHNISCHE MERKMALE Fassungsvermögen des Brennstoffbehälters 20 kg Wirkungsgrad 85 % Nutzleistung 9,3 kW Betriebsautonomie (Min / Max) 9/18 Stunden Brennstoffverbrauch (Min /Max) 1,1/2,2 kg/h 260 m3 141/186 kg Rauchkanal-Durchmesser (A Aufnahmeteil) 80 mm Durchmesser des Außenlufteingangs (B Einsteckteil) 40 mm Beheizbares Raumvolumen * Gewicht mit Verpackung (Min / Max) * Das Beheizbare Raumvolumen ist berechnet bei Pellet mit mindestens 4300 Kcal/Kg und einer Isolation nach d
MONTAGE UND INSTALLATION (Händler) In Ermangelung anderslautender Angaben gelten die im Aufstellungsland einschlägigen Bestimmungen. In Italien sind die UNI-Norm 10683 sowie auch örtliche Umwelt- oder gesundheitsamtliche Verordnungen zu beachten. Bei Installation in einem Mehrfamilienhaus ist vorab das Einverständnis der Hausverwaltung einzuholen. PRÜFUNG DER VERTRÄGLICHKEIT MIT ANDEREN GERÄTEN Der Heizofen darf NICHT im gleichen Raum mit Absauggebläsen oder Gasgeräten des Typs B aufgestellt werden.
Abb. 1 Abb. 2 Rauch Vorhandener gemauerter Schornstein Mindesthöhe 1,5 m StahlrohrSchornstein Aus dem Freien entnommene Verbrennungsluft Außenlufteinlass zum Aufstellungsraum (freier Querschnitt mindestens 80 cm²) Im Aufstellungsraum entnommene Verbrennungsluft Abstände zu entflammbarem Material Abb. 3 DEUTSCH Bodenschutzplatte Abb.
ANBRINGUNG DER BLECHAUSSEN VERKLEIDUNG BLECHAUSSENVERKLEIDUNG MAREA • die beiden obersten Schrauben der Rückwand entfernen • die (nur eingeklemmte) Aufsatzplatte ablösen • die rechte und linke Ofenseite aus Metall in die Aluminiumprofile von oben einsetzen (und nach unten gleiten lassen) • Teil Nr.
BEDIENELEMENTE Bedienfeld mit Display und 4 Tasten: 0/1 : Ein- und Abschaltung Menù: Menü aufrufen +/-: Eingabewerte erhöhen / senken HEIZBETRIEB Vor der Einschaltung beachten Erstinbetriebnahme: Wenden Sie sich an Ihren örtlichen Händler, der Ihren Heizofen gemäß dem verwendeten Pellet-Typ und den übrigen Einsatzbedingungen fachgerecht einstellen wird. Bei den ersten Benutzungen kann ein leichter Lackgeruch bemerkbar werden, der jedoch nach kurzer Zeit vergeht.
Systemuhr stellen Durch einen zwei Sekunden langen Druck auf die Menü-Taste ruft man das Uhr-Menü auf. Man kann dort die Betriebsparameter für die Systemuhr der Steuerplatine einstellen. Durch mehrmalige Betätigung der Menü-Taste erscheinen nacheinander die folgenden Parameter und lassen sich jeweils ändern: Tag, Monat, Jahr, Uhrzeit (h), Uhrzeit (min), Wochentag.
FERNBEDIENUNG art-nr. 633280 : Ein- bzw. Ausschalt-Taste + : Taste zur Erhöhung der Leistung bzw. der Betriebstemperatur (im Rahmen eines Menüs erhöht sie die angezeigte Veränderliche) : Taste zur Verminderung der Leistung bzw.
FEHLERSUCHE PROBLEM MÖGLICHE URSACHE ABHILFEMASSNAHMEN Bedientafel ist aus, Tasten funktionieren nicht Kein Netzstrom kontrollieren, dass der Netzstecker angeschlossen ist Fernbedienung (Extrazubehör) funktioniert nicht Zu große Distanz vom Heizofen Sich dem Heizofen nähern Batterien der Fernbedienung leer Batterien kontrollieren und ggf.
FEHLERSUCHE - KEIN UNTERDRUCK (tritt ein, wenn der Luftstromsensor eine unzureichende Verbrennungsluftzufuhr feststellt) Die Verbrennungsluftzufuhr kann zu gering sein, wenn die Ofentür geöffnet ist oder nicht gut schließt (z. B. bei schadhafter Dichtung), wenn es Probleme mit dem Lufteinlass oder mit dem Rauchausstoß gibt, oder wenn der Brennkammereinsatz verstopft ist.
PFLEGE UND WARTUNG Die planmäßige und sachgerechte Wartung ist eine Grundvoraussetzung für den einwandfreien Ofenbetrieb. Vor dem Beginn jeglicher Wartungsarbeiten die Stromversorgung des Gerätes unterbrechen. TÄGLICHE REINIGUNG Shake oft Rauchkanal Putzstöcke Für die Ofenreinigung ist ein Staubsauger zu verwenden. Dieser Vorgang erfordert täglich nur wenige Minuten.
Geachte mevrouw, geachte heer, Wij danken u voor uw keuze voor onze MAREA kachel. Vooraleer de kachel in gebruik te nemen, kunt u best deze technische fiche aandachtig lezen. Op die manier zult u ten volle van al zijn kenmerken kunnen genieten en dat in alle veiligheid. Denk eraan dat de kachel de eerste keer ENKEL door een erkend verdeler mag worden aangestoken, die de installatie nakijkt en het garantiedocument opstelt.
WERKINGSPRINCIPE OPMERKING over de brandstof. De kachel op pellet MAREA is ontworpen en geprogrammeerd voor het verbranden van pellet houtpellets 6 mm diameter. De pellet is een brandstof die voorkomt in de vorm van kleine staafjes met een diameter van ongeveer 6 mm, verkregen door zaagsel van hoge kwaliteit samen te persen, zonder gebruik van lijm of andere kleefmiddelen. Om de goede werking van de kachel NIET in het gedrang te brengen, mag NOOIT iets anders worden verbrand.
THERMOTECHNISCHE KENMERKEN Capaciteit reservoir 20 kg Rendement 85 % Nuttig vermogen 9,3 kW Autonomie (min/max) 9/18 uur 1,1/2,2 kg/h 260 m3 141/186 kg Diameter afvoerpijp rook (mannelijk) 80 mm Diameter luchtinlaatpijp (mannelijk) 40 mm Verbruik brandstof (min/max) Verwarmd volume * Gewicht met verpakking (min/max) * Het verwarmingsvolume is berekend met inachtneming van het gebruik van pellets van ten minste 4.
MONTAGE EN INSTALLATIE (VERDELER) Altijd de plaatselijke en nationale normen raadplegen voor alles wat niet expliciet in deze fiche is aangegeven. In Italië de norm UNI 10683 raadplegen alsook eventuele lokaal geldende eisen. Bij installatie in appartementsgebouwen, vooraf de toestemming vragen aan de syndicus. CONTROLEREN VAN DE COMPATIBILITEIT MET ANDERE SYSTEMEN De kachel MAG NIET worden geïnstalleerd in dezelfde ruimte waar zich ook afzuiginstallaties en gastoestellen van het type B bevinden.
Afbeelding 1 Afbeelding 2 Rook Schoorsteenpijp in metselwerk Minimale hoogte 1,5 m Stalen schoorsteenpijp Verbrandingslucht van buitenaf Luchtinlaatopening van buitenaf naar de ruimte (opening van minimaal 80 cm²) Verbrandingslucht uit de omgeving Afstand brandbaar materiaal Afbeelding 3 NEDERLANDS Vloerbescherming Afb.
MONTAGE BEKLEDING IN STAAPLAAT MONTAGE BEKLEDING MAREA IN STAAPLAAT • De 2 bovenste schroeven losdraaien van het achterpaneel, het bovenstuk losmaken van de kachel. • Van bovenuit (naar beneden laten glijden) de rechtse en linkse metalen zijdelen invoegen in de alu profilen (13). • Onderdeel nummer 72 vastmaken met de drie schroeven in overeenstemming met de 2 centrale ogen en met het achterste oog. • Het bovenstuk opnieuw op zijn plaats brengen en vastmaken met de 2 schroeven aan het achterpaneel (49).
INTERFACE Bedieningspaneel met scherm voorzien van 4 toetsen: 0/1 : om aan te steken en uit te doven Menù: om het menu te openen +/-: om de diverse instellingen te verhogen/te verlagen WERKING Voor het aansteken 1ste keer aansteken: neem contact op met uw verdeler, die uw kachel zal kalibreren overeenkomstig het soort pellets dat u gebruikt en overeenkomstig de gebruiksvoorwaarden. De eerste keren dat u de kachel aansteekt, kan een lichte verfgeur ontstaan die zeer snel zal verdwijnen.
Instellen van het uur Druk gedurende 2 s op de menu-toets om het menu klok te openen. Met deze toets kunt u de parameters voor de werking van de klok in de elektronische kaart instellen. Druk vervolgens op de Menu-toets om de volgende gegevens in volgorde te doorlopen en in te stellen: Dag, Maand, Jaar, Uur, Minuten, Dag van de week.
AFSTANDSBEDIENING code 633280 : start-/stopknop + : toets om het vermogen/de arbeidstemperatuur toe te laten nemen (in een menu neemt de weergegeven variabele toe) : toets om het vermogen/de arbeidstemperatuur af te laten nemen (in een menu neemt de weergegeven variabele af) A : toets om van handmatig naar automatisch en omgekeerd om te schakelen M : toets om van automatisch naar handmatig en omgekeerd om te schakelen - De afstandsbediening produceert een infrarood signaal.
TIPS IN HET GEVAL VAN PROBLEMEN PROBLEEM OORZAAK OPLOSSINGEN display bedieningspaneel uitgeschakeld Geen netspanning controleer of het netsnoer is aangesloten, controleer de zekering (op de stekker) Te ver van de kachel verwijderd Ga dichter naar de kachel Afstandsbediening (optioneel) werkt niet Batterij van de afstandsbediening leeg controleer de batterij en vervang hem indien nodig Uitstromende lucht niet warm Te veel roet in de warmtewisselaar Maak de warmtewisselaar schoon via de binnenkan
TIPS IN HET GEVAL VAN PROBLEMEN - No depression (grijpt in als de sensor voor de luchtstroom te weinig verbrandingslucht opmeet) De stroom kan onvoldoende zijn als het deurtje openstaat, niet perfecte afsluiting van het deurtje (bijv. pakking), in het geval van een probleem in de aspiratie van lucht of de verwijdering van de rook of een verstopte haard.
ONDERHOUD Een regulier onderhoud staat aan de base van een goede functionering van de kachel. Koppel het apparaat van de elektrische stroomvoorziening af alvorens een willekeurige vorm van onderhoud uit te voeren. DAGELIJKSE REINIGING Shake vaak rookpijp reinigen staven De reiniging dient uitgevoerd te worden met behulp van een stofzuiger. De gehele procedure vereist een aantal minuten per dag.
- 74 - 70 75 Dotazione 83 83 83 13 49 76 77 78 72 13 28 26 55 48 51 52 41 42 45 Optional 44 43 47 46 31 27 81 54 38 37 36 35 56 57 40 82 52 18 34 53 33 30 33 29 25 24 39 32 21 58 19 1 85 3 84 15 2 1 1 16 11 50 8 68 17 4 60 6 7 74 9 5 64 67 14 62 22 59 20 10 23 12 69 61 67 71 13 63 79 65 78 72 66 13 80 65 83 83 83
- 75 - Piede antivibr.30x20x8/70 shr.
- 76 - Sensore flusso aria Sensore temperatura ambiente Gommino porta sensore temperatura Presa di rete con interruttore Tubo per cartuccia accensione Pannello posteriore Interuttore sinottico assemblato Staffa fissaggio ventilatori sx Gommino antivibrante Staffa fissaggio ventilatori dx Ventilatore twin aria riscaldamento Telecomando Scheda elettronica Cavo flat Cavo alimentazione Frontalino superiore Frontalino superiore - Marea nera Guarnizione ø13 Fermavetro superiore Telaio antina i
645500 - 77 - .....12.