sk tecnica mimì-norma multilingue2.qxp 30/11/2009 12.00 Pagina 2 Melody Line MIMI’ - NORMA I UK F E D NL Installazione, uso e manutenzione Installation, use and maintenance Installation, usage et maintenance Instalación, uso y mantenimiento Installations-, Betriebs- und Wartungsanleitung Installatie, gebruik en onderhoud. pag. 2 pag. 21 pag. 40 pag. 59 pag. 78 pag.
ITALIANO sk tecnica mimì-norma multilingue2.qxp 30/11/2009 12.00 Pagina 3 Gentile Sig.ra/Egregio Signore La ringraziamo per avere scelto la nostra termostufa. Prima di utilizzarla, Le chiediamo di leggere attentamente questa scheda, al fine di poterne sfruttare al meglio e in totale sicurezza tutte le caratteristiche.
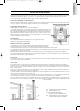
0/11/2009 12.00 Pagina 4 ITALIANO sk tecnica mimì-norma multilingue2.qxp DIMENSIONI A = ingresso aria di combustione B = valvola di sicurezza ½ MF C = reintegro acqua ½ M D = rubinetto di scarico acqua E = ritorno impianto ¾ M F = mandata impianto ¾ M G = uscita fumi Ø 8 cm H = porta AUX (da collegare con cavetto cod.
30/11/2009 ITALIANO sk tecnica mimì-norma multilingue2.qxp 12.
30/11/2009 12.00 Pagina 6 PRINCIPIO DI FUNZIONAMENTO La termostufa utilizza come combustibile il pellet, costituito da piccoli cilindretti di materiale legnoso pressato, la cui combustione viene gestita elettronicamente. Il calore prodotto dalla combustione è trasmesso principalmente all’acqua e in piccola parte, per irraggiamento, all’ambiente di installazione. Il serbatoio del combustibile (A) è ubicato nella parte posteriore della termostufa.
ITALIANO sk tecnica mimì-norma multilingue2.qxp 30/11/2009 12.00 Pagina 7 DISPOSITIVI DI SICUREZZA E RILEVAZIONE Termocoppia fumi posta sullo scarico fumi, ne legge la temperatura. Regola la fase di accensione e in caso di temperatura troppo bassa o troppo alta lancia una fase di blocco (Stop fiamma o Over temperatura fumi rispettivamente) . Sensore di flusso posto sul tubo di aspirazione aria combustione, rileva la corretta circolazione dell’aria stessa e dello scarico dei fumi.
30/11/2009 12.00 Pagina 8 INSTALLAZIONE Per quanto non espressamente riportato, fare riferimento in ogni nazione alle norme locali. In Italia fare riferimento alla norma UNI 10683/2005, alla norma UNI 10412-2, e alla D.M. 37, ex L 46/90 nonché ad eventuali indicazioni regionali o delle ASL locali. In caso di installazione in condominio, chiedere parere preventivo all'amministratore.
ITALIANO sk tecnica mimì-norma multilingue2.qxp 30/11/2009 12.00 Pagina 9 ALLACCIAMENTI IDRAULICI (a cura Centro Assistenza Tecnica) LA TERMOSTUFA NON DEVE MAI FUNZIONARE SENZA ACQUA NELL’IMPIANTO. UNA EVENTUALE ACCENSIONE “A SECCO” COMPROMETTE LA TERMOSTUFA. L’allacciamento idraulico deve essere eseguito da personale qualificato che possa rilasciare dichiarazione di conformità secondo il D.M. 37 ex L.46/90. Fare comunque riferimento alle leggi vigenti nelle singole nazioni.
30/11/2009 12.00 Pagina 10 ALLACCIAMENTI IDRAULICI Impianto con produzione di acqua calda sanitaria in accumulo con Idrokit abbinato a caldaia. Il presente schema è indicativo, la corretta installazione è a cura dell’idraulico.
ITALIANO sk tecnica mimì-norma multilingue2.qxp 30/11/2009 12.00 Pagina 11 MONTAGGIO RIVESTIMENTI MIMI’ Fase A Fase A In questa fase si vede come la stufa si presenta al cliente appena viene sballata e posizionata nel locale Fase B Fase B Sfilare il frontalino inferiore facendo leva con un semplice cacciavite nella sua parte superiore, facendo attenzione al comando manuale della canalizzazione se presente nella stufa A Fase C Avvitare il frontalino inferiore con le viti e le rondelle D.
30/11/2009 12.01 Pagina 12 ITALIANO sk tecnica mimì-norma multilingue2.qxp MONTAGGIO RIVESTIMENTI NORMA Fase A Fase A In questa fase si vede come la stufa si presenta al cliente appena viene sballata e posizionata nel locale Fase B Fase B Sfilare il frontalino inferiore facendo leva con un semplice cacciavite nella sua parte superiore, facendo attenzione al comando manuale della canalizzazione se presente nella stufa Fase C Avvitare il frontalino inferiore con le viti e le rondelle D.
30/11/2009 ITALIANO sk tecnica mimì-norma multilingue2.qxp 12.
30/11/2009 12.02 Pagina 14 ISTRUZIONI D’USO 1° Accensione (a cura Centro Assistenza Tecnica) Rivolgersi al centro assistenza tecnica, di zona (CAT), (per informazioni chiedere al rivenditore o consultare il sito www.edilkamin.com), che tarerà la termostufa in base al tipo di pellet e alle condizioni di installazione. Verificare che l’impianto idraulico sia correttamente eseguito e sia dotato di vaso di espansione sufficiente a garantirne la sicurezza.
ITALIANO sk tecnica mimì-norma multilingue2.qxp 30/11/2009 12.02 Pagina 15 ISTRUZIONI D’USO REGOLAZIONI Regolazione orologio Premendo per 2" il tasto MENU’ e seguendo coi tasti + e – le indicazioni del display, si accede al MENU’ “Orologio”. Permettendo di impostare l’orologio interno alla scheda elettronica. Premendo successivamente il tasto MENU’, appaiono in sequenza e possono essere regolati i seguenti dati: Giorno, Mese, Anno, Ora, Minuti, Giorno della settimana.
30/11/2009 12.02 Pagina 16 ITALIANO sk tecnica mimì-norma multilingue2.qxp MANUTENZIONE Una regolare manutenzione è alla base del buon funzionamento della termostufa. La termostufa segnala a pannello un messaggio “°C fumi/alta” o “MANUTENZIONE??” in caso sia necessaria ulteriore pulizia. Essa è anticipata da scritta “Pulire -scamb.re” LA MANCATA MANUTENZIONE almeno STAGIONALE può provocare cattivo funzionamento; eventuali problemi da ciò derivanti non potranno essere considerati in garanzia.
ITALIANO sk tecnica mimì-norma multilingue2.qxp 30/11/2009 12.02 Pagina 17 MANUTENZIONE Pulizia del condotto fumi • A stufa spenta e fredda muovere con energia le aste di pulizia (vedi pag. 15); togliere il frontalino inferiore in ghisa (fig D) ; il tappo di silicone (fig E) ed aspirare il residuo (fig F). La quantità di residuo dipende dal tipo di combustibile e dal tipo di impianto. L’assenza di tale pulzia può provocare il blocco della termostufa.
30/11/2009 12.02 Pagina 18 POSSIBILI INCONVENIENTI SEGNALAZIONE EVENTUALI CAUSE DI BLOCCHI E INDICAZIONE DEI RIMEDI Nel caso sia necessario, è possibile visualizzare sul display la motivazione dello spegnimento. 1) PTC H2O Rotta: spegnimento per sonda lettura temperatura acqua guasta o scollegata. Verificare collegamento della sonda alla scheda. Verificare funzionalità tramite collaudo a freddo 2) Verifica/estratt.: spegnimento per anomalia al sensore giri del motore espulsione fumi.
ITALIANO sk tecnica mimì-norma multilingue2.qxp 30/11/2009 12.02 Pagina 19 POSSIBILI INCONVENIENTI Le segnalazioni restano visualizzate fino a che non si interviene sul pannello, premendo il tasto 0/1. Si raccomanda di non far ripartire la termostufa prima di aver verificato l'eliminazione del problema Nel caso di avvenuto blocco, per riavviare la termostufa è necessario lasciar avvenire la procedura di spegnimento (10 minuti con riscontro sonoro) e quindi premere il tasto 0/1.
30/11/2009 12.02 Pagina 20 FAQ Le risposte sono qui riportate in forma sintetica, maggiori dettagli sono riportati nelle altre pagg del presente documento. 1) Cosa devo predisporre per poter installare le termostufe Mimì - Norma? Scarico fumi di almeno 80 mm diametro. Presa aria nel locale di almeno 80 cm2.
ITALIANO sk tecnica mimì-norma multilingue2.qxp 30/11/2009 12.
sk tecnica mimì-norma multilingue2.qxp 30/11/2009 12.02 Pagina 22 For further clarification or assistance, please contact the Retailer in your area or visit our website and click on DEALERS. Please note that a DEALER MUST commission the thermal stove (as stipulated in the Italian Ministerial Decree No. 37 ex Italian Law No. 46/90), verify the installation and complete the warranty card. For installations implemented outside Italy, please refer to specific national regulations.
sk tecnica mimì-norma multilingue2.qxp 30/11/2009 12.
sk tecnica mimì-norma multilingue2.qxp 30/11/2009 12.
sk tecnica mimì-norma multilingue2.qxp 30/11/2009 12.02 Pagina 25 ENGLISH PRINCIPLE OF OPERATION The thermal stove is fuelled by pellets. These are little, cylindrical shapes of pressed wood whose combustion is controlled electronically. The heat produced by combustion is mainly transmitted to the water and partly emitted into the room by radiation. The fuel hopper (A) is found on the back part of the thermal stove.
sk tecnica mimì-norma multilingue2.qxp 30/11/2009 12.02 Pagina 26 Smoke thermocouple placed on the smoke exhaust pipe to detect the temperature. It controls the ignition phase and if the temperature is too high or too low it triggers a block phase (Stop Flame or Overheated Smoke). Flow sensor placed on the combustion air inlet pipe. It detects correct air circulation and smoke discharge. It gives a signal in volts that can be read on the display in the sensor status (only by the Technician).
sk tecnica mimì-norma multilingue2.qxp 30/11/2009 12.02 Pagina 27 ENGLISH INSTALLATION Refer to local regulations in the country of use for anything that is not specifically covered in this manual. In Italy, refer to standards UNI 10683/2005 and UNI 10412-2, as well as the Ministerial Decree No. 37, ex Law No. 46/90, in addition to any Regional or Local Health Authority regulations. If installing in a block of apartments, first consult the block administrator.
sk tecnica mimì-norma multilingue2.qxp 30/11/2009 12.02 Pagina 28 HYDRAULIC CONNECTIONS THE THERMAL STOVE MUST NEVER RUN WITHOUT WATER IN THE SYSTEM. IT CAN BE DAMAGED IF IT IS IGNITED WITH NO WATER IN THE SYSTEM. The hydraulic connection must be set up by qualified personnel who can issue a declaration of conformity according to the Ministerial Decree No. 37 ex Law No. 46/90. In any case, refer to current laws applicable to individual countries.
sk tecnica mimì-norma multilingue2.qxp 30/11/2009 12.02 Pagina 29 System with production of stored hot sanitary water with Idrokit combined with boiler. This diagram is purely indicative. The plumber is responsible for a correct installation.
sk tecnica mimì-norma multilingue2.qxp 30/11/2009 12.03 Pagina 30 MOUNTING THE COVERING Step A Step B Step A This step shows the stove after having been unpacked and positioned in the room. Step B Remove the lower front panel, using a normal screwdriver as a lever on the upper part, whilst ensuring not to damage the manual channelling control (if applicable). A Step C asten the lower front panel to its support found beneath the door, using the screws and washers D.6 supplied.
sk tecnica mimì-norma multilingue2.qxp 30/11/2009 12.03 Pagina 31 MOUNTING THE COVERING ENGLISH NORMA Step A Step A This step shows the stove after having been unpacked and positioned in the room. Step B Step B Remove the lower front panel, using a normal screwdriver as a lever on the upper part, whilst ensuring not to damage the manual channelling control (if applicable). Step C Fasten the lower front panel to its support found beneath the door, using the screws and washers D.6 supplied.
sk tecnica mimì-norma multilingue2.qxp 30/11/2009 12.03 Pagina 32 OPERATION ENGLISH Mimic panel press for 2 seconds to turn on and off, exits from the menu to access the menu to increase the various settings to decrease the various settings (pellet loading/reserve button) press once to ‘inform’ the thermal stove memory that a 15 kg sack of pellets has been loaded, thereby allowing it to keep track of the reserve.
sk tecnica mimì-norma multilingue2.qxp 30/11/2009 12.03 Pagina 33 INSTRUCTIONS FOR USE ENGLISH 1st ignition (implemented by the DEALER) You must consult the DEALER in your area when igniting the stove for the first time, in order for the thermal stove to be calibrated according to the type of pellets and installation conditions. Verify that the hydraulic system is correctly installed and is equipped with an expansion tank that is sufficiently large to guarantee safety.
sk tecnica mimì-norma multilingue2.qxp 30/11/2009 12.03 Pagina 34 INSTRUCTIONS FOR USE Setting the clock Press the MENU button for 2 seconds and use the + and – keys to follow the instructions given on the display to access the ‘Clock’ menu. This allows you to set the time on the electronic control board. Then press MENU and the following data appears in sequence – this can be adjusted: day, month, year, hour, minutes, day of the week.
sk tecnica mimì-norma multilingue2.qxp 30/11/2009 12.03 Pagina 35 ENGLISH MAINTENANCE egular maintenance is required for the thermal stove to function correctly. The thermal stove will trigger the message: ‘°C smoke/high’ or ‘MAINTENANCE??’ to appear on the panel when further cleaning is necessary. This is preceded by ‘Clean exchanger’ appearing on the display.
sk tecnica mimì-norma multilingue2.qxp 30/11/2009 12.04 Pagina 36 MAINTENANCE • With the stove off and cold, move the cleaning rods energetically (see page 34). Remove the lower cast iron front panel (fig. D), the silicone stopper (fig. E) and vacuum the residue (fig. F). The amount of residue will depend on the type of fuel and system. Failure to carry out this cleaning procedure may cause the thermal stove to block.
sk tecnica mimì-norma multilingue2.qxp 30/11/2009 12.04 Pagina 37 POSSIBLE TROUBLESHOOTING ENGLISH WARNINGS SIGNALLING ANY BLOCKAGE AND SUGGESTED SOLUTIONS If necessary, the reason for a shutdown is shown on the display. 1) Broken PTC H2O: Shuts down due to the water temperature sensor being broken or disconnected. Check connection of the sensor to the control board. Verify functionality by means of a cold test 2) Check/extract.
sk tecnica mimì-norma multilingue2.qxp 30/11/2009 12.04 Pagina 38 POSSIBLE TROUBLESHOOTING It is recommended not to use the thermal stove before verifying that the problem has been resolved. Should it block, re-ignite the stove after allowing it to shutdown (10 minutes with an audible signal), then press the 0/1 key. Never unplug the device during the shutdown process. It is important for the DEALER to know what warning signal appears on the panel.
sk tecnica mimì-norma multilingue2.qxp 30/11/2009 12.04 Pagina 39 FAQ ENGLISH Summarised answers are given here, however, further details are given in other pages within this document. 1) What do I need to prepare in order to install the Mimì – Norma thermal stoves? Smoke outlet that is at least 80 mm in diameter. An air inlet in the room that is at least 80 cm2. ¾” G outlet and inlet fitting. ¾” G drains connection for overpressure valve. ¾” G load fitting.
sk tecnica mimì-norma multilingue2.qxp 30/11/2009 12.04 Pagina 40 CHECK LIST Positioning and installation • Room ventilation • Only the thermal stove outlet passes through the smoke channel/chimney flue • The smoke channel has: a maximum of 2 curves – a maximum of 2 horizontal metres, at least 1.5 vertical metres • The exhaust pipes are made of suitable material (recommended: stainless steel) • When using any flammable materials (e.g.
sk tecnica mimì-norma multilingue2.qxp 30/11/2009 12.04 Pagina 41 Madame/Monsieur, Nous vous remercions d’avoir choisi notre thermopoêle. Avant de l’utiliser, nous vous demandons de lire attentivement cette fiche, afin de pouvoir exploiter au mieux et en toute sécurité toutes les caractéristiques. Pour des éclaircissements ou des besoins ultérieurs contactez votre Revendeur ou visitez notre site internet à la rubrique REVENDEURS.
sk tecnica mimì-norma multilingue2.qxp 30/11/2009 12.
sk tecnica mimì-norma multilingue2.qxp 30/11/2009 12.
sk tecnica mimì-norma multilingue2.qxp 30/11/2009 12.04 Pagina 44 Le thermopoêle utilise comme combustible le pellet, constitué de petits cylindres en matériau ligneux comprimé, et sa combustion est gérée électroniquement. La chaleur produite par la combustion est transmise principalement à l'eau et en petite partie, par rayonnement, à la pièce d'installation. Le réservoir du combustible (A) est situé dans la partie postérieure du thermopoêle.
sk tecnica mimì-norma multilingue2.qxp 30/11/2009 12.04 Pagina 45 DISPOSITIFS DE SECURITE ET DE DETECTION Thermocouple fumées situé sur l'évacuation des fumées, il lit leur température. Il règle la phase d'allumage et en cas de température trop basse ou trop élevée il lance une phase de verrouillage (Stop flammes ou Over température fumées respectivement).
sk tecnica mimì-norma multilingue2.qxp 30/11/2009 12.04 Pagina 46 INSTALLATION Pour ce qui n'est pas expressément indiqué, se reporter pour chaque pays aux normes locales. En Italie se reporter à la norme UNI 10683/2005, à la norme UNI 10412-2, et au D.M. 37, ex L 46/90 ainsi qu'aux éventuelles indications régionales ou des ASL locales. En cas d'installation dans une copropriété, demander l'avis préventif au gérant.
sk tecnica mimì-norma multilingue2.qxp 30/11/2009 12.04 Pagina 47 RACCORDEMENTS HYDRAULIQUES (aux soins du Revendeur) LE THERMOPOELE NE DOIT JAMAIS FONCTIONNER SANS EAU DANS L'INSTALLATION. UN EVENTUEL ALLUMAGE " A SEC " COMPROMET LE THERMOPOELE. Le raccordement hydraulique doit être effectué par du personnel qualifié qui peut délivrer une déclaration de conformité selon le D.M. 37 ex. L.46/90. Quoi qu'il en soit, se reporter aux lois en vigueur dans chaque pays.
sk tecnica mimì-norma multilingue2.qxp 30/11/2009 12.04 Pagina 48 RACCORDEMENTS HYDRAULIQUES Installation avec production d'eau chaude sanitaire en accumulateur avec Idrokit combiné à la chaudière. Ce schéma est indicatif, l'installation correcte est aux soins du plombier.
sk tecnica mimì-norma multilingue2.qxp 30/11/2009 12.04 Pagina 49 MONTAGE REVÊTEMENT MIMI’ Phase A Phase A Dans cette phase on voit comment le poêle se présente au client dès qu'il est déballé et placé dans la pièce. Phase B FRANÇAIS Phase B Enlever la façade inférieure en faisant levier avec un simple tournevis dans sa partie supérieure, en faisant attention à la commande manuelle de la canalisation si elle est présente dans le poêle.
sk tecnica mimì-norma multilingue2.qxp 30/11/2009 12.04 Pagina 50 MONTAGE REVÊTEMENT NORMA Phase B Phase B Enlever la façade inférieure en faisant levier avec un simple tournevis dans sa partie supérieure, en faisant attention à la commande manuelle de la canalisation si elle est présente dans le poêle. Phase C Visser la façade inférieure avec les vis et les rondelles D.6 fournis au support de la façade inférieure placé sous le petit volet.
sk tecnica mimì-norma multilingue2.qxp 30/11/2009 12.
sk tecnica mimì-norma multilingue2.qxp 30/11/2009 12.04 Pagina 52 INSTRUCTIONS D'UTILISATION 1er Allumage (aux soins du Revendeur) S'adresser à son revendeur (pour des renseignements demander au revendeur ou consulter le site www.edilkamin.com), qui étalonnera le thermopoêle selon le type de pellet et les conditions d'installation. Vérifier que l'installation hydraulique est effectuée correctement et qu'elle est dotée d'un vase à expansion suffisant pour garantir la sécurité.
sk tecnica mimì-norma multilingue2.qxp 30/11/2009 12.04 Pagina 53 INSTRUCTIONS D'UTILISATION REGLAGES Réglage horloge FRANÇAIS En appuyant pendant 2 '' sur la touche MENU et en suivant avec les touches + et - les indications du display, on accède au MENU " Horloge ". En permettant de régler l'horloge à l'intérieur de la carte électronique.
sk tecnica mimì-norma multilingue2.qxp 30/11/2009 12.04 Pagina 54 ENTRETIEN Un entretien régulier est la base du bon fonctionnement du thermopoêle. Le thermopoêle signale sur le panneau un message " °C fumées/haute " ou " MAINTEN_ANCE ?? " si un nettoyage ultérieur est nécessaire. Celle-ci est anticipée par le message " Nettoyer -échang.
sk tecnica mimì-norma multilingue2.qxp 30/11/2009 12.04 Pagina 55 ENTRETIEN Nettoyage du conduit de fumées • Quand le thermopoêle est éteint et froids secouer énergiquement les tiges de nettoyage (voir page 53); enlever la façade inférieure en fonte (fig. D), le bouchon en silicone (fig. E) et aspirer les résidus (fig. F). La quantité de résidus dépend du type de combustible et du type d'installation. L'absence de nettoyage peut provoquer le blocage du thermopoêle.
sk tecnica mimì-norma multilingue2.qxp 30/11/2009 12.04 Pagina 56 INCONVENIENTS POSSIBLES SIGNALISATION DE CAUSES EVENTUELLES DE BLOCAGE ET INDICATION DES SOLUTIONS. Si c'est nécessaire, on peut visualiser sur le display le motif de l'extinction 1) PTC H2O Cassée: extinction pour cause de sonde de lecture température de l'eau en panne ou débranchée. Vérifier le branchement de la sonde à la carte. Vérifier le fonctionnement avec un test à froid.
sk tecnica mimì-norma multilingue2.qxp 30/11/2009 12.04 Pagina 57 INCONVENIENTS POSSIBLES Les signalisations restent affichés jusqu'à ce qu'on intervienne sur le panneau, en appuyant sur la touche 0/1. Il est recommandé de ne pas faire repartir le thermopoêle avant d'avoir vérifié que le problème est éliminé. En cas de blocage avenu, pour redémarrer le thermopoêle il faut laisser la procédure d'extinction se faire (10 minutes avec réponse sonore) et puis appuyer sur la touche 0/1.
sk tecnica mimì-norma multilingue2.qxp 30/11/2009 12.04 Pagina 58 FAQ 1) Que dois-je préparer pour pouvoir installer les thermopoeles Mimì-Norma ? Conduit d'évacuation des fumées d'au moins 890 mm de diamètre. Prise d'air dans la pièce d'au moins 80 cm2. Fixation refoulement et retour au collecteur ¾" G Évacuation à l'égout pour la soupape de surpression ¾" G Prise pour chargement ¾" G Branchement électrique à l'installation, aux normes, avec interrupteur magnétothermique 230V +/- 10%, 50 Hz.
sk tecnica mimì-norma multilingue2.qxp 30/11/2009 12.
sk tecnica mimì-norma multilingue2.qxp 30/11/2009 12.04 Pagina 60 E stimado Sr./Sra. Le agradecemos que haya elegido nuestra termoestufa. Antes de utilizarla, le pedimos que lea atentamente esta ficha con el fin de poder disfrutar de manera óptima y con total seguridad de todas sus características. Para más aclaraciones o en caso de necesidad contacte su Vendedor de zona o visite el sitio internet en la opción VENDEDOR.
sk tecnica mimì-norma multilingue2.qxp 30/11/2009 12.04 Pagina 61 DIMENSIONES ESPAÑOL A= entrada aire de combustión B = válvula de seguridad 1/2 MF C = reintegración agua 1/2 M D = grifo descarga agua E = retorno instalación 3/4 M F = envío instalación 3/4 M G = salida humos 8 cm Ø H = puerta AUX (que conectar con cable cód.
sk tecnica mimì-norma multilingue2.qxp 30/11/2009 12.
sk tecnica mimì-norma multilingue2.qxp 30/11/2009 12.04 Pagina 63 ESPAÑOL PRINCIPIO DE FUNCIONAMIENTO La termoestufa utiliza como combustible el pellet, constituido por pequeños cilindros de material leñoso prensado, cuya combustión se gestiona electrónicamente. El calor producido por la combustión se transmite principalmente al agua y en menor medida, por irradiación, en el ambiente de instalación. El depósito del combustible (A) está ubicado en la parte posterior de la termoestufa.
sk tecnica mimì-norma multilingue2.qxp 30/11/2009 12.04 Pagina 64 DISPOSITIVOS DE SEGURIDAD Y ALERTA Termopar humos situado en la descarga de humos, lee su temperatura. Regula la fase de encendido y en caso de temperatura demasiado baja o demasiado alta lanza una fase de bloqueo (stop llama o Exceso temperatura humos respectivamente). Sensor de flujo situado en el tubo de aspiración aire comburente, detecta la correcta circulación del aire y de la descarga de humos.
sk tecnica mimì-norma multilingue2.qxp 30/11/2009 12.04 Pagina 65 INSTALACIÓN normativa UNI 10683/2005, a la norma UNI 10412-2, y a la D.M. 37, ex L 46/90 además de las eventuales indicaciones regionales o de las ASL Unidades Sanitarias Locales. En caso de instalación en comunidad de propietarios, solicitar el visto bueno previo al administrador.
sk tecnica mimì-norma multilingue2.qxp 30/11/2009 12.04 Pagina 66 CONEXIONES HIDRÁULICAS (a cargo del Vendedor) LA TERMOESTUFA NO DEBERÁ FUNCIONAR NUNCA SIN AGUA EN EL SISTEMA. UN EVENTUAL ENCENDIDO “EN SECO” PODRÍA DAÑAR LA TERMOESTUFA. La conexión hidráulica debe ser efectuada por personal cualificado que pueda dejar declaración de conformidad según el D.M. 37 ex L.46/90. Hacer referencia a las leyes vigentes en los diferentes países.
sk tecnica mimì-norma multilingue2.qxp 30/11/2009 12.04 Pagina 67 CONEXIONES HIDRÁULICAS Instalación con producción de agua caliente sanitaria en acumulación con Idrokit combinado a caldera. El siguiente esquema sólo es a nivel indicativo, la correcta instalación debe realizarse por personal especializado.
sk tecnica mimì-norma multilingue2.qxp 30/11/2009 12.05 Pagina 68 MONTAJE REVESTIMIENTO MIMI’ Fase A Fase A En esta fase se ve como la estufa se presenta al cliente recién desembalada y colocada en el local. Fase B A Fase C Atornillar la parte frontal inferior con los tornillos y las arandelas D.6 suministradas en el soporte de la parte frontal inferior colocado debajo de la puerta.
sk tecnica mimì-norma multilingue2.qxp 30/11/2009 12.05 Pagina 69 MONTAJE REVESTIMIENTO NORMA Fase A Fase A En esta fase se ve como la estufa se presenta al cliente recién desembalada y colocada en el local. Fase B ESPAÑOL Fase B Extraer la parte frontal inferior haciendo palanca con un destornillador en la parte superior, prestando atención al mando manual de la canalización si estuviera en la estufa. Fase C tornillar la parte frontal inferior con los tornillos y las arandelas D.
sk tecnica mimì-norma multilingue2.qxp 30/11/2009 12.
sk tecnica mimì-norma multilingue2.qxp 30/11/2009 12.05 Pagina 71 ISTRUCCIONES DE USO 1er Encendido (a cargo del Vendedor) Contactar al vendedor de zona, que calibrará la termoestufa según el tipo de pellet y condiciones de instalación. Comprobar que el sistema hidráulico haya sido realizado correctamente y esté dotado de vaso de expansión suficiente para garantizar su seguridad.
sk tecnica mimì-norma multilingue2.qxp 30/11/2009 12.05 Pagina 72 ISTRUCCIONES DE USO REGULACIONES Regulación del reloj Presionando durante 2” la tecla MENÚ y siguiendo con las teclas + y – las indicaciones de la pantalla, se accede al Menú “Reloj” Permitiendo programar el reloj interno en la ficha electrónica. Presionando la tecla MENÚ sucesivamente, aparecen en secuencia y pueden ser regulados los siguientes datos: Día, Mes, Año, Hora, Minutos, Día de la semana.
sk tecnica mimì-norma multilingue2.qxp 30/11/2009 12.06 Pagina 73 MANUTENCIÓN Un mantenimiento regular es la base de un buen funcionamiento de la termoestufa. La termostufa señala en el panel un mensaje "°C humos/alta" o "MANUTENIMIENTO??" si es necesaria otra limpieza. Esta es anticipada con la opción “Limpiar- scamb.re” LA FALTA DE MANTENIMIENTO DE TEMPORADA puede provocar mal funcionamiento; posibles problemas que eso conlleva no se considerarán en garantía.
sk tecnica mimì-norma multilingue2.qxp 30/11/2009 12.06 Pagina 74 MANUTENCIÓN Limpieza del conducto de humos ESPAÑOL • Con la estufa apagada mover con energía las varillas de limpieza (ver pág. 73); eliminar la parte frontal de fundición (fig D); el tapón de silicona (fig E) y aspirar el residuo (fig F). La cantidad de residuo depende del tipo de combustible y del tipo de instalación. La ausencia de dicha limpieza puede provocar el bloqueo de la termoestufa.
sk tecnica mimì-norma multilingue2.qxp 30/11/2009 12.06 Pagina 75 POSIBLES INCONVENIENTES SEÑALIZACIÓN POSIBLES CAUSAS DE BLOQUEOS E INDICACIONES DE LOS REMEDIOS Si fuera necesario, se puede visualizar en la pantalla la motivación del apagado. 1) PTC H2O Rota: apagado por sonda lectura temperatura agua averiada o desconectada. Comprobar conexión de la sonda a la ficha. Comprobar funcionalidad en el ensayo en frío. ESPAÑOL 2) Control/extrac.
sk tecnica mimì-norma multilingue2.qxp 30/11/2009 12.06 Pagina 76 POSIBLES INCONVENIENTES Las señalizaciones se visualizan hasta que no se interviene en el panel, apretando la tecla 0/1. Se recomienda no volver a poner en marcha la termoestufa si antes no se comprueba la eliminación del problema. En caso de que se produzca un bloqueo, para volver a poner en marcha la termoestufa es necesario dejar que se apague (10 segundos con prueba de sonido) y luego presionar la tecla 0/1.
sk tecnica mimì-norma multilingue2.qxp 30/11/2009 12.06 Pagina 77 FAQ Las respuestas se indican aquí sintéticamente, mayores detalles se señalan en las otras páginas del presente manual. ESPAÑOL 1) ¿Qué debo predisponer para poder instalar las termoestufas Mimì-Norma? Descarga de humos de al menos 80 mm de diámetro. Toma de aire en el local de al menos 80 cm2.
sk tecnica mimì-norma multilingue2.qxp 30/11/2009 12.06 Pagina 78 LISTA DE COMPROBACIÓN Colocación e instalación • Aireación en el local • El canal de humo / el tubo de salida de humos recibe sólo la descarga de la termoestufa • El canal de humo presenta: máximo 2 curvas, máximo 2 metros en horizontal, al menos 1,5 metros en vertical • Los tubos de descarga son de material idóneo (se aconseja acero inoxidable) • En el paso a través de eventuales materiales inflamables (por ej.
sk tecnica mimì-norma multilingue2.qxp 30/11/2009 12.06 Pagina 79 Sehr geehrte Kundin, sehr geehrter Kunde, Wir möchten Ihnen für Ihre Wahl unseres Heizofens danken. Wir bitten Sie, vor dem Gebrauch dieses Merkblatt aufmerksam zu lesen, um sämtliche Eigenschaften des Geräts auf die beste Weise und in völliger Sicherheit auszunutzen. Für weitere Erklärungen oder Erfordernisse wenden Sie sich bitte an den Händler, bei dem Sie Ihren Kauf getätigt haben.
sk tecnica mimì-norma multilingue2.qxp 30/11/2009 12.06 Pagina 80 ABMESSUNGEN A = Einlass Verbrennungsluft B = Sicherheitsventil ½ MF C = Wasser-Nachfüllung ½ M D = Wasser-Abflusshahn E = Anlagen-Rücklauf ¾ M F = Anlagen-Vorlauf ¾ M G = Rauchablass Ø 8 cm H = AUX-Port (mit Kabel Art.-Nr.
sk tecnica mimì-norma multilingue2.qxp 30/11/2009 12.06 Pagina 81 MERKMALE WÄRMETECHNISCHE MERKMALE Fassungsvermögen Pelletbehälter 26 kg Gesamt-Wirkungsgrad (zirka) 89,9 % Wasser-Wirkungsgrad (zirka) 80 % Nennleistung 14 kW Nennleistung wasserseitig 10 kW Reduzierte leistung 5 kW Reduzierte leistung wasserseitig 3 kW Mindest-/Höchst-Autonomie 8,5 / 26 Std.
sk tecnica mimì-norma multilingue2.qxp 30/11/2009 12.06 Pagina 82 Der Heizofen verwendet als Brennstoff Pellet, das aus kleinen Zylindern aus gepresstem hölzernen Material besteht, dessen Verbrennung elektronisch gesteuert wird. Die durch die Verbrennung erzeugte Wärme wird hauptsächlich auf das Wasser übertragen und zu einem kleinen Teil mittels Abstrahlung an den Aufstellungsraum abgegeben. Der Brennstoffbehälter (A) befindet sich auf der Rückseite des Heizofens.
sk tecnica mimì-norma multilingue2.qxp 30/11/2009 12.06 Pagina 83 SICHERHEITS- und MESSVORRICHTUNGEN Thermoelement Rauchgase Am Rauchabzug installiert, ermittelt es die Rauchgastemperatur. Es steuert die Zündphase und im Fall von zu niedriger oder zu hoher Temperatur blockiert es den Ofen (Stopp Flamme oder Übertemperatur Rauchgas). Flusssensor Im Verbrennungsluftansaugkanal angebracht, misst er ordnungsgemäßen Kreislauf der Verbrennungsluft und des Rauchabzugs.
sk tecnica mimì-norma multilingue2.qxp 30/11/2009 12.06 Pagina 84 INSTALLATION Soweit nicht ausdrücklich angegeben, sind in jedem Land die örtlichen Vorschriften zu befolgen. In Italien sind die Normen UNI 10683/2005, UNI 10412-2 und die Ministerverordnung 37 nach Gesetz 46/90 zu befolgen, sowie eventuelle regionale Bestimmungen oder Vorgaben der lokalen Gesundheitsbehörden. Im Fall der Installation in einem Mitbesitzerhaus ist die vorherige Stellungsnahme des Verwalters einzuholen.
sk tecnica mimì-norma multilingue2.qxp 30/11/2009 12.06 Pagina 85 WASSERANSCHLÜSSE (seitens des Händlers) DER HEIZKAMIN DARF NIEMALS OHNE WASSER IN DER ANLAGE BETRIEBEN WERDEN. EIN MÖGLICHER BETRIEB „IN TROCKENZUSTAND“ WÜRDE IHN UNWIDERRUFLICH BESCHÄDIGEN. Der Wasseranschluss hat durch Fachpersonal zu erfolgen, der eine Konformitätserklärung gemäß Ministerverordnung 37 nach Gesetz 45/90 ausstellen kann. Jedenfalls die in den einzelnen Ländern geltenden Vorschriften beachten.
sk tecnica mimì-norma multilingue2.qxp 30/11/2009 12.06 Pagina 86 WASSERANSCHLÜSSE Anlage mit Sanitär-Warmwassererzeugung im Speicher mit Idrokit in Verbindung mit Heizkessel. Das folgende Schema besitzt nur Richtwertcharakter, die korrekte Installation gebührt dem Klempner.
sk tecnica mimì-norma multilingue2.qxp 30/11/2009 12.06 Pagina 87 MONTAGE DER VERKLEIDUNG MIMI’ Phase A Phase A Diese Phase stellt den Ofen nach dem Auspacken und der Aufstellung im Raum dar. Phase B Phase B Das untere Frontteil durch Hebeln mit einem Schraubenzieher herausziehen, dabei auf die manuelle Steuerung der Kanalisierung achten (falls vorhanden). A Phase C Das untere Frontteil mit den beigefügten Schrauben und den Unterlegscheiben D6 an der Halterung unter der Tür anschrauben.
sk tecnica mimì-norma multilingue2.qxp 30/11/2009 12.06 Pagina 88 MONTAGE DER VERKLEIDUNG NORMA Phase A Phase A Diese Phase stellt den Ofen nach dem Auspacken und der Aufstellung im Raum dar. Phase B Phase B Das untere Frontteil durch Hebeln mit einem Schraubenzieher herausziehen, dabei auf die manuelle Steuerung der Kanalisierung achten (falls vorhanden).
sk tecnica mimì-norma multilingue2.qxp 30/11/2009 12.06 Pagina 89 BETRIEB Bedienfeld 2 Sek.
sk tecnica mimì-norma multilingue2.qxp 30/11/2009 12.06 Pagina 90 GEBRAUCHSANWEISUNGEN Anzünden (seitens des Händlers) Sich an den gebietsmäßig zuständigen Händler wenden, der den Heizofen aufgrund des Pellettyps und der Installationsbedingungen einstellt. Überprüfen, dass die Hydraulikanlage ordnungsgemäß ausgeführt wurde und mit einem genügend großen Ausdehnungsgefäß versehen ist, um dessen Sicherheit zu gewährleisten.
sk tecnica mimì-norma multilingue2.qxp 30/11/2009 12.06 Pagina 91 GEBRAUCHSANWEISUNGEN EINSTELLUNGEN DEUTSCH Einstellung der Uhrzeit Durch 2 Sekunden langes Drücken der Taste MENÜ und mit den Tasten +/- den Angaben des Displays folgend, gelangt man ins Menü „Uhr“ und ermöglicht damit die Einstellung der in der Schaltkarte befindlichen Uhr. Durch aufeinanderfolgendes Drücken der Taste MENÜ erscheinen folgende Daten in Folge und können eingestellt werden: Tag, Monat, Jahr, Stunde, Minuten, Wochentag.
sk tecnica mimì-norma multilingue2.qxp 30/11/2009 12.07 Pagina 92 WARTUNG Eine regelmäßige Wartung ist für den guten Betrieb des Ofens grundlegend. Der Heizofen zeigt auf dem Display eine Meldung „°C Rauch/hoch“ oder „WARTUNG??“ für den fall an, dass eine zusätzliche Reinigung erforderlich sein sollte. Dieser Meldung geht der Schriftzug „Tauscher reinigen“ voran.
sk tecnica mimì-norma multilingue2.qxp 30/11/2009 12.07 Pagina 93 WARTUNG Reinigung des Rauchgasabzugs • Bei abgeschaltetem und kaltem Ofen die Reinigungsstäbe kräftig rütteln (siehe Seite 91); das untere Frontteil aus Gusseisen abnehmen (Abb. D), den Verschlussstopfen aus Silikon (Abb. E) und die Rückstände absaugen (Abb. F). Die Menge des Rückstands hängt von der Art des Brennstoffes und der Art der Anlage ab. Die mangelnde Vornahme dieser Reinigung kann die Blockierung des Ofens verursachen.
sk tecnica mimì-norma multilingue2.qxp 30/11/2009 12.07 Pagina 94 MÖGLICHE PROBLEME ANZEIGE EVENTUELLER AUSFALLURSACHEN UND BEHEBUNGSHINWEISE Ist dies erforderlich, können auf dem Display die Ursachen des Erlöschen angezeigt werden. 1) PTC H2O defekt: Ausfall wegen defekter oder nicht angeschlossener Temperatursonde. Anschuss der Sonde an die Schaltkarte überprüfen. Betrieb mittels Kaltabnahme überprüfen. 2) Prüf./Abzug: Ausfall wegen Störung des Sensors der Umdrehungen des Rauchabzugsmotors.
sk tecnica mimì-norma multilingue2.qxp 30/11/2009 12.07 Pagina 95 MÖGLICHE PROBLEME Die Meldungen bleiben solange angezeigt, bis man auf dem Bedienfeld die Taste 0/1 drückt. Es wird empfohlen, den Ofen nicht neu zu starten, bevor nicht das Problem behoben wurde. Im Fall von erfolgter Blockierung, ist für einen Neustart erforderlich, dass die Abschaltprozedur abgelaufen ist (10 Minuten mit akustischer Bestätigung); anschließend die Taste 0/1 drücken.
sk tecnica mimì-norma multilingue2.qxp 30/11/2009 12.07 Pagina 96 FAQ Die Antworten sind hier in Kurzform aufgeführt, nähere Einzelheiten können auf den anderen Seiten des vorliegenden Dokuments gefunden werden. 1) Was muss ich für eine Installation der Öfen Mimì - Norma vorbereiten? Rauchabzug von mindestens 80 mm Durchmesser. Lufteinlass in den Aufstellungsraum von mindestens 80 cm².
sk tecnica mimì-norma multilingue2.qxp 30/11/2009 12.07 Pagina 97 CHECK LIST Mit der vollständigen Lektüre des technischen Merkblatts zu ergänzen Aufstellung und Installation • Belüftung des Raums • Der Rauchkanal bzw.
sk tecnica mimì-norma multilingue2.qxp 30/11/2009 12.07 Pagina 98 Geachte Meneer/Mevrouw, We danken u dat voor een van onze thermokachels gekozen heeft. We nodigen u uit om dit blad aandachtig door te lezen voordat u van uw kachel gebruik maakt om optimaal en in algehele veiligheid van al zijn eigenschappen gebruik te kunnen maken. Neem voor overige informatie of vereisten contact op met uw plaatselijke Dealer of bezoek de pagina DEALERS van onze website.
sk tecnica mimì-norma multilingue2.qxp 30/11/2009 12.
sk tecnica mimì-norma multilingue2.qxp 30/11/2009 12.
sk tecnica mimì-norma multilingue2.qxp 30/11/2009 12.07 Pagina 101 FUNCTIONERINGSPRINCIPE De thermokachel benut voor de verbranding houtpellets, kleine cilinders geperst houtmateriaal. De verbranding hiervan wordt elektronisch aangestuurd. De warmte, die door de verbranding geproduceerd is, wordt voor het grootste deel aan het water afgegeven terwijl een klein deel door uitstraling naar de installatieruimte wordt gezonden. De brandstoftank (A) bevindt zich aan de achterkant van de thermokachel.
sk tecnica mimì-norma multilingue2.qxp 30/11/2009 12.07 Pagina 102 BESCHERMINGS- EN MEETINSTALLATIES Thermokoppel rook bevindt zich op de rookafvoer en meet de temperatuur van de rook op. Regelt de ontstekingsfase en activeert in het geval van een te lage of te hoge temperatuur een blokkeringsfase (Stop Fiamma of Overtemperatuur rook). Stroomsensor bevindt zich op de verbrandingslucht aanzuigleiding en meet de correcte circulatie van de lucht en de rookafvoer op.
sk tecnica mimì-norma multilingue2.qxp 30/11/2009 12.07 Pagina 103 INSTALLATIE Raadpleeg, voor zover dit niet uitdrukkelijk aangegeven staat, de wetgeving die in uw land van kracht is. Raadpleeg in Italië de norm UNI 10683/2005, de norm UNI 10412-2 en het Ministeriële Besluit 37, voorheen Wet 46/90, alsmede de eventuele regionale of ASL bepalingen. In het geval van een installatie in een appartementencomplex moet u van te voren de beheerder om toestemming vragen.
sk tecnica mimì-norma multilingue2.qxp 30/11/2009 12.07 Pagina 104 HYDRAULISCHE AANSLUITINGEN (door de Dealer) LAAT DE THERMOKACHEL NOOIT ZONDER WATER IN DE INSTALLATIE FUNCTIONEREN. EEN EVENTUELE “DROGE” ONTSTEKING BRENGT DE THERMOKACHEL IN GEVAAR. De hydraulische aansluiting moet door gekwalificeerd personeel worden uitgevoerd dat in staat is om een conformiteitsverklaring af te geven in overeenstemming met het Italiaanse Ministeriële Besluit 37, voorheen Wet 46/90.
sk tecnica mimì-norma multilingue2.qxp 30/11/2009 12.07 Pagina 105 HYDRAULISCHE AANSLUITINGEN sammelleitung imterne onderdelen van de kachel Installatie voor de productie van warm water voor sanitair gebruik voor opslag met Idrokit in combinatie met een ketel. Dit schema is indicatief, de correcte installatie is ten laste van de loodgieter.
sk tecnica mimì-norma multilingue2.qxp 30/11/2009 12.07 Pagina 106 MONTAGE BEKLEDING MIMI’ Fase A Fase B Fase A In deze fase toont de thermokachel zoals hij zich bij de klant presenteert nadat hij uitgepakt en in de installatieruimte geplaatst is. Fase B Verwijder het voorelement onderaan door onder de bovenkant hiervan een schroevendraaier te steken. Let goed op de handmatige kanalisatiebediening.
sk tecnica mimì-norma multilingue2.qxp 30/11/2009 12.08 Pagina 107 MONTAGE BEKLEDING NORMA Fase A Fase A In deze fase toont de thermokachel zoals hij zich bij de klant presenteert nadat hij uitgepakt en in de installatieruimte geplaatst is. Fase B Fase B Verwijder het voorelement onderaan door onder de bovenkant hiervan een schroevendraaier te steken. Let goed op de handmatige kanalisatiebediening. se A 1 Fase C Draai het voorelement onderaan met de geleverde schroeven en D.
sk tecnica mimì-norma multilingue2.qxp 30/11/2009 12.08 Pagina 108 FUNCTIONERING Synoptisch paneel voor het ontsteken en uitdoven (2” ingedrukt houden), verlaat het menu voor toegang tot het menu voor de toename van de verschillende instellingen voor de afname van de verschillende instellingen (toets laden pellets/reserve) als u de toets eenmaal indrukt, wordt aan het geheugen van de thermokachel “meegedeeld” dat een zak met 15 kg houtpellets toegevoegd is.
sk tecnica mimì-norma multilingue2.qxp 30/11/2009 12.08 Pagina 109 GEBRUIKSAANWIJZINGEN 1ste Ontsteking (door de Dealer) Wend u tot uw plaatselijk erkende Dealer, welke de kachel naar aanleiding van het soort pellets en de installatieomstandigheden zal ijken. Controleer dat de hydraulische installatie op correcte wijze uitgevoerd is en dat de installatie voorzien is van een expansievat dat groot genoeg is om de veilige functionering te kunnen garanderen.
sk tecnica mimì-norma multilingue2.qxp 30/11/2009 12.08 Pagina 110 GEBRUIKSAANWIJZINGEN INSTELLINGEIN Tijdprogrammeur onsteken en uitdoven tijdens de week Tijdprogrammeur onsteken en uitdoven tijdens de week. Door 2 seconden lang te drukken op de toets MENU op het afstandsbediening krijgt u toegang tot de instellingen van de klok. Door vervolgens te drukken op de toets + krijgt u toegang tot de functie wekelijkse tijdprogrammering, hetgeen op het display aangeduid wordt met het bericht “Program.
sk tecnica mimì-norma multilingue2.qxp 30/11/2009 12.08 Pagina 111 ONDERHOUD Regelmatig onderhoud vormt de basis van een goede functionering van uw thermokachel. Op het paneel van de thermokachel wordt een bericht “°C fumi/alta” of “MANUTENZ_IONE??” weergegeven als een uitgebreidere reiniging noodzakelijk is. Deze reiniging wordt aangekondigd met het bericht “Pulire –scamb.re”. HET NIET UITVOEREN VAN DE SEIZOENSGEBONDEN REINIGING kan een slechte functionering tot gevolg hebben.
sk tecnica mimì-norma multilingue2.qxp 30/11/2009 12.08 Pagina 112 ONDERHOUD Het rookkanaal reinigen • Beweeg op energieke wijze de reinigingsstaven bij uitgeschakelde en koude haard (zie pag. 110). Verwijder het onderste gietijzeren voorelement (afb.D), de siliconendop (afb.E) en zuig de resten op (afb.F). De hoeveelheid restafval hangt af van het soort brandstof en het soort installatie. Het niet uitvoeren van deze reiniging kan ervoor zorgen dat de thermokachel geblokkeerd raakt.
sk tecnica mimì-norma multilingue2.qxp 30/11/2009 12.08 Pagina 113 MOGELIJKE STORINGEN SIGNALERING EVENTUELE OORZAKEN VAN BLOKKERINGEN EN OPLOSSINGEN Indien dit noodzakelijk blijkt, is het mogelijk om op het display de reden voor de uitdoving af te lezen. 1) Broken PTC H2O: uitdoving wegens defecte of losgekoppelde temperatuurmeter. Controleer de aansluiting van de thermokoppel op de kaart. Controleer de functionering tijdens een keuring bij koude kachel. 2) Check/extract.
sk tecnica mimì-norma multilingue2.qxp 30/11/2009 12.08 Pagina 114 MOGELIJKE STORINGEN De signaleringen worden weergegeven tot u op het paneel ingrijpt, door op de toets 0/1 te drukken. We raden u aan om de thermokachel niet opnieuw aan te steken voordat u gecontroleerd heeft dat het probleem verholpen is. In het geval van een blokkering is het noodzakelijk de uitschakelingsprocedure uit te voeren om de thermokachel weer in te kunnen schakelen (10 minuten met geluidssignaal).
sk tecnica mimì-norma multilingue2.qxp 30/11/2009 12.08 Pagina 115 FAQ De hieronder aangegeven antwoorden zijn allen beknopt. Verdere details worden op de andere pagina’s van deze handleiding besproken. 1) Wat heb ik nodig om de thermokachels Mimì – Norma te installeren? Rookafvoer met een doorsnede van minstens 80 mm. Luchttoevoer in de installatieruimte van minstens 80 cm2. Aansluiting voor toevoer en terugvoer aan collector ¾” G. Afvoer op riool voor overdrukklep ¾” G. Aansluiting voor toevoer ¾” G.
sk tecnica mimì-norma multilingue2.qxp 30/11/2009 12.08 Pagina 116 CHECK LIST Te integreren met een complete bestudering van het technische blad Plaatsing en installatie • Ventilatie van de installatieruimte. • Het rookkanaal/de schoorsteen worden uitsluitend voor de thermokachel gebruikt. • Het rookkanaal heeft: maximaal 2 bochten, maximaal 2 meter horizontaal, minstens 1,5 meter verticaal. • de rookafvoerbuizen zijn gemaakt van passend materiaal (inox staal is aanbevolen).
117 113 123 116 105 101 60 Ricambi assemblati Ricambi assemblati /Assembled spare parts Pièces de rechange assemblées Recambios ensamblados Ersatzteil-Baugruppen Geassembleerde reserveonderdelen 135 102 132 133 107 103 76 77 139 11 106 34 138 139 78 68 110 12 108 104 57 61 62 64 66 69 74 75 72 134 56 59 55 98 143 142 58 63 70 67 65 66 71 125 4 81 85 99 126 95 3 42 100 96 144 26 18 127 17 124 6 41 14 1 2 147 1 9 145 91 1 1 8 96 9
33 34 35 36 37 38 39 40 41 42 43 44 45 46 47 48 49 50 51 52 53 54 55 56 57 58 DEUTSCH Creuset inférieur Smoke extraction fan Paper gasket for motor Cleaning pipe assembly Ceramic paper gasket for inspection lid Lower grille Lower front door panel Smoke outlet pipe Gasket for smoke outlet pipe Upper front panel made of sandstone Guarnizione carta ceramica per motore Assieme tubo pulizia Guarnizione carta ceramica per coperchio ispezione Griglia inferiore Frontalino inferiore antina Tubo
59 60 61 62 63 64 65 66 67 68 69 70 71 72 73 74 75 76 77 78 79 80 81 82 83 85 86 87 88 89 90 91 92 93 94 95 96 97 98 99 100 101 102 103 104 105 106 107 108 109 110 111 112 113 114 115 116 117 118 FRANÇAIS Thermocouple type " J " Ensemble réservoir pellet Gear motor Gear motor blockage bush Rubber stopper Lower shaft locking shaft Loader ceramic paper gasket Teflon coated bush for loader Loader shaft Loader body Safety thermostat R/aut.
ITALIANO Desiccant crystals Top complete with cover and gasket Door complete without glass Door complete with glass Left lower aluminium profile Upper aluminium profile MIMI side panel made of Sandstone NORMA side aluminium panel NORMA lateral spacers Central plate for under the top Left plate for under the top Right plate for under the top RS232 serial port with flat cable Top pipe flow Sali antiumidità Top completo di coperchio e guarnizione Antina completa senza vetro Antina completa di
sk tecnica mimì-norma multilingue2.qxp 30/11/2009 12.00 Pagina 1 I 20020 Lainate (Mi) - Via Mascagni, 7 Tel. +39 02.937.62.1 - Fax +39 02.937.62.400 www.edilkamin.com - mail@edilkamin.com Edilkamin S.p.A. si riserva di modificare senza preavviso parti del seguente manuale. Declina ogni responsabilità per i possibili errori di stampa presenti nella scheda tecnica. UK 20020 Lainate (Mi) - Via Mascagni, 7 Tel. +39 02.937.62.1 - Fax +39 02.937.62.400 www.edilkamin.com - export@edilkamin.com Edilkamin S.p.