EdilKamin Pellet Fire Installation & Operation Manual Iris Plus & Little Models Important information..................................... 2 Dimensions ................................................... 8 Operation and fuel.......................................... 3 Installation clearances..................................... 9 Technical specifications.................................. 4 Control panels & weekly timer.................. 10-13 Assembly & installation...................................
WARNING! Important Information • THE APPLIANCE AND FLUE-SYSTEM SHALL BE INSTALLED IN ACCORDANCE WITH AS/NZS 2918 AND THE APPROPRIATE REQUIREMENTS OF THE RELEVANT BUILDING CODE OR CODES. • THE PELLET FIRE MUST NOT BE LOCATED IMMEDIATELY BELOW AN ELECTRICAL SOCKETOUTLET. • CAUTION: THE PELLET FIRE HAS MOVING PARTS. DISCONNECT POWER BEFORE SERVICING. Purchase Information Please record and retain the following information for future reference Customer Name .................................................
Operation of your pellet fire (Iris Plus & Little models) The pellet hopper is at the top of the pellet fire. The hopper is filled through a lid found at the back of the top The internal structure of the pellet fire is completely made of cast iron. The Iris Plus and Little are pellet burning fires which manage pellet combustion electronically. The fuel (pellets) is taken from the storage hopper (A) and delivered to the combustion chamber (D) by a auger (B) driven by a gearmotor (C).
Technical Specifications (Iris Plus & Little models) Optional extras The heatable room dimensions are calculated on the basis of pellets with a calorific value of at least 20.2Mj/kg and home insulation in compliance with NZ regulations. It is also important to consider the location of the pellet fire in the room heated. • Remote Control (cod. N. 254160) It is possible to buy a remote control to turn the pellet fire on and off and adjust it remotely.
Assembly and Installation of your Pellet Fire (Iris Plus & Little models) 9 Once you are satisfied you have the pellet fire in its final position, secure it to the floor using suitable anchors. Drill through the floor protector and into the floor using the two 8mm holes provided at the centre of the pellet fire base.
Assembly and Installation of your Pellet Fire (Iris Plus & Little models) Fire Safety Distances and Location a double lined through wall vent system, such as the Metro through wall vent kit. The Pellet Fire must be level for it to work correctly. Check the floor’s load-bearing capacity.
Pellet Fire Vent System (Iris Plus & Little models) 600mm 600mm minimum minimum A A 75mm B Iris Plus - Figure 2 Iris Plus - Figure 1 600mm 600mm minimum minimum A A 75mm B Little - Figure 1 Little - Figure 2 A: Stainless steel vent Although EdilKamin pellet fires have been tested and approved for 100mm side wall and 200mm rear wall clearance. We recommend sufficient space be provided (minimum 200mm) on each side of the pellet fire to service the unit.
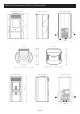
Pellet Fire Dimensions (Iris Plus & Little models) IRIS PLUS (side PROFILE) IRIS PLUS (REAR PROFILE) 320mm 6 375mm 950mm IRIS PLUS (FRONT PROFILE) 3 215mm 490mm 530mm 480mm 600mm Little (FRONT PROFILE) 2 77 600mm Little 500mm Iris Plus 106mm 7 Little (REAR PROFILE) 370mm 6 315mm 940mm Little (side PROFILE) 3 134mm 106 2 77 160mm 480mm page 8 7
EdilKamin Installation Clearances & Specifications Installation Clearances recommended as the Iris Plus and Little pellet fires can use up to 24 cubic metres of room air every hour. Minimum clearances shown are in mm, and all figures for clearances are to combustible materials. All EdilKamin pellet fires are tested using all applicable procedures and equipment under AS/NZS2918:2001. There are three methods of supplying the pellet fire with combustion air.
The Iris Plus Control Panel • The combustion chamber is clean. • The display shows standby (flashing power or temperature) WARNING! Important Information • DO NOT USE FLAMMABLE LIQUIDS OR AEROSOLS TO START OR REKINDLE THE FIRE • DO NOT USE FLAMMABLE LIQUIDS OR AEROSOLS IN THE VICINITY OF THIS APPLIANCE WHEN IT IS OPERATING • AVOID CONTACT WITH HOT VENT PIPE Auger loading If the pellet hopper empties completely, press and release the + and - keys together to fill the auger. IR will be displayed.
Weekly Timer Program built into the Iris Plus Control Panel Weekly time programmer built into panel Setting a program (e.g. Pr01) Using the weekly time programmer built into the central panel it is possible to set 3 ignition programmes: 1. Hold the MENU key down for about two seconds until IP appears then release, tS appears. • Pr02 with settable on and off times; 2. Press the MENU key three times until Prog appears. • Pr02 with settable on and off times; 3.
The Little Control Panel Auger loading Any time the pellet hopper is fully empty, press the + key followed by the Menu key for a few seconds to fill the auger. IR will be displayed. This operation must be carried out before ignition if the pellet fire ceased operating because it had run out of pellets. It is normal for a few pellets, which the auger is not able to pick up, to remain in the hopper.
Weekly Timer Program built into the Little Control Panel Weekly time programmer built into panel Setting a program (e.g. Pr01) Using the weekly time programmer built into the central panel it is possible to set 3 ignition programmes: 1. Hold the MENU key down for about two seconds until IP appears then release, tS appears. • Pr01 with settable on and off times; 2. Press (-) and “Prog” will appear. • Pr02 with settable on and off times; 3. Press “Menu” and “ProF” or “PrOn” will appear.
Troubleshooting (Iris Plus & Little models) Display-control panel off no mains voltage • make sure the power cord is connected • check the house fuse Remote control (optional) not working excessive distance from pellet fire • move nearer to pellet fire remote control battery flat • check battery and replace if necessary Outlet air not hot too much soot in heat exchanger • clean heat exchanger from inside the firebox No flame appears (remember that it only appears 5 minutes after pressing the 0/1
Troubleshooting (Iris Plus & Little models) SF (H3) No fire A flame has appeared but AR is displayed after AF (Trips when the thermocouple detects that the smoke temperature is lower than a set value, interpreting such as the absence of flame) Check: - that the thermocouple is working correctly - that the start temperature is set within the parameters The flame may be absent due to: - a lack of pellets too many pellets have smothered the flame the maximum temperature thermostat has tripped (H5) Power
Warranty for your pellet fire (Iris Plus & Little models) Warranty Warranty Exclusions: Your EdilKamin Pellet fire is covered by a full twelve month warranty, and a three year firebox warranty. This Manufacturers Warranty DOES NOT cover: • Service calls which are not related to any defect in the Product (I.e operational, installation or fuel issues). The cost of a service call will be charged if the problem is not found to be a product fault.