
Operating Instructions and Installation Instructions


41
ENGLISH
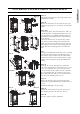
CHERIE COVERING DISASSEMBLY
For proper disassembly of the ceramic series proceed as
follows:
Phase A
Represents the stove in its finished version
Phase B
Remove the ceramic top (1).
Phase C/D
Disassembling the ceramic front plates:
Disassemble the upper grille (2) applying suitable pres-
sure to unhook it from the locking springs.
Take off the ceramic front panel below (4), by removing
the knurled washers.
Using the supplied Allen wrench, unscrew the stop
screws of the lower front grille (3) and remove it.
Take off the ceramic front plate below (5) by removing
the knurled washers.
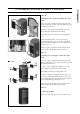
Phase E
Disassembly right side ceramic (handle):
Open the door.
Remove the rear profile (6) by unscrewing the fastening
screws.
Remove the ceramic (7) disengaging it from the holding
brackets.
Close the door.
Disassembly left side ceramic:
Keep the door closed.
Remove the rear profile (8) by unscrewing the fastening
screws.
Remove the ceramic (9) disengaging it from the holding
brackets.
Phase A
Phase B
Phase C
Phase D
Phase E
2
1
3
4
6
5
7
9
8