802.11n/MIMO Antenna Relocation Stand Quick Installation Guide (Q.I.G.) Version 1.
Multi-Language QIG on the CD =============================== Český: Českého průvodce rychlou instalací naleznete na přiloženém CD s ovladači Deutsch: Finden Sie bitte das deutsche S.A.L. beiliegend in der Treiber CD Español: Incluido en el CD el G.R.I. en Español. Français: Veuillez trouver l’français G.I.R ci-joint dans le CD Italiano: Incluso nel CD il Q.I.G. in Italiano. Magyar: A magyar telepítési útmutató megtalálható a mellékelt CD-n Nederlands: De nederlandse Q.I.G.
Copyright© by Edimax Technology Co, LTD. all rights reserved.
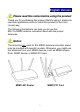
English Version. Please read this notice before using the product Thank you for purchasing this product. Before using it, please do read this application notice to install this product in the most correct way. The following illustrations can help you to use this 802.11n/MIMO antenna relocation stand with the proper antennas. Notice: The antennas are used for this MIMO antenna relocation stand may be bundled with specific models.
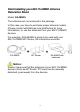
Start Installing your 802.11n/MIMO Antenna Relocation Stand Model: EA-MARS The antennas are not enclosed in the package. In this case, you have to purchase proper antenna models (Please contact with Edimax local distributors for more information.) or use the antennas from your 802.11n/MIMO devices. For example, If EA-MARS is going to be used with your 802.11n/MIMO AP/ Router, the connection would be: + EA-MARS = AP/ Router EA-MARS with antennas Notice: Please make sure that the antennas of your 802.
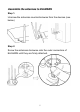
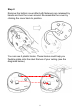
Assemble the antennas to EA-MARS Step 1. Unscrew the antennas counterclockwise from the devices (see below) Step 2. Screw the antennas clockwise onto the outer connectors of EA-MARS until they are firmly attached.
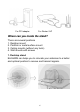
For PCI adapter For Router / AP Where can you locate the stand? There are several positions 1. Desktop mount 2. Partition or metal surface mount 3. Ceiling mounts (without any tools) 4. Wall mounts with screws 1. Desktop stand EA-MARS can helps you to relocate your antennas to a better and optimal position to receive and transmit signals.
2. Office partition or metal surface installation EA-MARS is embedded with strong magnets to stick EA-MARS to the metal walls or cabinets without extra tools or accessories. Warning: EA-MARS has 2 magnetic please keeps it away at least 6 inches from you PC in order not to crash the data or to make other devices failed.
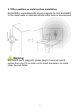
Step 1. Please note there are 2 plastic fasteners on the bottom of the base.
Step 2. Remove the bottom cover after both fasteners are released by hands and turn the cover around. Re-assemble the cover by clicking the cover back to position. You can see 2 plastic hooks. These hooks could help you flexible grabs onto the steel frames of your ceiling (see the diagrams below).
4. Wall installations (With screws and tools) You need to use tools to complete this installation The distance between screw holes is about 6cm, try to measure and match this range before fix your screws on the wall.
Screws installations Lock the screw tightly and keep some margin spaces left (about 3 to 5mm) like the diagram below. 3mm Therefore EA-MARS can be hanged onto the wall with both screws.
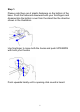
The antennas on the right and left side are for signal reception and should be set perpendicular (90 degrees) to each other. The central one is for signal transmission and should be pulled up about 45 degree. Please see the illustration below. About antenna angle adjustment Please position place the antenna vertically to the horizontal surface (ceiling or floor), since the omni-directional antennas best signal coverage is 360°. Do not put the antenna perpendicular to the wall.
Warning: For better performance, both base stations and clients are recommended to use EA-MARS with antennas It should be no obstacles between the transmission areas. The performance estimation is based on typical usage. The range is varied with different site conditions.