Internet Camera Quick Installation Guide The QIG will guide you through the basic setup of your product. The detail instruction is stated in the user’s manual.
1. Check your package contents One Internet Camera One Power Adapter One Camera Stand accessory kit One 100cm Category 5 Ethernet Cable One Quick Installation Guide One CD (Including Manual/Utility/Driver) If any of the above items are missing, please contact your supplier. 2.
. Hardware Installation 3.1. LED and Focusing The Camera head and its focus ring allow you to modify the aim and focus of the Camera. To adjust the Camera’s focus, rotate the dark focus ring. There are two LEDs indicating the camera status and networking status. y Green Steady: System is ready Blinking: System is booting. y Blue Steady: LAN is connected. Blink: WLAN is activated.
3.2. Camera Ports The Camera features two ports and a button. Button: 1 click for WPS function(wireless model) or reset function or hold for more than 5 seconds to reset the camera settings to factory default value. Power Jack: Connect to power adapter for power supply with 5V DC. LAN Jack: Connect to your local area network by network cable.
3.3. Installation Procedure 1. Unpack the Internet Camera package and verify that all the items listed in the Chapter 1 are provided. 2. Connect the Internet Camera to your network by attached the network cable from the switch/router to the LAN port of the Internet Camera. 3. Connect the power adapter to the Internet Camera and plug the power adapter to power outlet. The Internet Camera will be powered on. When the Internet Camera is ready, the Green LED will light.
4. Software Installation Follow the simple steps below to run the Install Wizard to guide you quickly through the Installation process. The following installation is implemented in Windows XP. The installation procedures in Windows 2000/XP/Server 2003/Vista/Win7 are similar. 1. Insert the CD shipped along with the Internet Camera into your CD-ROM drive. The “Autorun.exe” program should be executed automatically. If not, run “Autorun.exe” manually from “Autorun” folder in the CD. 2.
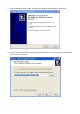
3. Click ‘’Install Administrator Utility’’ and when the following window appears, click ‘Next’. 4. You can specify the destination folder of software installation, you can just use the default folder, and click ‘Next’ to continue.
5. If you need installation program to create a desktop icon or a quick launch icon for you, click all items you need here, and click ‘Next’ to continue. 6. Here lists all options you chose in previous steps, if everything’s correct, click ‘Install’ to start installing procedure, or click ‘Back’ to go back to previous step to modify installing settings.
7. The installing procedure will take some time, please be patient. 8. When you see this window, it means the software installing procedure is complete. Please click ‘Finish’ to finish the procedure (IP camera surveillance software will start after you click ‘Finish’ button, if you want to start it later, uncheck ‘Launch IP Cam Surveillance Software’ box).
9. After finished the installation of Administrator Utility, please go back to wizard page and click ‘’Install 16 Chan camera viewer’’, the system will start running viewer installation and the procedures are similar to the installation of administration utility. 10. When the installation is completed. Please run ”Administrator Utility“. On the Internet Camera first page, the cameras found in the network are listed. Choose the one you want to configure and click “Setting Wizard” to proceed.
. Please enter the default password “1234” and click “OK” to login to the IP setup page. 12. Internet Camera is working through the network (TCP/IP Protocol). The IP address setting must be correct, or you cannot access to the camera. The wizard program will detect the IP address status of your network automatically and suggest a free IP address for the Camera. You can accept the suggested value or enter the value manually.
Or select ‘’DHCP’’ to obtain an auto IP setting from DHCP server and click ‘’OK’’ to apply the configuration. 13. Click ‘IP Cam Surveillance Software’ icon from desktop, quick launch bar, or start menu to start the IP camera surveillance software.
14. Please click ‘System configure’ button and a popup menu will appear Please select ‘Configure Cameras’ to configure cameras 15. In this table you can configure all cameras you wish to connect. Up to 16 cameras can be connected simultaneously, choose the camera you want to connect on the ‘’Camera Search’’ list and click ‘’Select’’ to add it into the channel you want to view then click ‘’ok’’ 16. The IP Cam Viewer will pop out and the video will show on the channel you choose automatically.
Federal Communication Commission Interference Statement This equipment has been tested and found to comply with the limits for a Class B digital device, pursuant to Part 15 of the FCC Rules. These limits are designed to provide reasonable protection against harmful interference in a residential installation. This equipment generates, uses and can radiate radio frequency energy and, if not installed and used in accordance with the instructions, may cause harmful interference to radio communications.